X
4 Rate this article:
No rating

Easily Share Workflows With the Analytics Repository

Zachary Norman

With the recent release of ENVI® 6.2 and the Analytics Repository, it’s now easier than ever to create and share image processing workflows across your organization. With that in mind, we wrote this blog to:

  • Introduce the Analytics Repository

  • Describe how you can use ENVI’s interactive workflows to help automate processes with the ENVI Modeler

  • Show how you can create workflows that other members of your team can access


Hello, Analytics Repository!


The Analytics Repository was included in the release of ENVI 6.2 and IDL® 9.2, and is a new piece of server-based software that enables users to create, share, and install content from others within their organization.

Here’s a visual that shows how users can create content using tools on the left to share with locations on the right:


As a content creator, this means you can make data processing tools or image processing workflows available to your teammates directly within ENVI or IDL.

This can be quite beneficial if you are the remote sensing expert for your team and there’s too much data to process by yourself. It’s a way that you can let others take advantage of the expertise that you bring to the table.

With that in mind, let’s walk through how you can create reusable change detection workflows and how you can share them in ENVI.

Through the Looking Glass: Observing Change

One of the most common scenarios that we try to solve with remote sensing is detecting change. At-a-glance, change detection is very simple in concept where you want to find a feature that has changed between two images of the same area taken at different times (i.e. urban growth, deforestation, flooding, burn area).

However, change detection can be a complex problem to solve based on real-world conditions when data is collected, differences between sensors, and the type of change you are looking for.

Because of this, ENVI has some interactive workflows that guide you step-by-step through the process. You can find them in the “Workflows” toolbox within ENVI’s UI, where there’s a handful of multi-step processes to help you prepare data, perform spectral classification, or do change detection.

These workflows are great because, after you step through the process, you can then create an automated version of the steps you went through in the form of an ENVI Modeler Workflow.

As an example of what these interactive workflows look like, here’s the thresholding step of the Change Detection workflow

ENVI’s Interactive Workflows

As you go through any one of the interactive workflows, ENVI tracks the steps and any parameters that you select. This means, at the end of your workflow, you can open any manual process you stepped through in the ENVI Modeler.


Here’s an example of where you can find this button and what the ENVI Modeler representation looks like:


Now, before you are ready to share this, there are a few things that need to be done for this to be re-usable and accessible to other members of your team.

Specifically, you need to use the “Input Parameters” and “Output Parameters” nodes in the ENVI Modeler to capture what you want users to have access to. You can find these nodes in the top-left of the ENVI Modeler UI.

For this change detection workflow here’s how I connected the input and output parameters:

For Input

  • Time 1 raster
  • Time 2 raster
  • Spectral index for change detection
  • The filename for the output raster

For Output

  • The output raster from change threshold classification

One important pattern to try and follow is that, for any output raster or vector, you want to have the file path for that dataset as an input parameter. This follows ENVI patterns and makes sure users have access to all the relevant parameters. You can see how I have Input and Output Parameters connected to the Change Threshold Classification step to do just this.


Here’s what my updated ENVI Modeler Workflow looks like after making some tweaks based on the text above:


Pro tip: If you want to know what your tool looks like, you can hit the “run” button once to set the input parameters and see the interface before you are done. I use this to see parameter ordering or naming and make changes to feel and look like other ENVI dialogs.

Once you have your parameters set up just how you want, it’s easy to publish the workflow so that others can use it.


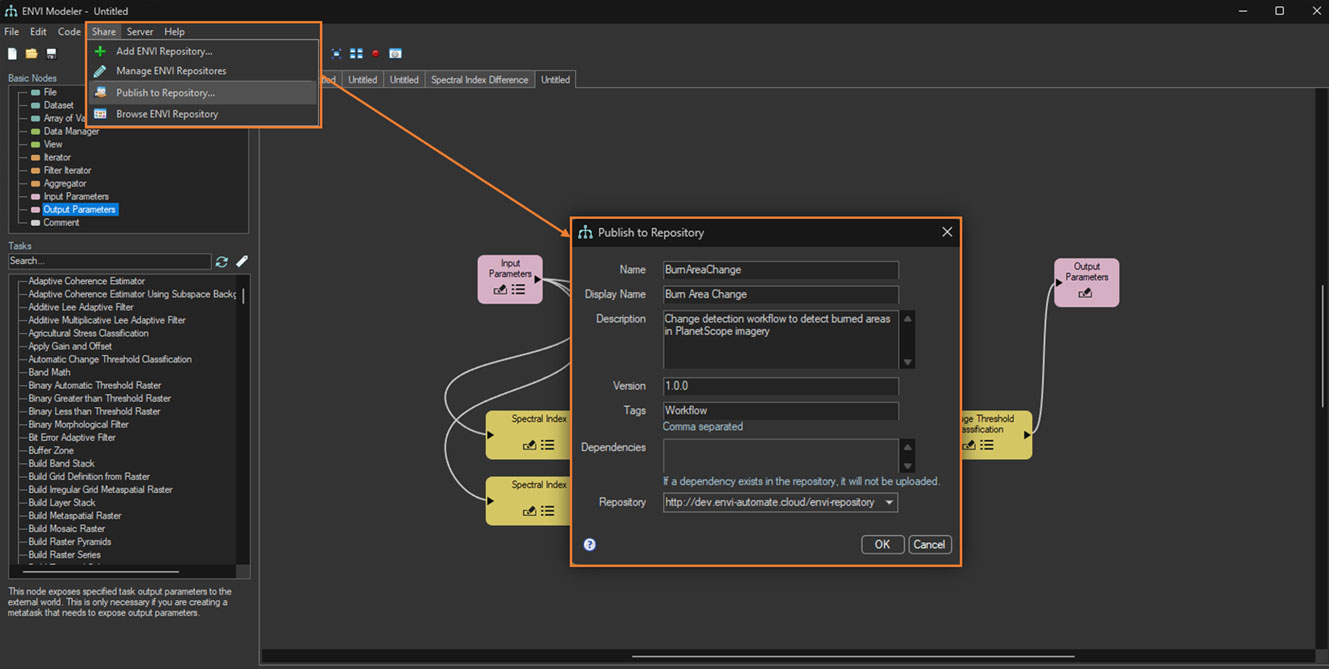
In the ENVI Modeler UI, select “Share” and then “Publish to Repository.” This will open our publishing dialog which has a few fields for you to populate. Below is an example showing the pattern we follow in ENVI for display name and name, where the display name is easy to read and the name has no spaces present.


Once published, you can navigate to the Repository Browser in ENVI and see that it’s now live! Here’s a screenshot showing my ENVI Modeler Workflow as the first row in the Analytics Repository:


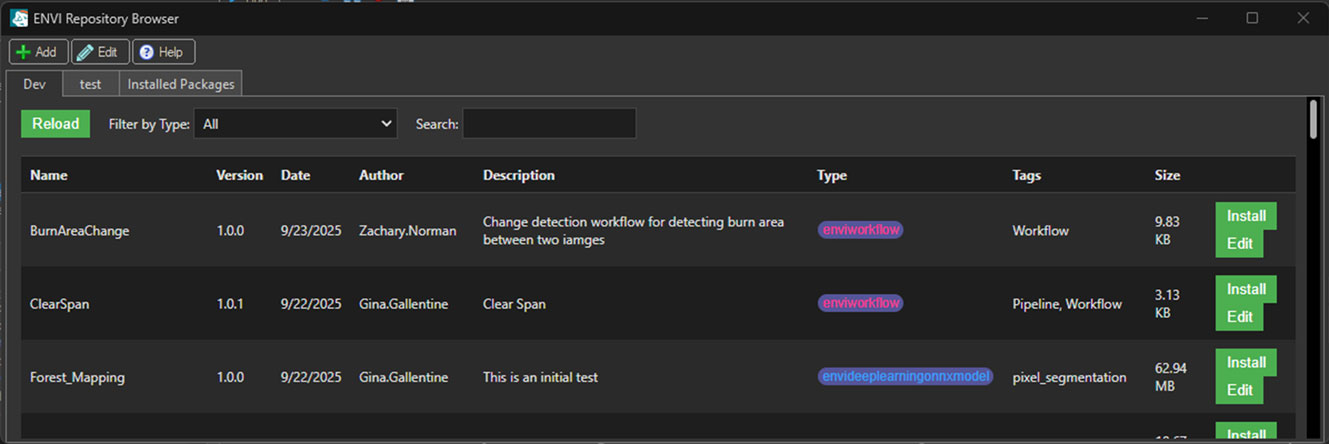
From here, anyone in your organization can click install and then they can easily run workflows you create against data at their disposal.

After you roll through this process a few times, it should become easier and quick to step through. It’s also a great way to learn how to create workflows from the ENVI Modeler and you may not need to use the interactive processes as a starting point in the future.

What’s Next?


While this is the end of the blog, there’s a few other directions that you can take things if you choose:

For this change detection workflow here’s how I connected the input and output parameters:

  • Add in any additional processing steps based on your data and type of change you are looking for

  • Image Intersection to prepare imagery if your datasets have different pixel sizes or spatial extents

  • Radiometric Normalization which can help reduce noise between two sets of images

  • Classification Smoothing (or similar) to cleanup results and remove noise

  • Classification to Vector Shapefile to generate a vector

  • Export Vector as GeoJSON to create GeoJSON instead of Shapefiles (requires ENVI 6.2)

Use the ENVI Modeler as a way to learn the ENVI API and IDL:

  • Any ENVI Modeler Workflow can be exported to IDL code and allows you to see, for programmers or scripters, alternatives when automating your workflow

  • Programmers can also share their workflows as IDL Packages which can be consumed in IDL or ENVI + IDL

The Analytics Repository is extremely helpful and will enable others within your organization to extract insights from imagery even if they don’t have the same knowledge or experience as you do.


Below are a few other resources for the Analytics Repository. And you can always contact your account manager .