[INTERNAL] [for now] An end-to-end ENVI Services Engine example
Anonym
Topic:
The purpose of this article is to provide a step by step demonstration how to produce an ENVI Services Engine (ESE) task and a JavaScript based client for end users.
Discussion:
This article will assume that you are using ESE 5.1. It describes how to produce and publish an ENVI task using the workbench. This feature is not included in ESE 1.0.1. If you are using ESE 1.0.1, you will need to upload the task manually.
Example Unsupervised Classification Task
The first thing you will want to do is write the task to perform the processing. To do this, follow the procedure below:
1) In the IDL workbench create a new project and call it "k_means_classification"
2) Right click on the "k_means_classification" project and select "New Task"
3) In the "New Task" dialog, enter "k_means" as the "Display Name" and "Folder Name". Then, enter "k_means_classification_task" as the "IDL Routine Name".
4) There should now be a files called "k_means_classification.pro" and "config.json" generated in the project. These files will have some automatically generated code designed to help you produce your task. In this case though, replace the code in "k_means_classification.pro" with the following code:
;+; :description:
; ese task to run the unsupervised classification (k-means) on a single
; layer of an image
;
; :information:
; this task was written as part of an example program. it has not been
; rigoursly tested and should be used with that caution.
; :keywords:
; in_im_url - this the url of the input image.
;
; num_classes - this is the number of classes outpt from the image (see envi
; documentation for more information).
;
; change_thresh - this specifies the percentage of pixels that can change
; classes during each iteration
;
; iterations - maximum iteration count
;
; pos - band position keyword (see envi documentation for more information)
;
; result - this is the output url of the result png that can be displayed in the
; client
;
; :notes:
; for more information about ese tasks, please consult the documentation.
;-
pro k_means_classification_task, in_im_url=in_im_url, num_classes=num_classes, $
change_thresh=change_thresh, iterations=iterations, $
pos=pos, result=result, two_result=two_result
compile_opt idl2
;todo auto-generated stub
nv = envi(/headless) ;launch envi without a display
in_file_name = !server.urltofile(in_im_url) ;covert the image url to a
;open the input image with envi
test_rast = nv.openraster(in_file_name)
;get the test_fid
test_fid = envirastertofid(test_rast)
;get the dimensions of the input file
envi_file_query, test_fid, dims=dims
;create an array to specify the colors of each class
ll = lindgen(3,num_classes+1)
;manipulate 3 byte arrays to get num_classes+1 different
;colors
green = bindgen(num_classes+1)*255/(num_classes+1)
red = reverse(green)
blue = shift(green, (num_classes+1)/2)
;add the colors to the 'll' array
ll[0,*]=red
ll[1,*]=green
ll[2,*]=blue
;the unclassifed color should be black
ll[*,0]=[0,0,0]
;create an output file for output of "class_doit"
;this probably should be an input parameter
filename="temp_output.dat"
;perform class_doit with the parmenters provided by
;
envi_doit, "class_doit", dims=dims, $
r_fid=class_fid, fid=test_fid, lookup=ll, $
out_name=filename, $
method=7, change_thresh=change_thresh, num_classes=num_classes,$
iterations=iterations, pos=pos
;get the data of the classification
class_data = envi_get_data(dims=dims,pos=0l,fid=class_fid)
;create a png image with the data from the classification
write_png, "test_envi_png.png", class_data,red,green,blue, /order
nv.close ;close envi (this will slow down operations but it will
;also keep envi in a clean state)
result = !server.filetourl("test_envi_png.png") ;return the url of the file
;create a zip file of the output
file_zip, ["temp_output.dat", "temp_output.hdr","test_envi_png.png"],$
"test_output.zip"
two_result = !server.filetourl("test_output.zip")
end
|
5) Replace "config.json" with the following code:
{
"name":"k_means_classification_task",
"displayName":"Unsupervised Classification (K-means)",
"executionType":"asynchronous",
"invocationType":"keywords",
"taskReset":"no",
"serverVersion":"1.0.0",
"parameters":[
{
"name":"in_im_url",
"displayName":"in_im_url",
"dataType":"url",
"direction":"input",
"parameterType":"required"
},
{
"name":"num_classes",
"displayName":"num_classes",
"dataType":"int",
"direction":"input",
"parameterType":"required"
},
{
"name":"change_thresh",
"displayName":"change_thresh",
"dataType":"double",
"direction":"input",
"parameterType":"required"
},
{
"name":"iterations",
"displayName":"iterations",
"dataType":"int",
"direction":"input",
"parameterType":"required"
},
{
"name":"pos",
"displayName":"pos",
"dataType":"int",
"direction":"input",
"parameterType":"required"
},
{
"name":"result",
"displayName":"result",
"dataType":"url",
"direction":"output",
"parameterType":"required"
},
{
"name":"two_result",
"displayName":"two_result",
"dataType":"url",
"direction":"output",
"parameterType":"required"
}
]
} |
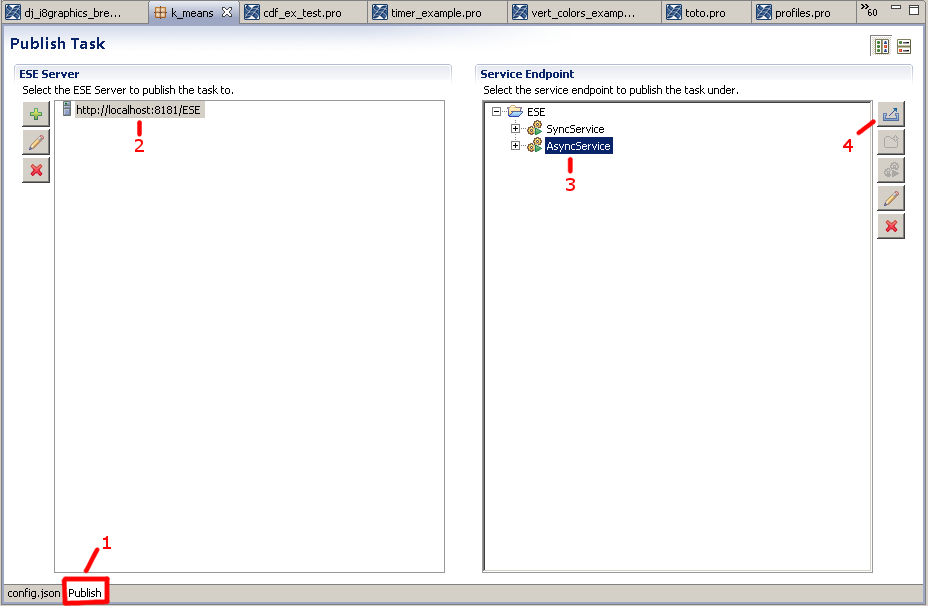
6) If there aren't any syntax errors in the JSON code, then a tab that says "Publish" should appear in the bottom left hand corner of the editor in the workbench. Click on the "Publish" tab and follow the steps below:
- Click on the "Publish" tab (labeled 1)
- Click on the Server to wish you want to publish (or add it using the green plus sign) (labeled 2)
- Select "AsyncService" (labeled 3)
- Click on the "Publish" button (labeled 4)
Task to Display Raw Image
The next thing you will want to do is write the task to display the raw image. To do this, follow the procedure below:
1) In the IDL workbench create a new project and call it "Display_Raster_Task"
2) Right click on the "Display_Raster_Task" project and select "New Task"
3) In the "New Task" dialog, enter "Display_Raster_Task" as the "Display Name" and "Folder Name". Then, enter "Display_Raster_djs" as the "IDL Routine Name".
4) There should now be a files called "Display_Raster_djs.pro" and "config.json" generated in the project. These files will have some automatically generated code designed to help you produce your task. In this case though, replace the code in "Display_Raster_djs.pro" with the following code:
;+
; :description:
; ese task that takes in a raster image and then outputs a png. it returns
; a url that can be used to dislay the graphic in a browser
;
; :information:
; this task was written as part of an example program. it has not been should
; be used with rigously tested and should be used with that caution.
;
; :keywords:
; in_im_url - the url for the input image
;
; result - the url of the output image (png)
;
;
;-
pro display_raster_djs, in_im_url=in_im_url, result=result
compile_opt idl2
nv = envi(/headless) ;start envi in headless mode
in_file_name = !server.urltofile(in_im_url) ;covert the image url to a filepath
rast = nv.openraster(in_file_name) ;open the raster in envi
fid = envirastertofid(rast) ; get the envi file fid
envi_file_query, fid, dims=dims ;get the dimensions
;get the data of the 1st layer from the file
class_data = envi_get_data(dims=dims,pos=0l,fid=fid)
;write a png with the data from the file
write_png, "test_envi_png.png", bytscl(class_data), /order
nv.close ;close envi (this will slow down operations
;but it will also keep envi in a clean state)
result = !server.filetourl("test_envi_png.png") ;return the url of the file
end |
5) Replace "
config.json" with the following code:
{
"name":"Display_Raster_djs",
"displayName":"Display Raster Task",
"executionType":"asynchronous",
"invocationType":"keywords",
"taskReset":"no",
"serverVersion":"1.0.0",
"parameters":[
{
"name":"in_im_url",
"displayName":"in_im_url",
"dataType":"url",
"direction":"input",
"parameterType":"required"
},
{
"name":"result",
"displayName":"Result",
"dataType":"url",
"direction":"output",
"parameterType":"required"
}
]
}
|
6) Publish the "Display_Raster_Task" task to the same server as you published "k_means_classification.pro"
Client
After you have uploaded both tasks to the server and tested these tasks with the admin console, the final step is to create a client to invoke these tasks. An ESE client can be produced in any language that understands HTTP (IDL, JavaScript, Java, etc...). In this case, the client is written using HTML and JavaScript. This create a web interface for end users to interact with your services. To create the client, follow the procedure below:
1) Go to the docroot directory in the ESE working directory (ESE_WORK_DIR). The location of the ESE working directory is described here.
2) Create a new directory called "sandbox" inside of docroot. The new directory should be in the following locations: "ESE_WORK_DIR/docroot/sandbox"
3) Open a new document called "k_means_client.htm" in a plain text editor. Copy and paste the following text into the document and then enter save it to the newly created "sandbox" directory.
<!DOCTYPE html>
<html>
<head>
<title> Unsupervised Classification (k-means) example client</title>
<!-- These load the jquery API which is used throughout this client -->
<script type="text/javascript" src="/js/jQuery/js/jquery-1.8.3.min.js"></script>
<script type="text/javascript" src="/js/jQuery/js/jquery-1.9.2.ui.js"></script>
<link rel="stylesheet" href="/js/jQuery/css/ui-lightness/jquery-ui-1.9.2.css">
</head>
<body>
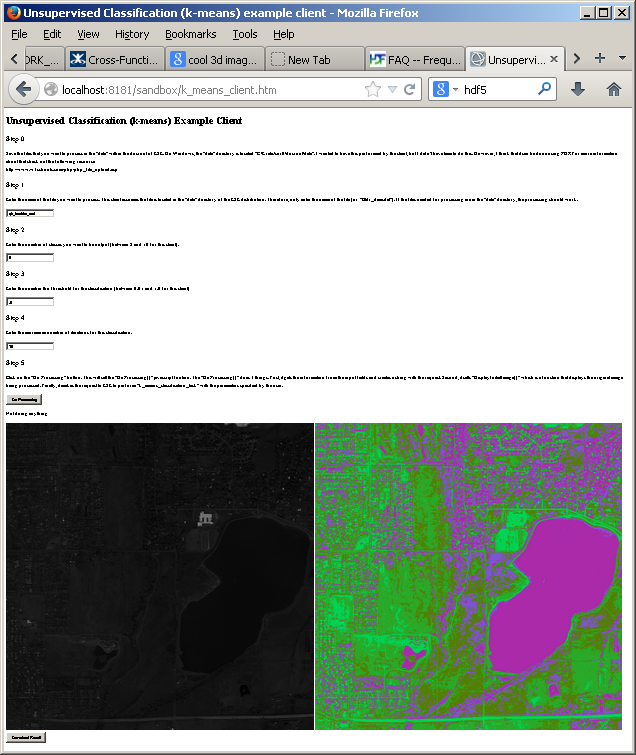
<h1> Unsupervised Classification (k-means) Example Client </h1>
<h2> Step 0 </h2>
<p>
Save the files that you want to process in the "data" within the docroot of ESE. On
Windows, the "data" directory is located "C:\Exelis\se10\docroot\data". I wanted to have this
performed by the client, but I didn't have time to do this. However, I think that it
can be done using PHP. For more information about that check out the following resource: </br>
http://www.w3schools.com/php/php_file_upload.asp
</p>
<h2> Step 1 </h2>
<p>
Enter the name of the file you want to process. This client assumes the file is located in the "data"
directory of the ESE distribution. Therefore, only enter the name of the file (ex: "Bldr_dem.dat").
If the files needed for processing are in the "data" directory, the processing should work.
</p>
<input type="text" id="filename">
<h2> Step 2 </h2>
<p>
Enter the number of classes you want to be output (between 2 and 10 for this client).
</p>
<input type="number" id="Classes" min="2" max="10">
<h2> Step 3 </h2>
<p>
Enter the number the Threshold for the classification (between 0.01 and 1.0 for this client)
</p>
<input type="number" id="Threshold" min="0.01" max="1.0">
<h2> Step 4 </h2>
<p>
Enter the maximum number of iterations for this classification.
</p>
<input type="number" id="Iterations" min="1" max="100">
<h2> Step 5 </h2>
<p>
Click on the "Do Processing" button. This will call the "DoProcessing()" javascript
funtion. The "DoProcessing()" does 3 things. First, it gets the information from the
input fields and creates a string with the request. Second, it calls "DisplayInitialImage()"
which is a function that displays the original image being processed. Finally, it makes the
request to ESE to perform "k_means_classification_task" with the parameters specified by the
user.
</p>
<button type="button" onclick="DoProcessing()">Do Processing </button>
<p id="status"> Not Doing Anything </p>
<a id="initial_space" target="_blank"> <img id="initial_image"/></a>
<a id="final_space" target= "_blank"> <img id="final_image"/></a>
</br>
<button type="button" onclick="DownloadResult()"> Download Result </button>
<!-- Below is the Javascript code for this client. It makes the requests to
ESE and then manipulates the html to display the results -->
<script>
//Create a global environment variable that stores the URL of the
//resulting zip file. This could probably be handled more elegantly.
var output_zip_url = "nothing"
function poll(request_sent, which_img) {
//Function to wait while asynchronous task is performed
//NOTE: Most of the this code was taken from the "ese_smooth_sailing.html"
//Please see that example "http://localhost:8181/examples/ese_smooth_sailing/"
//for more information
var test = '/'+request_sent.jobStatusURL;
$.ajax({
url: test,
dataType: "json",
success: function(result) {
var job_status = result.jobStatus;
var job_progress = parseInt(result.jobProgress);
// Process jobStatus
switch (job_status)
{
// If jobStatus is 'esriJobSucceeded' then jump to job_success function to display result.
case 'esriJobSucceeded':
document.getElementById("status").innerHTML="Done!" //display "Done!" when processing complete
PrintImage(result.results[0].value.url, which_img);
if (which_img == "final_image")
{
output_zip_url = result.results[1].value.url;
}
document.getElementById("status").innerHTML="Not doing anything";
break;
// If job has been cancelled then display message.
case 'esriJobCancelled':
alert('Job cancelled'); //bring up a message box saying the job was cancelled
break;
// If job has failed then display message.
case 'esriJobFailed':
alert('Job failed'); //bring up a message box saying the job failed
break;
// Loop until job complete.
default:
document.getElementById("status").innerHTML="Please Wait..."; //display "please wait" while processing
setTimeout(poll(request_sent, which_img),1000); //wait 1 second before recalling function
break;
}
},
});
}
function DownloadResult(result_url)
{
//If present, download result from server (zip file).
//If not present, inform user
if (output_zip_url == "nothing")
{
//If the output_zip_url hasn't been changed tell the user
//and leave the function
alert("No result files. Please click 'Do Processing'");
}
else
{
//download the resulting zip file
window.location=output_zip_url;
}
}
function PrintImage(img_url, which_img)
{
//This function simply displays the image
document.getElementById(which_img).src = img_url;
}
function DisplayInitialImage()
{
var filename = document.getElementById("filename").value
var request = '/ESE/AsyncService/Display_Raster_djs/submitJob?in_im_url=%7B%22url%22%20%3A%20%22%2Fdata%2F'+ filename + '%22%7D'
//call the Display_Raster_djs tasks
$.ajax({
url: request,
dataType: "json",
error: function(errorresult) {
alert("Failure!");
},
success: function(request_sent){
poll(request_sent, "initial_image");
},
})
}
function DoProcessing() //This function calls the k_means_classification task
{
//Get the images from the file
var req_01 = '/ESE/AsyncService/k_means_classification_task/submitJob?in_im_url=%7B%22url%22%20%3A%20%22%2Fdata%2F'
var filename = document.getElementById("filename").value
var num_classes = document.getElementById("Classes").value
var change_thresh = document.getElementById("Threshold").value
var iterations = document.getElementById("Iterations").value
var request = req_01 + filename +'%22%7D&num_classes='+ num_classes.toString()+'&change_thresh='+change_thresh.toString()+'&iterations=' + iterations.toString()+'&pos=0'
DisplayInitialImage(); //call the function DisplayInitialImage
$.ajax({
url: request,
dataType: "json",
error: function(errorresult) {
alert(request);
alert("Failure!"); //alert the user that the job was a failure.
},
success: function(request_sent){
poll(request_sent, "final_image"); //perform the poll function until processing is completed
},
})
}
</script>
</body>
</html> |
Setup the data and run
1) Copy the files:
From:
ENVI_DIR/data/qb_boulder_msi
ENVI_DIR/data/qb_boulder_msi.hdr
To:
ESE_WORK_DIR/docroot/data/qb_boulder_msi
ESE_WORK_DIR/docroot/data/qb_boulder_msi.hdr
2) Enter one of the following URLs int a browser:
http://localhost:8181/sandbox/k_means_client.htm
OR
http://<ESE MASTER HOSTNAME>:8181/sandbox/k_means_client.htm
OR
http://< IP address>:8181/sandbox/k_means_client.htm
If everything has gone well, you should be able to follow the instructions on the webpage to operate the client. The output should have an appearance similar to the following: