X

NV5 Geospatial Blog

Each month, NV5 Geospatial posts new blog content across a variety of categories. Browse our latest posts below to learn about important geospatial information or use the search bar to find a specific topic or author. Stay informed of the latest blog posts, events, and technologies by joining our email list!


Not All Supernovae Are Created Equal: Rethinking the Universe’s Measuring Tools

Not All Supernovae Are Created Equal: Rethinking the Universe’s Measuring Tools

6/3/2025

Rethinking the Reliability of Type 1a Supernovae   How do astronomers measure the universe? It all starts with distance. From gauging the size of a galaxy to calculating how fast the universe is expanding, measuring cosmic distances is essential to understanding everything in the sky. For nearby stars, astronomers use... Read More >

Using LLMs To Research Remote Sensing Software: Helpful, but Incomplete

Using LLMs To Research Remote Sensing Software: Helpful, but Incomplete

5/26/2025

Whether you’re new to remote sensing or a seasoned expert, there is no doubt that large language models (LLMs) like OpenAI’s ChatGPT or Google’s Gemini can be incredibly useful in many aspects of research. From exploring the electromagnetic spectrum to creating object detection models using the latest deep learning... Read More >

From Image to Insight: How GEOINT Automation Is Changing the Speed of Decision-Making

From Image to Insight: How GEOINT Automation Is Changing the Speed of Decision-Making

4/28/2025

When every second counts, the ability to process geospatial data rapidly and accurately isn’t just helpful, it’s critical. Geospatial Intelligence (GEOINT) has always played a pivotal role in defense, security, and disaster response. But in high-tempo operations, traditional workflows are no longer fast enough. Analysts are... Read More >

Thermal Infrared Echoes: Illuminating the Last Gasp of a Dying Star

Thermal Infrared Echoes: Illuminating the Last Gasp of a Dying Star

4/24/2025

This blog was written by Eli Dwek, Emeritus, NASA Goddard Space Flight Center, Greenbelt, MD and Research Fellow, Center for Astrophysics, Harvard & Smithsonian, Cambridge, MA. It is the fifth blog in a series showcasing our IDL® Fellows program which supports passionate retired IDL users who may need support to continue their work... Read More >

A New Era of Hyperspectral Imaging with ENVI® and Wyvern’s Open Data Program

A New Era of Hyperspectral Imaging with ENVI® and Wyvern’s Open Data Program

2/25/2025

This blog was written in collaboration with Adam O’Connor from Wyvern.   As hyperspectral imaging (HSI) continues to grow in importance, access to high-quality satellite data is key to unlocking new insights in environmental monitoring, agriculture, forestry, mining, security, energy infrastructure management, and more.... Read More >

1345678910Last
6777 Rate this article:
4.0

Interactive Vector GUI

Anonym

With holidays rapidly approaching, I thought it might be nice to present a light hearted demonstration of capabilities; something that you can delight friends and family with during cold winter nights.  This week’s post shows how to use a simple widget_window to create an interactive vector animation.  The code is broken up into four pieces VectorBlog, VectorBlog_Event, VectorBlogMouseEvent, and VectorBlogVectorBuilder. The VectorBlog creates the widget itself and initially displays the vector information.  VectorBlog_Event runs the events for the base widget.  This is mainly the closing of the widget. VectorBlogMouseEvent is the mechanism by which the mouse locations are recoded by the widget window. Last but not least VectorBlogVectorBuilder builds the two matrices containing the horizontal and vertical components of the vector.  When the following code is run the cursor location is recorded, a distance weighted vector diagram is created, and the resulting image is then displayed in the widget window.  The only tricky bits in this code relate to the fact that there are two event handlers, one for the base widget and one for the mouse events in the widget window.  The object reference for the image displayed must also be maintained and manipulated each time the cursor is move.


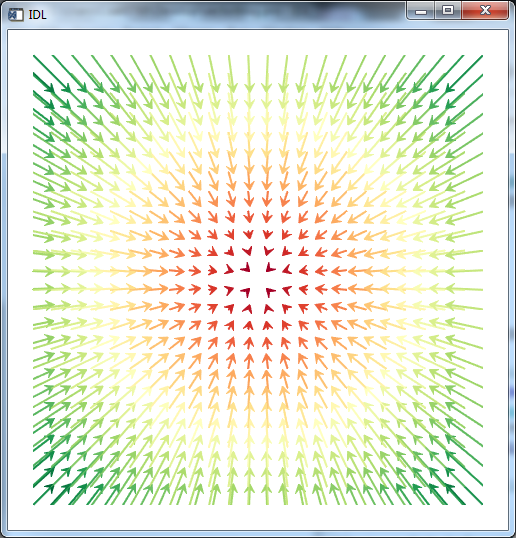
Figure 1: Example Vector Plot


;+
; Build the vecort components
; This is distance weighting
;-
pro VectorBlogVectorBuilder, dims = dims, pt = pt, u = u, v = v
  compile_opt IDL2

  ; Get all the x locations
  xs = findgen(dims[0])
  xs = xs#replicate(1,dims[1])

  ; Get all the y locations
  ys = findgen(dims[1])
  ys = transpose(ys# replicate(1,dims[0]))

  ; Build the horizontal components
  u = pt[0] - xs

  ; Build the vertical components
  v =  pt[1] - ys
end


;+
; The event handler called when the mouse is moved.
;-
FUNCTION VectorBlogMouseEvent, win, x, y, keymods
  COMPILE_OPT idl2

  ; Set the window
  win.SetCurrent

  ; Set the scale factor
  sc = .05

  ; Get the size of the window
  dims = win.DIMENSIONS * sc

  ; Get the vecotr information
  VectorBlogVectorBuilder, dims = dims, pt = [x*sc,y*sc], $
    u = u , v = v

  ; Build the vecotr image
  vector = vector(u,v,xrange=[0,dims[0]], yrange=[0,dims[1]], /current, AUTO_COLOR=1,  $
    RGB_TABLE=73, AXIS_STYLE = 0, LENGTH_SCALE=1.5, ARROW_THICK =3)

  ; Delete the old image
  win.uvalue.delete

  ; Display the new image
  win.uvalue = vector


END


;+
; The event handler for the widget
;-
pro VectorBlog_Event, ev
  compile_opt IDL2


end


pro VectorBlog
  compile_opt IDL2

  ; Setup the widget
  tlb = widget_base()
  wwindow = widget_window(tlb, MOUSE_MOTION_HANDLER='VectorBlogMouseEvent', $
    XSIZE=500, YSIZE=500)
  widget_control, tlb, /REALIZE

  ; Set the scale factor
  sc = .05

  ; Get infomation about the widget window
  WIDGET_CONTROL, wwindow, GET_VALUE=w
  dims = w.DIMENSIONS * sc

  ; Build the vecotr infomation
  VectorBlogVectorBuilder, dims = dims, pt = [(dims[0])/2.,(dims[1])/2.], $
    u = u , v = v

  ; Display the vectors
  vector = vector(u,v,xrange=[0,dims[0]], yrange=[0,dims[1]], /current, AUTO_COLOR=1,  $
    RGB_TABLE=73, AXIS_STYLE = 0, LENGTH_SCALE=1.5, ARROW_THICK =3)

  ; Record the vector object
  w.uvalue = vector
  WIDGET_CONTROL, tlb, SET_UVALUE=w

  ; Start the task manager
  XMANAGER, 'VectorBlog', tlb

end

1 comments on article "Interactive Vector GUI"

Avatar image

Austin Coates

Huijian Du from Esri China just pointed out that if you replace

; Build the vecotr image

vector = vector(u,v,xrange=[0,dims[0]], $

yrange=[0,dims[1]], /current, AUTO_COLOR=1, $

RGB_TABLE=73, AXIS_STYLE = 0, $

LENGTH_SCALE=1.5, ARROW_THICK =3)

; Delete the old image

win.uvalue.delete

; Display the new image

win.uvalue = vector

In the VectorBlogMouseEvent function with

win.uvalue.setdata, u, v

win.uvalue.refresh

the performance is greatly improved! Thank you very much Mr. Du!!

Please login or register to post comments.