9089
Example how to use .Xdefaults to alter appearance of Widgets on Linux
Topic:
Since IDL uses X Motif widgets on Linux, Mac OS X, and Solaris systems, the appearance of widgets on these platforms might appear different than the appearance on Windows. This article discusses how you can create an .Xdefaults file to customize the appearance of IDL's widgets on these platforms.
Discussion:
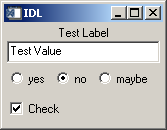
If you create a widget application using IDL, you may find that the appearance is different between Windows and Linux. For example, if you run "test_control_widget_colors.pro" (shown below) it will have the following appearance on Windows:
.
If you run "test_control_widget_colors.pro" on a Linux, Mac OS X, or Solaris system, the result will have the following appearance:
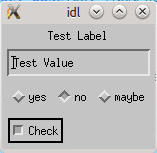
The reason the appearance is different is because IDL uses Window's native toolkit and the Unix platforms are using the XMotif toolkit. You can adjust the appear of the widgets on Unix platforms by using the RESOURCE_NAME and adjust the properties of this Widget objects using the ~/.Xdefaults fileTo change the graphics you can use the following procedure:
1) Open a text editor and enter the following text and save it as ".Xdefaults" in your home diretory :
Idl*background:grey90
Idl*testWidget*testText*background: White
Idl*testWidget*area*indicatorType: One_OF_MANY_ROUND
Idl*testWidget*area*selectColor: Black
Idl*testWidget*area*bottomShadowColor: grey39
Idl*testWidget*area*topShadowColor: grey39
Idl*testWidget*checkarea*indicatorOn: INDICATOR_CHECK_BOX
2) Enter the following command into
xrdb -load ~/.Xdefaults
3) Open "idlde" from the same terminal (or any other text editor) and enter the following text into a new document. Save the document as "test_control_widget_colors.pro".
pro test_control_widget_colors_event, ev
compile_opt idl2
help, /STRUCTURE, ev
end
pro test_control_widget_colors
compile_opt idl2
wb = widget_base(resource_name="testWidget",/COLUMN)
wlabel = WIDGET_LABEL(wb, VALUE="Test Label")
wtext = WIDGET_TEXT(wb, VALUE="Test Value", $
resource_name="testText",/EDITABLE)
areabase = widget_base(wb, /exclusive, $
/row, resource_name="area")
yes_button = WIDGET_BUTTON(areabase, $
value='yes', $
RESOURCE_NAME="radiobutton")
no_button = widget_button(areabase, value='no', $
RESOURCE_NAME="nobutton")
maybe_button = widget_button(areabase,value='maybe', $
RESOURCE_NAME="maybebutton")
checkbase = widget_base(wb, /NONEXCLUSIVE, /row, $
RESOURCE_NAME="checkarea")
checkbutton = widget_button(checkbase, value="Check", $
RESOURCE_NAME="checkbutton")
widget_control, /REALIZE, wb
xmanager, "test_control_widget_colors", wb
end
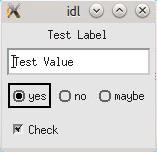
If everything works, the output widget should have the following appearance:
There is some additional information and an example in the RESOURCE_NAME section of the WIDGET_BASE help page:
http://harrisgeospatial.com/docs/WIDGET_BASE.html
Written by DS and reviewed by JU 1/24/2014