Can I Subset an Image Using a Shapefile?
Anonym
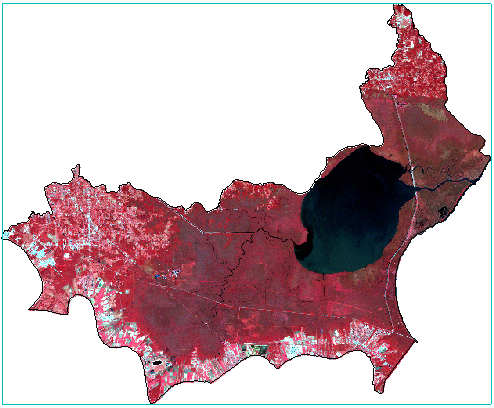
In this article I will show how to subset an image from a polygon shapefile that has been converted to a region of interest (ROI). A typical use case is to process only the pixels that are within a geographic boundary, as the following image shows. This is not a “clip” operation but rather a masking procedure whereby the pixels outside of the shapefile boundary are set to values of NoData.
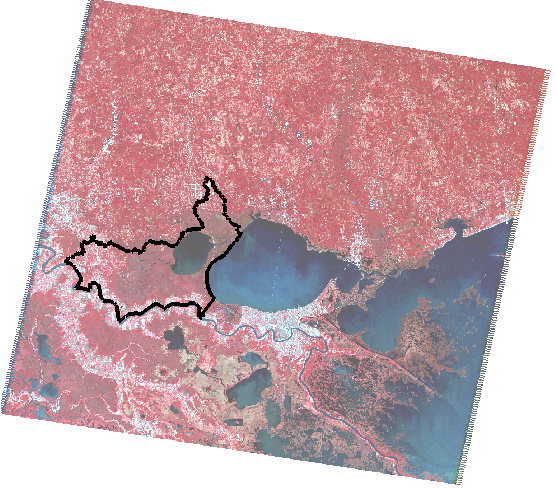
This example uses a Landsat 5 TM image and a polygon shapefile of the Lake Maurepas watershed boundary in the Mississippi River coastal delta region of Louisiana.
First, you need to create an ROI from the polygon shapefile. Follow these steps:
- From the ENVI menu bar, select File > New Region of Interest.
- In the ROI Tool menu bar, select File > Import from Vector.
- Select the polygon shapefile when prompted.
- In the Convert Vector to ROI dialog, choose All Records to a single ROI or Each record to a separate ROI, depending on how you want to export the shapefile records.
- From the ROI Tool menu bar, select File > Save As and save the ROI to an XML file.
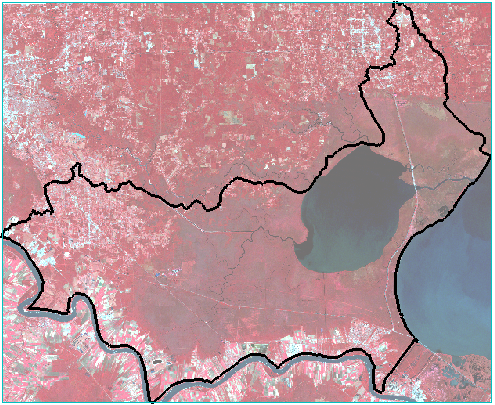
Now you are ready to subset the image. In addition to manually defining the spatial extents of the subset, ENVI® offers other options for spatial subsetting such as Subset by Raster, Subset by Vector, and Subset by ROI. The latter two options produce a rectangular subset that is based on the geographic extents of the shapefile or ROI. The subset includes pixels that are outside of the shapefile or ROI, for example:
To create a subset that contains only data pixels inside the ROI boundary (see the example at the beginning of this article), you need to create a mask from the ROI. Follow these steps to create a mask and to subset the image by ROI:
- From the ENVI menu bar, select File > Save As > Save As (ENVI, NITF, TIFF, DTED).
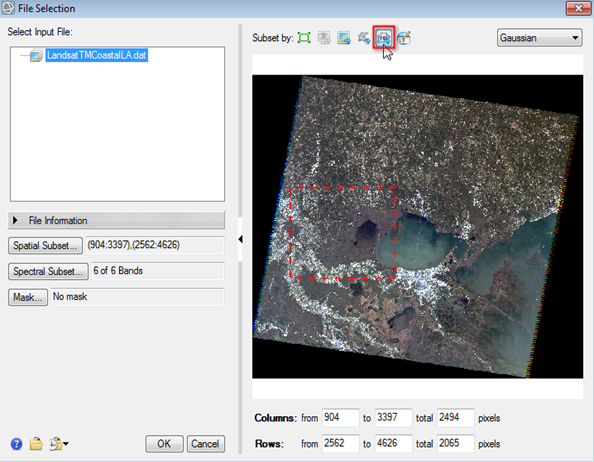
- Select the image file, then click the Spatial Subset button.
- Click the Subset by ROI button.
- Select the ROI when prompted.
- In the File Selection dialog, click the Mask button.
- In the Mask Selection dialog, select the ROI file and click OK.
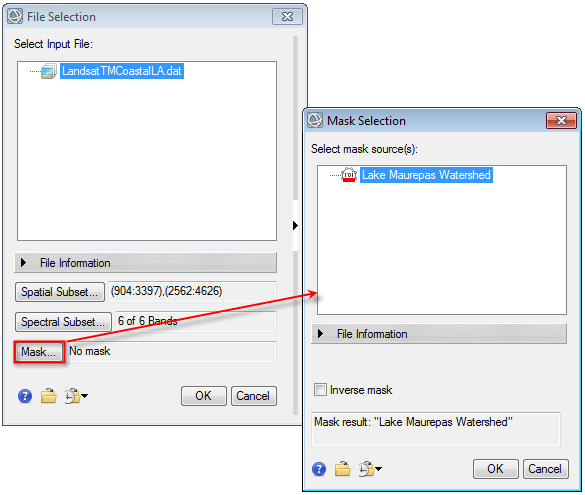
- Click OK in the File Selection dialog.
- Save the masked raster to a file on disk.
The result will look similar to the image at the beginning of this article. The white pixels are filled with NoData values. Also note that the coordinate systems differ between the Landsat image and the ROI; however, we did not need to take extra steps to reproject one dataset to the other. ENVI automatically reprojected the ROI to match the coordinate system of the Landsat image.
For more information on subsetting options and creating masks, please refer to the ENVI Help.
Acknowledgements
Landsat imagery was provided by the U.S. Geological Survey.
The Lake Maurepas shapfile was provided as part of the U.S. Watershed Boundary Dataset (WBD). The WBD is a coordinated effort between the United States Department of Agriculture-Natural Resources Conservation Service (USDA-NRCS), the United States Geological Survey (USGS), and the Environmental Protection Agency (EPA). The WBD was created from a variety of sources from each state and aggregated into a standard national layer for use in strategic planning and accountability. The WBD data for Louisiana is available from http://datagateway.nrcs.usda.gov [Accessed 02/29/2016].