Embedding an IDL graphics window in a Python GUI
Anonym
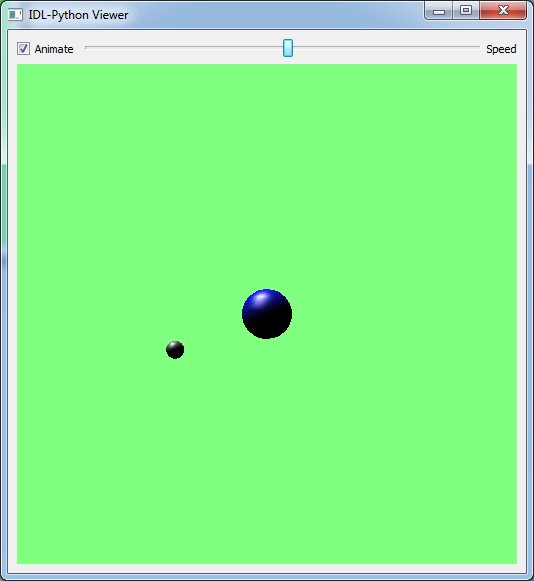
Continuing the theme that Jim Pendleton started last week, I am going to show an example that goes in the other direction. Starting with a Python GUI application, using PyQt4 in this case, the example shows how to embed an IDLgrWindow object so that IDL object graphics can be rendered into the desired location in the Python GUI. I am using an undocumented keyword for the IDLgrWindow that allows for setting a destination window ID. I have run the code on both Linux and Windows, and while there are some small differences, the code posted below works in both cases. I would like to point out that I used the Anaconda-2.1.0 installer in both cases to ensure that the Python version is consistent. I found it useful to follow the instructions recommended on the Python Bridge help page.
The result is a simple application that allows the user to animate an IDL graphics hierarchy inside the Python GUI. The pictures show what it looks like under Windows 7 and Ubuntu 12.04.


The complete Python source code can be seen below.
# GUI widgets
import PyQt4
from PyQt4 import QtGui
from PyQt4 import QtCore
import sys
# numpy needed for IDL
import numpy
from numpy import array
from idlpy import IDL
# OS is needed to handle Linux vs. Windows
import os
class MainWin(QtGui.QMainWindow):
def __init__(self, win_parent=None):
QtGui.QMainWindow.__init__(self,win_parent)
# widget layout
wcol = QtGui.QVBoxLayout()
wrow = QtGui.QHBoxLayout()
wcol.addLayout(wrow)
self.check = QtGui.QCheckBox('Animate')
self.slider = QtGui.QSlider(1)
self.text = QtGui.QLabel('Speed')
# EmbedContainer only works on Linux, for Windows use QWidget
if os.name== 'nt':
self.idldraw = QtGui.QWidget()
else:
self.idldraw = QtGui.QX11EmbedContainer()
self.idldraw.setFixedHeight(500)
self.idldraw.setFixedWidth(500)
wrow.addWidget(self.check)
wrow.addWidget(self.slider)
wrow.addWidget(self.text)
wcol.addWidget(self.idldraw)
w = QtGui.QWidget()
w.setLayout(wcol)
self.setCentralWidget(w)
self.setWindowTitle('IDL-Python Viewer')
self.timer = QtCore.QTimer()
# Set the timer delay in milliseconds
self.delay = 100
self.timer.start(self.delay)
self.hasDraw = False
# connect event handlers
QtCore.QObject.connect(self.check,
QtCore.SIGNAL('clicked()'),
self.on_check_clicked)
QtCore.QObject.connect(self.timer,
QtCore.SIGNAL('timeout()'),
self.on_timeout)
def on_check_clicked(self):
print 'click'
# Animate checkbox was clicked for the first time
if self.hasDraw == False:
# Create the IDL graphics objects only once
# Windows comes up as 'nt'
if os.name == 'nt':
winid = int(self.idldraw.winId())
else:
winid = self.idldraw.effectiveWinId()
# Create the IDLgrWindow, using software rendering
# connect to the Python widget using EXTERNAL_WINDOW
self.win = IDL.obj_new('IDLgrWindow', external_window=winid,
renderer=1)
self.view = IDL.obj_new('IDLgrView', color=array([128,255,128]),projection=2)
self.model = IDL.obj_new('IDLgrModel')
self.view.add(self.model)
self.planet = IDL.obj_new('orb', radius=0.1, color=array([20,20,255]))
self.moon = IDL.obj_new('orb', radius=0.03, pos=array([0.75,0,0]),
color=array([128,128,128]))
self.sun = IDL.obj_new('IDLgrLight', type=1, location=array([0,18,8]))
self.model.rotate(array([1,0,0]), 10)
self.model.add(self.sun)
self.model.add(self.planet)
self.model.add(self.moon)
self.hasDraw = True
if self.hasDraw:
self.win.draw(self.view)
def on_timeout(self):
# handle timer event, draw the scene, rotate by 2 degrees
# and check the slider value to determine the new
# timer interval
if self.hasDraw & self.check.isChecked():
self.model.rotate(array([0,0.9848,0.1736]),-2)
self.win.draw(self.view)
# slider goes from 0-99, so delay goes from 1 ms to 100 ms
speed = 100-self.slider.value()
if self.delay != speed:
self.delay = speed
self.timer.setInterval(self.delay)
if __name__ == '__main__':
# Someone is launching this directly
# Create the QApplication
app = QtGui.QApplication(sys.argv)
# The Main window
main_window = MainWin()
main_window.show()
# Enter the main loop
app.exec_()