18902
ENVI 5.5.3 Release Notes
This topic contains release notes for ENVI 5.5.3. See the following sections:
System Requirements
| Platform |
Hardware |
Operating System |
Supported Versions |
| Windows |
Intel/AMD 64-bit |
Windows |
10 |
| Macintosh |
Intel 64-bit |
OSX |
10.14, 10.15* |
| Linux |
Intel/AMD 64-bit |
Linux |
Kernel 3.10.0 or higher, glibc 2.17 or higher |
* If you are installing ENVI on a Mac 10.15 operating system, or if you have ENVI installed on a previous Mac OS and are upgrading to 10.15, please refer to this Help Article before you begin the installation.
An X-Windows manager is required for Macintosh. ENVI was tested using XQuartz 2.7.11.
Supported versions indicate that ENVI was either built on the lowest version listed or tested on that version. You can install and run ENVI on other versions that are binary-compatible with those listed.
The 64-bit Windows installer contains 32-bit binaries so that you can launch ENVI in 32-bit mode on 64-bit Windows systems. This ensures interoperability with ArcGIS®. You can find the 32-bit versions of ENVI in the Windows Start menu under Programs > ENVI 5.5 > ENVI for ArcGIS® and Programs > ENVI 5.5 > Tools > ENVI Classic 5.5 (32-bit).
For optimal performance, your video card should have a minimum of 1 GB RAM and should support OpenGL 2.0 or later. Also be sure to install the latest drivers for your video card.
ENVI Help requires an HTML5-compatible browser.
What's New in This Release
This release contains many exciting improvements to help you create high-quality reports in ENVI. Several new features also enable you to work more quickly and efficiently in ENVI.
Supported Data Types
ENVI reads the following data types:
- Göktürk-1
- PRISMA (PRecursore IperSpettrale della Missione Applicativa) hyperspectral data from the Italian Space Agency
- CSSHPB (shapefile) Data Extension Segment (DES) in NITF files
Annotations
Text annotations have a better default color and font style. North arrows and symbol annotations also have a more professional default style and color.
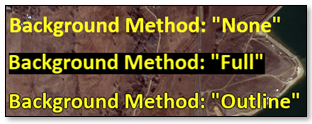
The Background Fill property and preference has been replaced by Background Method for text, symbols, north arrows, color bars, scale bars, legends, and grid lines. The choices are None, Full, and Outline.
An Image Magnifier annotation type was introduced. When you select this item in the Annotations drop-down list and draw a box in the view, a window is displayed that contains a magnified view of the selected area.
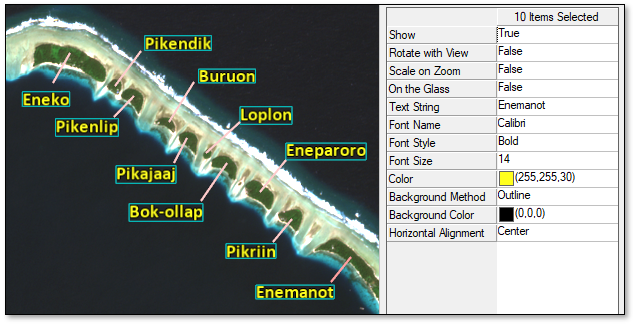
You can update the shared properties of multiple annotation items; for example, change the color of multiple text annotations. To do this, draw a box around the annotations in the current view, or use the Ctrl key to select multiple annotation items in the current view. Only the shared properties of the annotations are displayed in the lower-right corner of the ENVI application. Update the shared properties as needed.
You can create legend annotations with user-defined class names and colors. You can also import class names and colors from a classification file as before.
When rotating arrow annotations, hold down the Shift key to rotate them in 45° increments. You can also click and drag entire arrows to move them, whereas previously you had to select and move the two end points independently.
A new Transparency preference lets you set the transparency of north arrows against the underlying view.
For picture annotations:
- You can create a picture annotation from any raster format that ENVI supports. Click the Annotations drop-down list in the toolbar and select Pictures > From File or Pictures > From ENVI to select a raster.
- The raster can have any number of bands. If the raster contains up to four bands, use the Annotations > Pictures > From File option to import it. If the raster contains more than four bands, you must open the raster in ENVI first and then select Annotations > Pictures > From ENVI to import it.
- You can define a spatial and spectral subset when selecting the raster.
- If the raster has a data type other than byte, a 2% linear stretch will be applied to all of the bands you select.
- If the raster has any transparent pixels, they will appear transparent in the annotation.
- If you select a PNG file with a full alpha channel, the alpha channel will be used in the annotation.
- The aspect ratio is always maintained when resizing.
- You can create a picture annotation from any plot or scatterplot window that is displayed in ENVI. Click the Annotations drop-down list in the toolbar and select Pictures > From Plot.
- Picture annotations honor the On the Glass property. This means you can affix picture annotations to the display so that they remain stationary when you rotate, view, or zoom.
PowerPoint Template Configuration
The File > Chip View To > PowerPoint functionality has been significantly improved to allow creation of custom reports in PowerPoint. In previous versions of ENVI, the contents of one view could be chipped to PowerPoint. In this version, you can send multiple views to PowerPoint while configuring the layout of additional elements such as text, images, north arrows, and reference maps. You can create your own template in PowerPoint or you can choose from six predefined templates that are included with ENVI. Combining custom templates with images and annotations in ENVI allows you to quickly create PowerPoint reports that have common themes and layouts.
A new Creating Custom PowerPoint Reports tutorial describes how to create reports.
ENVI provides six predefined templates:
- ENVI Briefing: A slide that is designed for analyst briefings.
- Full Screen (16x9): Fills an entire slide with the chipped area using a 16:9 presentation view ratio. The layout emphasizes the chipped view with minimal text and graphics.

- Full Screen (4x3): Similar to the previous template but uses a 4:3 presentation view ratio.
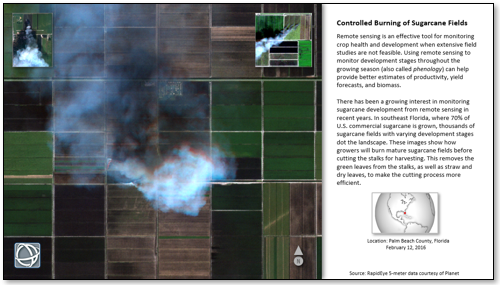
- Stories from Above: Provides space to write a brief story about the contents of the view.
- Vertical Report: An 8.5" x 11" slide suitable for printing.
- Square: A stylish template suitable for exporting as an image for social media.

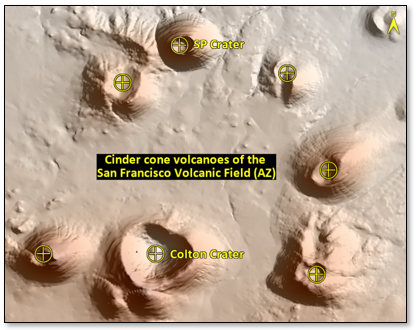
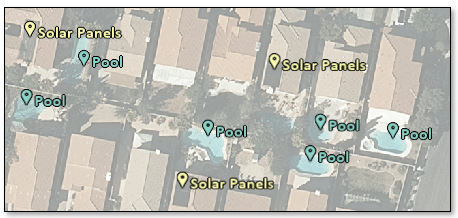
Feature Counting
The default colors and font styles for new feature counts have been improved.
A new Text Background Fill property was added. The choices are None, Full, and Outline.

You can open ENVI Feature Counting files (.efc) using the File > Open menu option.
Use the File > Export > ENVI ROIs menu option in the Feature Counting Tool to save feature counts to point-based regions of interest (ROIs) in XML format.
Use number keys (1-9) in the Feature Counting Tool to add points for different feature groups. For example, if you have four different features (Feature_1 through Feature_4), clicking the 3 key will add a point beneath the cursor location for Feature_3.
The Vector to Feature Count tool lets you convert vector records into a feature counting layer.
ArcGIS Integration
ENVI supports ArcGIS Pro 2.4 in addition to 2.3. It also supports ArcMap 10.7.
New Functionality
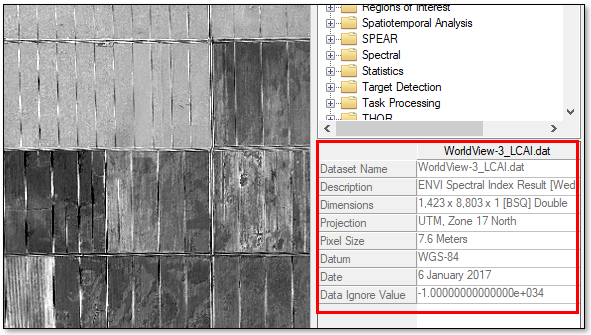
Properties of rasters, annotations, vector layers, contour lines, and grid lines are now displayed in the lower-right corner of the ENVI application below the ENVI Toolbox. You no longer have to double-click these items in the Layer Manager to view and edit their properties. An exception is with vector layers; right-clicking a vector layer and selecting Properties will display the same Vector Properties dialog as before so that you can edit properties of individual attributes.
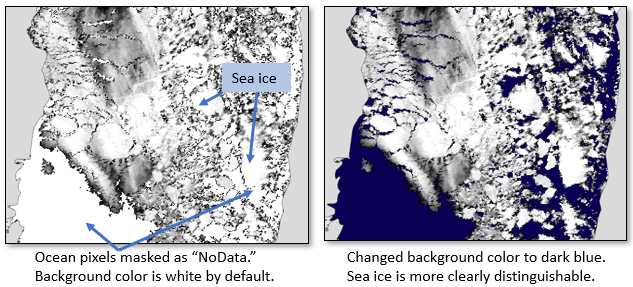
You can change the background color of the display by right-clicking on the View layer in the Layer Manager and selecting Change Background Color. Changing the color can be helpful in distinguishing between bright features and pixels that have been marked as "NoData."
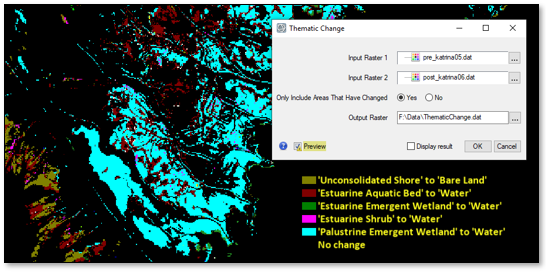
The new Thematic Change tool lets you identify differences between two classification images of the same geographic area taken at different times. This tool provides a quicker and simpler way to perform thematic change detection, compared to the Thematic Change Workflow.
Use the Quick Mosaic tool or right-click option in the Layer Manager to quickly group a number of adjacent georeferenced rasters and treat them as a single raster, effectively creating a virtual mosaic. Virtual mosaics are much faster to create than regular mosaics.
You can convert GeoJSON features to one or more ROIs and vice-versa. See the Region of Interest (ROI) Tool help topic for more information.
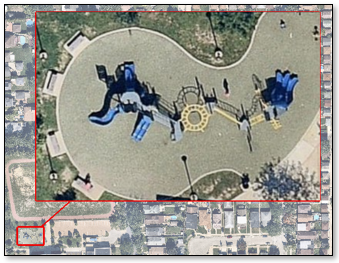
Click the Scroll View button in the ENVI toolbar to display one section of a dataset at a time, in a vertical or horizontal direction. This tool can be helpful for advancing through sections of a large image when you are counting features or otherwise exploring the image.
You can create vector layers or regions of interest (ROIs) from ASCII data.
You can create arbitrary transects by importing ASCII data or vector data.
The new Convert Interleave tool lets you convert the interleave of a raster.
The new Reproject Vector tool lets you reproject the records in a vector file from one coordinate system to another.
The new Build Band Stack tool lets you build a new file consisting of bands from different rasters with the same dimensions. The image bands do not have to be georeferenced.
The new Cast Raster Data Type tool lets you change the data type of a raster; for example, integer or double-precision floating-point.
The Layer Stacking tool was renamed to Build Layer Stack.
ENVI tries to put most of the temporary files created during processing into a new "Temporary Workspace." This is a subdirectory under the Temporary Directory that is named "ENVI_Session_." ENVI deletes the Temporary Workspace and all files in it when you exit ENVI or close all open files.
Programming
New ENVITasks
You can use these new ENVITasks to perform data-processing operations in your own ENVI+IDL programs. They are also available as task nodes in the ENVI Modeler so that you can combine them with other tasks to build a custom data-processing workflow.
| Task |
Description |
| ENVIASCIIToROITask |
Create an ROI layer from ASCII data. |
| ENVIASCIIToVectorTask |
Create a vector layer from ASCII data. |
| ENVIConvertInterleaveTask |
Convert the interleave of a raster. If the input raster has one band, the output is always band sequential (BSQ). |
| ENVIExtractGeoJSONFromFileTask |
Open and parse a GeoJSON string from an input URI. |
| ENVIGenerateMaskFromVectorTask |
Generate a mask from a rasterized polyline or polygon vector layer. |
| ENVIReprojectVectorTask |
Reproject vector records from one coordinate system to another. |
| ENVIROIToGeoJSONTask |
Convert geometry-based ROIs to GeoJSON features. |
| ENVIVectorToFeatureCountTask |
Convert vector records to a feature counting layer. |
New Routines and Methods
| Routine/Method |
Description |
| ENVIFeatureCount |
This object contains a set of feature counts restored from an ENVI Feature Counting file (.efc). |
| ENVITime::GetString |
This method returns an ENVITimeString in a specified format. |
Other Updates
You can create a new, empty ENVISpectralLibrary object as well as restore a spectral library file from disk. AddSpectra and RemoveSpectra methods were also added to ENVISpectralLibrary.
The following are new user interface API classes to be used by programmers to create their own dialogs:
- ENVIFeatureCount_UI: Select an ENVI Feature Counting file (.efc).
- ENVIGCPSet_UI: Select an ENVI Ground Control Point file (.pts).
- ENVITiePointSet_UI: Select an ENVI tie point file (.pts).
Fixed Issues
| Issue |
Description |
| ENVI-71917 |
ENVI could not open WorldView-2 data using the .TIL file. |
| ENVI-71907 |
ENVI issued an error message when trying to open recently purchased WorldView-3 and WorldView-4 images. |
| ENVI-71809 |
Intersection and Union options were swapped in the Build Layer Stack tool. |
| ENVI-71800 |
Errors were issued while calculating statistics for raster color slices. |
| ENVI-71019 |
WorldView-3 default Radiometric Calibration coefficients within .IMD metadata were inaccurate. |
| ENVI-70414 |
CN Spectral Sharpening produced an incorrect image. |