Images, or rasters, are the most common data in ENVI. Many different data processing tasks are available for rasters such as classification, principal components analysis, and mosaicking. Rasters have metadata that describe their unique properties, and they can be georeferenced to different coordinate systems. This topic describes some of the basic operations you can perform with raster data:
Access Data Files
Once you start the ENVI application, you have several options to access data files from a disk on a local workstation:
- Create a variable that contains a string with a fully qualified filename. The term fully qualified means that you have specified its exact name and path so that it cannot be mistaken for any other file on that system. Examples:
Windows: File = 'C:/Data/MyImage.dat'
Linux: file = '/home/image.dat'
- Use the IDL FILE_SEARCH function to return a string array that contains the names of all files matching the input path specification.
MyFiles = FILE_SEARCH('C:/Data/*.tif')
- The IDL FILEPATH function is preferred in scripts that need to support cross-platform file paths.
- The ENVI::GetTemporaryFilename() method manages file names and paths for you.
To access data files from remote locations, create a variable that contains a string with the direct URL or Universal Naming Convention (UNC) path to the dataset. For example:
Network: resource = '\\MyServer\image.dat'
ArcGIS image service: resource = 'http://exampleserver:1234/arcgis/rest/services/etc...'
OGC server: resource = 'http://ogc-server.org/cgi-bin/mapserv_dem?SERVICE=WMS&coverage=etc...'
In all of these cases, you are only creating string variables that reference the data location.
Open Rasters in ENVI
Pass the file reference to the ENVI::OpenRaster method to open the data in ENVI:
Raster = e.OpenRaster(File)
Or:
Raster = e.OpenRaster(resource)
See Supported File Types for a list of formats and sensor products that ENVI supports by default. For some formats, you may need to set the EXTERNAL_TYPE keyword to ENVI::OpenRaster. For HDF5 and similar formats, you may also need to set the DATASET_NAME keyword to ENVI::OpenRaster.
You now have an ENVIRaster object called Raster. Refer to the ENVIRaster help topic to see:
- Properties that are common to all rasters
- Methods, or actions, that you can perform with the raster
- Keywords that allow you to set additional properties on the raster
View Raster Properties
Every ENVIRaster object has a set of common properties that you can view but not edit. In the ENVIRaster help topic, these properties are marked as "Get."
Many of the same properties are also marked as "Init" (short for initialize), meaning that you can set values for these properties when you first initialize the object, but not afterward. You can only set these properties when creating a new ENVIRaster object, not when opening an existing file as an ENVIRaster object as in the example below.
Copy and paste the following code into the IDL command line:
e = ENVI()
File = FILEPATH('qb_boulder_msi', ROOT_DIR=e.ROOT_DIR, $
SUBDIRECTORY = ['data'])
Raster = e.OpenRaster(File)
PRINT, Raster
IDL prints the following:
ENVIRASTER <250912>
AUXILIARY_SPATIALREF = !NULL
AUXILIARY_URI = <Array[2]>
DATA_TYPE = 'uint'
INTERLEAVE = 'bsq'
METADATA = <ObjHeapVar251621(ENVIRASTERMETADATA)>
NBANDS = 4
NCOLUMNS = 1024
NROWS = 1024
PYRAMID_EXISTS = 1
READ_ONLY = 1
SPATIALREF = <ObjHeapVar251622(ENVISTANDARDRASTERSPATIALREF)>
TIME = <ObjHeapVar251623(ENVITIME)>
URI = 'INSTALL_DIR\ENVIxx\data\qb_boulder_msi'
Printing the raster's properties gives you some details about the raster, namely:
- It has four bands.
- Its pixel dimensions are 1024 x 1024.
- Its interleave type is band-sequential (BSQ).
- Its data type is unsigned integer ("uint").
To see the value of a specific property such as the number of bands, type the following (case does not matter):
PRINT, Raster.NBANDS
IDL prints:
4
Try changing the number of bands:
Raster.NBANDS = 5
IDL prints:
% Raster properties may not be set.
% Execution halted at: $MAIN$
Again, ENVIRaster properties can only be viewed but not changed. Some properties for other ENVI API objects can be set after they are first initialized. These are marked as "Set" in the associated help topics.
You can also use the RasterProperties task to retrieve raster properties within an image-processing script, then create variables from the various properties.
Keywords allow you to set additional properties on raster objects when you first intialize them. ENVIRaster has keywords such as DATA_IGNORE_VALUE, INHERITS_FROM, and ERROR. Here is an example of setting a data value to ignore on a new raster object:
raster = e.OpenRaster(file, DATA_IGNORE_VALUE=0)
While properties let you view the attributes of a raster object, methods allow you to perform actions on the raster. Methods are referenced by their name with double colons appended to the front, for example, ENVIRaster::GetData. Refer to the list of methods that are available for ENVIRaster.
Define Spatial Subsets
Use the ENVISubsetRaster routine to define spectral and spatial subsets. This function returns a new raster that only contains the subset.
Use the BANDS keyword to define a spectral subset (a select group of bands). Bands are zero-based:
e = ENVI()
File = FILEPATH('qb_boulder_msi', ROOT_DIR=e.ROOT_DIR, $
SUBDIRECTORY = ['data'])
Raster = e.OpenRaster(File)
Subset = ENVISubsetRaster(Raster, BANDS=[0,1,2])
Use the SUB_RECT keyword to define a spatial subset. Values can be in pixel or map coordinates.
Pixel Coordinates
Pixel locations are defined by their x,y coordinates, beginning with (0,0) in the upper-left corner of the upper-left pixel of a raster.
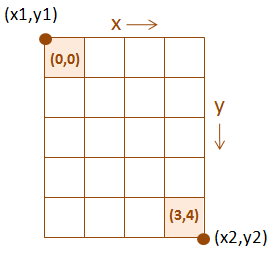
To define a spatial subset based on pixel coordinates, set the SUB_RECT keyword to a four-element array of integers in the form [x1,y1,x2,y2]. From the above illustration, define the spatial subset as follows:
Subset = ENVISubsetRaster(Raster, SUB_RECT=[0,0,3,4])
Alternatively, use the SubsetRaster task to subset data by pixel location. This option is useful when writing image-processing scripts that will be published as web services, using ENVI Services Engine (ESE).
Map Coordinates
To define a spatial subset based on map coordinates, set the SUB_RECT keyword to an array of floating-point or integer values in the form [x1,y1,x2,y2].
- You must also set the ENVIRaster SPATIALREF keyword to the name of a known spatial reference object, which contains detailed projection parameters or rational polynomial coefficients (RPCs). See Map Information for more information on this subject.
- x and y can be represented as map coordinates (x=eastings, y=northings) or geographic coordinates (x=longitude, y=latitude), depending on the spatial reference object used. The x,y coordinates must be in the same units (degrees, meters, feet, etc.) as the spatial reference object.
- See More Examples in the ENVISubsetRaster help topic for an example of converting to map coordinates when you only know latitude and longitude coordinates.
Alternatively, use the GeographicSubsetRaster task to subset data by geographic location. This option is useful when writing image-processing scripts that will be published as web services, using ENVI Services Engine (ESE).
Save Rasters to Disk
After creating a spatial subset, doing some image processing, or updating metadata on a raster, you may want to save the results to disk. Use the ENVIRaster::Export method.
The following example exports the first band of a four-band raster to a new file in GeoTIFF format:
e = ENVI()
File = FILEPATH('qb_boulder_msi', ROOT_DIR=e.ROOT_DIR, $
SUBDIRECTORY = ['data'])
Raster = e.OpenRaster(file)
SubRaster = ENVISubsetRaster(Raster, BANDS=0)
SubRaster.Export, 'C:\Data\Band1Subset.tif', 'TIFF'
When calling the Export method, you must supply a URI argument. URI stands for Uniform Resource Identifier, and it is a string with a direct URL or UNC path where you want to save the raster. (See Access Data Files above for example paths.) The above example saved the file to the C:\Data directory on a Windows system.
Another option is to save the resulting raster to the directory specified in the ENVI Temporary Directory preference setting. Use the ENVI::GetTemporaryFilename method to get a new, unique filename in that directory, then save the resulting raster using that filename.
e = ENVI()
File = FILEPATH('qb_boulder_msi', ROOT_DIR=e.ROOT_DIR, $
SUBDIRECTORY = ['data'])
Raster = e.OpenRaster(file)
TempFile = e.GetTemporaryFilename('tif')
SubRaster = ENVISubsetRaster(Raster, BANDS=0)
SubRaster.Export, TempFile, 'TIFF'
The temporary filename is of the form envitempfile<date><random number>.<extension>.
For ENVITasks, the temporary filename is of the form <task name>_<parameter name>_<date><random number>.<extension>.
Using ENVI::GetTemporaryFilename is a convenient option when you want to save intermediate processing results to disk. However, the ENVI API was designed so that intermediate results can be passed from one raster to another without any user intervention. This is the concept of a virtual raster. See the Virtual Rasters topic for more information.
View Raster Pixel State
ENVIRasters contain information about the state of every pixel for each band. Use the PIXEL_STATE keyword on ENVIRaster::GetData or ENVIRasterIterator::GetData to get this information. You cannot query or view the pixel state using the Cursor Value tool; it is stored as a property of the image, which you can only access programmatically.
PIXEL_STATE is returned as a byte array with the same dimensions as the pixel data. Each value in the array is a bitmask. Bitmasks are used to store multiple independent bits of information as one value.
PIXEL_STATE has three bits of information to determine if you want to use the corresponding pixel value in calculation:
- 1: No Data (Data Ignore Value, NaN, Inf for floating point rasters)
- 2: Mask
- 4: Outside of ROI
The PIXEL_STATE value for a pixel could be any combination of the above bits:
- 0 = Good Pixel
- 1 = No Data
- 2 = Mask
- 3 = No Data + Mask
- 4 = Outside of ROI
- 5 = No Data + Outside of ROI
- 6 = Mask + Outside of ROI
- 7 = No Data + Mask + Outside of ROI
Why should you be concerned with the pixel state of a raster? The following section shows an example.
Example
Taking into account pixel state is important, especially when calculating image statistics or doing image processing on masked rasters.
Here is an example. The following masks out all pixels in a panchromatic image with values greater than or equal to 550.
e = ENVI()
file = FILEPATH('qb_boulder_pan', ROOT_DIR=e.ROOT_DIR, $
SUBDIRECTORY = ['data'])
raster = e.OpenRaster(file)
mask = (raster.GetData(BAND=0) GE 550)
file = e.GetTemporaryFilename()
maskRaster = ENVIRaster(mask, URI=file)
maskRaster.Save
maskedRaster = ENVIMaskRaster(raster, maskRaster)
origData = raster.GetData(BAND=0)
Print, 'Original raster minimum value:', Min(origData)
Print, 'Original raster maximum value:', Max(origData)
Print, 'Original raster standard deviation:', StDev(origData)
Result:
Original raster minimum value: 151
Original raster maximum value: 2047
Original raster standard deviation: 146.229
Now suppose that you want to compute statistics from the masked raster:
maskedData = maskedRaster.GetData(BAND=0)
This is not the correct way to get statistics because it includes all pixels in the image, even the masked pixels which have values of 0. So this would skew the statistics.
Here is the correct way to calculate statistics from the masked raster, taking into account the pixel state:
maskedData = maskedRaster.GetData(BAND=0, PIXEL_STATE=pixelState)
pos = WHERE(pixelState EQ 0, count)
IF (count NE N_Elements(maskedData)) THEN $
maskedData = maskedData[pos]
Print, 'Masked raster minimum value:', Min(maskedData)
Print, 'Masked raster maximum value:', Max(maskedData)
Print, 'Masked raster standard deviation:', StDev(maskedData)
Result:
Masked raster minimum value: 550
Masked raster maximum value: 2047
Masked raster standard deviation: 84.1160
Notice how the minimum value is 550, which was the threshold value we used to create the mask originally.
To learn more about masked rasters, see the Masks topic.