The XVOLUME procedure is a utility for viewing and interactively manipulating volumes and isosurfaces. The utility provides a graphical interface for manipulating the volume orientation, adjusting the color table and opacity, viewing image planes and contours, and adjusting the color, opacity, and threshold value of an isosurface.
This routine is written in the IDL language. Its source code can be found in the file xvolume.pro in the lib/utilities subdirectory of the IDL distribution.
Tip: The XVOLUME_ROTATE and XVOLUME_WRITE_IMAGE procedures, which can be called only after a call to XVOLUME, can be used to easily create animations of volumes and isosurfaces displayed in XVOLUME. See XVOLUME_ROTATE for an example.
Note: IDL converts and stores volume data in a BYTE array. Thus, all incoming volume data is converted to BYTE type. This could alter the volume data values if the incoming data cannot accurately be stored as BYTE data.
Using XVOLUME
XVOLUME displays a resizeable top-level base with a toolbar, a menu, a graphical interface for controlling volume and isosurface properties, and a draw widget for displaying and manipulating the volume.
The XVOLUME Toolbar
The XVOLUME toolbar contains the following buttons.
Note: If you have the Auto-Render option selected, the Rotate, Zoom, and Pan features may be more difficult to use. For the best performance while manipulating the orientation of a volume using these features, uncheck the Auto-Render option.
|
Button |
Tool Name |
Function |
|

|
Reset
|
Resets rotation, scaling, and panning.
|
|

|
Rotate
|
Click the left mouse button on the object and drag to rotate.
|
|

|
Pan
|
Click the left mouse button on the object and drag to pan.
|
|

|
Zoom
|
Click the left mouse button on the object and drag to zoom in or out.
|
|

|
Select
|
Click on the object. The name of the selected object is displayed, if the object has a name, otherwise its class is displayed.
|
The XVOLUME Interface
The XVOLUME interface provides the following elements for controlling the display of image planes and contours, volumes, and isosurfaces:
Image Planes and Contours
Image planes and contours allow you to visualize the values associated with the volume or isosurface at a specified X, Y, or Z plane.
- Image Planes: Select one of the following options from the drop-down list for each dimension to control the display of image planes:
- Off: Turns off the image plane display.
- Opaque: Displays an opaque image plane at the location specified by the corresponding plane slider.
- Transparent: Displays a transparent image plane at the location specified by the corresponding plane slider. The transparency value of the plane is taken from the volume at the current location of the image plane.
- Contours: Check this option to display contours on the specified plane at the location specified by corresponding the plane slider.
- Plane Sliders: Move these sliders to change the position of the plane in each dimension.
Volume
- Color and Opacity: Click this button to change the color and/or opacity of the current volume. This opens a CW_PALETTE_EDITOR dialog, which is a compound widget used to edit color palettes. See CW_PALETTE_EDITOR for more information.
- Auto-Render: Select this option to have rendering executed automatically after each change you make to the volume. If Auto-Render is unchecked, you must manually click the Render button to see changes you have made to the volume. If Auto-Render is checked, the Render button will be grayed out.
- Render: Click on this button to execute rendering computations and display the current volume. If Auto-Render is checked, this button will be grayed out.
Isosurface
An isosurface is a 3-D surface on which the data values are constant along the entire surface. Use the following elements to control the appearance of the isosurface:
- Color: Click this button to change the color system and/or values for the current isosurface. This opens a CW_RGBSLIDER dialog, which is a compound widget that provides a drop-down list for selecting the RGB, CMY, HSV, or HLS color system, and three sliders for adjusting the values associated with each color system.
- Isosurface Off: Select this option to turn off the isosurface display.
- Opaque Isosurface: Select this option to display an opaque isosurface.
- Semi-transparent Isosurface: Select this option to display a semi-transparent isosurface.
- Level: Use this slider to adjust the threshold value of the isosurface.
Syntax
XVOLUME, Vol, [, /BLOCK] [, GROUP=widget_id] [, /INTERPOLATE] [, /MODAL] [, RENDERER={0 | 1}] [, /REPLACE] [, SCALE=value] [, /TEST] [, XSIZE=pixels] [, YSIZE=pixels]
Arguments
Vol
A 3-dimensional array of the form [x, y, z] that specifies a data volume.
Keywords
BLOCK
Set this keyword to have XMANAGER block when this application is registered. By default, BLOCK is set equal to zero, providing access to the command line if active command line processing is available. Note that setting the BLOCK keyword causes all widget applications to block, not just this application. For more information, see the documentation for the NO_BLOCK keyword to XMANAGER.
Note: Only the outermost call to XMANAGER can block. Therefore, to have XVOLUME block, any earlier calls to XMANAGER must have been called with the NO_BLOCK keyword. See the documentation for the NO_BLOCK keyword to XMANAGER for an example.
GROUP
Set this keyword to the widget ID of the widget that calls XVOLUME. When this keyword is specified, the death of the caller results in the death of XVOLUME.
INTERPOLATE
Set this keyword to indicate that trilinear interpolation is to be used when rendering the volume and the image planes. Setting this keyword improves the quality of images produced, at the cost of more computing time, especially when the volume has low resolution with respect to the size of the viewing plane. Nearest neighbor sampling is used by default.
MODAL
Set this keyword to block processing of events from other widgets until the user quits XVOLUME. The MODAL keyword does not require a group leader to be specified. If no group leader is specified, and the MODAL keyword is set, XVOLUME fabricates an invisible group leader for you.
Note: To be modal, XVOLUME does not require that its caller specify a group leader. This is unlike other IDL widget procedures such as XLOADCT, which, to be modal, do require that their caller specify a group leader. These other procedures were implemented this way to encourage the caller to create a modal widget that will be well-behaved with respect to layering and iconizing. (See "Iconizing, Layering, and Destroying Groups of Top-Level Bases for more information.)
To provide a simple means of invoking XVOLUME as a modal widget in applications that contain no other widgets, XVOLUME can be invoked as MODAL without specifying a group leader, in which case XVOLUME fabricates an invisible group leader for you. For applications that contain multiple widgets, however, it is good programming practice to supply an appropriate group leader when invoking XVOLUME, /MODAL. As with other IDL widget procedures with names prefixed with “X”, specify the group leader via the GROUP keyword.
RENDERER
Set this keyword to an integer value indicating which graphics renderer to use when drawing objects within the window. Valid values are:
- 0 = Platform native OpenGL (the default)
- 1 = IDL’s software implementation
REPLACE
If this keyword is set, and there is a current instance of XVOLUME running, the volume displayed in XVOLUME is replaced with the volume specified by Vol. For example, display volume1 using the command
XVOLUME, volume1
To replace volume1 with volume2, you would use the command
XVOLUME, volume2, /REPLACE
SCALE
Set this keyword to the zoom factor for the initial view. The default is 1/SQRT(3). This default value provides the largest possible view of the volume, while ensuring that no portion of the volume will be clipped by the XVOLUME window, regardless of the volume’s orientation.
When using the SCALE keyword for XVOLUME, you can scale with a 3-element array of values [x, y, z].
TEST
If set, the Vol argument is not required (and is ignored if provided). A volume of random numbers is displayed instead. This allows you to test code that uses XVOLUME without having to specify volume data.
XSIZE
The width of the drawable area in pixels.
YSIZE
The height of the drawable area in pixels.
Examples
Create a volume and display using XVOLUME:
vol = BYTSCL(RANDOMU((SEED=0),5,5,5))
vol = CONGRID(vol, 30,30,30)
XVOLUME, vol
Displaying Volumes Using XVOLUME
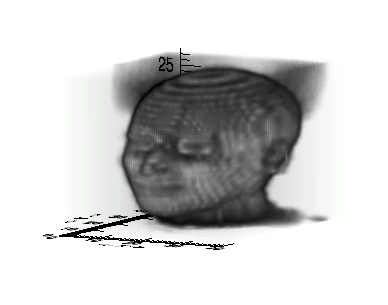
Unlike SLICER3, the IDL Object Graphics procedure, XVOLUME, allows you to interactively manipulate 3D volumes and isosurfaces. While the following example requires more processing time to display the same data (head.dat) as that previously displayed with SLICER3, remember that the output is not the same. The XVOLUME example is rendering an opaque volume of the data set whereas the previous SLICER3 example displayed an isosurface. Although Object Graphics display methods can require more processing time, they also offer significant advantages including greater interactivity, true volume rendering with the ability to specify opacities, and finer control over image and volumetric data.
Complete the following steps to load the head.dat volume into the XVOLUME application.
See displayxvolume.pro in the examples/doc/image subdirectory of the IDL installation directory for code that duplicates this example. Run the example procedure by entering displayxvolume at the IDL command prompt or view the file in an IDL Editor window by entering .EDIT displayxvolume.pro.
-
Select the file and read in the data, specifying known data dimensions:
file = FILEPATH('head.dat', SUBDIRECTORY=['examples','data'])
volume = READ_BINARY(file, DATA_DIMS = [80, 100, 57])
-
Reduce the size of the original array to speed up processing:
smallVol = CONGRID(volume, 40, 50, 27)
-
Using the INTERPOLATE keyword to smooth the data, display the volume using the XVOLUME procedure:
XVOLUME, smallVol, /INTERPOLATE
After the data is passed to the XVOLUME application, an image similar to the following figure appears.
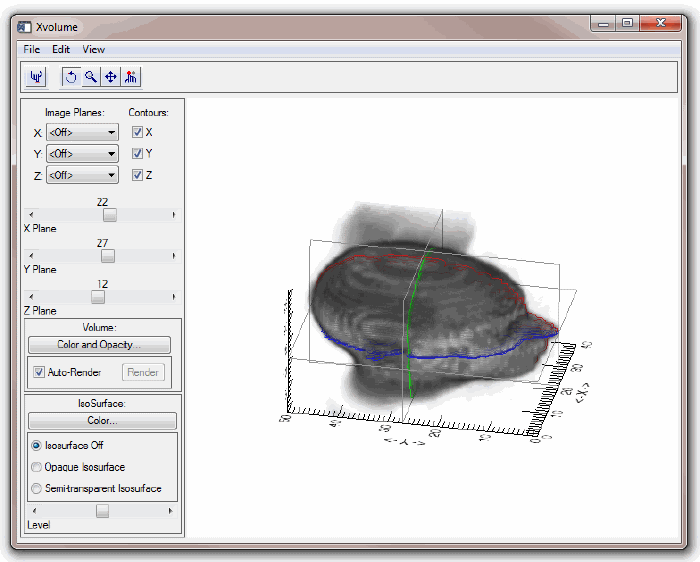
Manipulating Volumetric Data Using XVOLUME
Once data has been loaded into the XVOLUME application, you can create color coded contoured slices of data. Complete the following steps to create x-, y- and z‑dimensional contours of the head.dat volume.
- Rotate the image of the head so that the nose is facing toward the right. Click in the display window and, with your mouse button depressed, drag the mouse cursor to reposition the image display.
-
Select the X, Y, and Z “Contours” options, located on the upper-left portion of the XVOLUME interface.
Note: Turning off the XVOLUME “Auto-Render” feature produces faster responses to processing requests.
- Move the X Plane slider to a value of 22. A contour line appears in the display window, running down the center of the image of the head. When you click in the display window, the planar slice is visible.
- Move the Y Plane slider to a value of 27. A contour line appears along the middle of the y-dimension.
- Move the Z Plane slider to a value of 12. Another contour line appears near the middle of the z-dimension.
The XVOLUME interface should appear similar to the following figure.
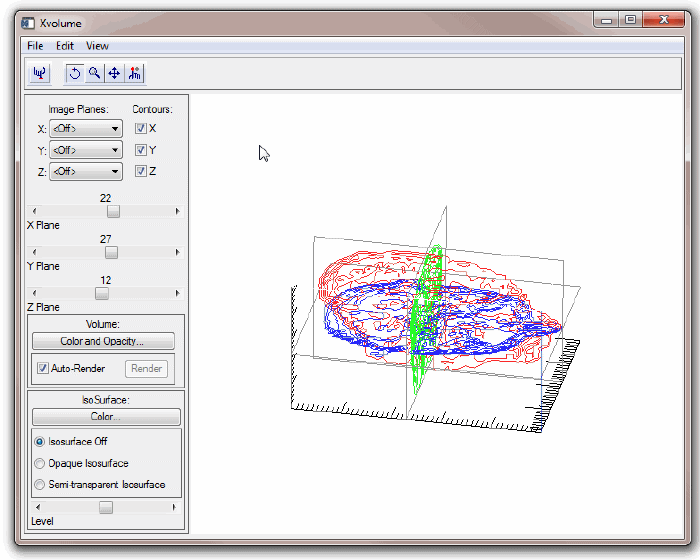
Click in the image display window to show the contour lines.
Tip: After a volumetric array has been loaded into the XVOLUME application, it can be animated using the XVOLUME_ROTATE procedure. To rotate the image above, run the example program for XVOLUME_ROTATE.
Version History
See Also
XVOLUME_ROTATE, XVOLUME_WRITE_IMAGE, IDLgrVolume, INTERPOLATE, ISOSURFACE