The READ_BINARY function reads the contents of a binary file using a passed template or basic command line keywords. Data is read from the given filename or from the current file position in the open file pointed to by FileUnit. If no template is provided, keywords can be used to read a single IDL array of data.
Examples
The following reads the data in a binary file, head.data, and passes the data to a volume display:
file = FILEPATH('head.dat', SUBDIR=['examples', 'data'])
vHeadData = READ_BINARY(file, DATA_DIMS=[80,100,57])
v = volume(vHeadData)
Syntax
Result = READ_BINARY ([Filename] | FileUnit [, TEMPLATE=template] [, DATA_START=value] [, DATA_TYPE=typecodes] [, DATA_DIMS=array] [, ENDIAN=string] [, /FLOAT16] )
Return Value
The result is an array or anonymous structure containing all of the entities read from the file.
Arguments
Filename
A scalar string containing the name of the binary file to read. If filename and file unit are not specified, a dialog allows the user to choose a file.
FileUnit
A scalar containing an open IDL file unit number to read from.
Keywords
DATA_DIMS
Set this keyword to a scalar or array of up to eight elements specifying the size of the data to be read and returned. For example, DATA_DIMS=[512,512] specifies that a two-dimensional, 512 by 512 array be read and returned. DATA_DIMS=0 specifies that a single, scalar value be read and returned. Default is -1, which, if a TEMPLATE is not supplied that specifies otherwise, indicates that READ_BINARY will read to end-of-file and store the result in a 1-D array.
DATA_START
Set this keyword to specify where to begin reading in a file. This value is as an offset, in bytes, that will be applied to the initial position in the file. The default is 0.
DATA_TYPE
Set this keyword to an integer giving the IDL typecode of the data to be read. See documentation for the SIZE function for a listing of typecodes. Default is 1 (IDL’s BYTE typecode). Possible values are:
|
Data_Type |
Data Type |
|
0 |
Undefined |
|
1 |
Byte |
|
2 |
Integer |
|
3 |
Longword integer
|
|
4 |
Floating point |
|
5 |
Double-precision floating
|
|
6 |
Complex floating
|
|
7 |
String |
|
8 |
Structure |
|
9 |
Double-precision complex
|
|
10 |
Pointer |
|
11 |
Object reference
|
|
12 |
Unsigned Integer
|
|
13 |
Unsigned Longword Integer
|
|
14 |
64-bit Integer |
|
15 |
Unsigned 64-bit Integer
|
ENDIAN
Set this keyword to one of three string values: “big”, “little” or “native” which specifies the byte ordering of the file to be read. If the computer running READ_BINARY uses byte ordering that is different than that of the file, READ_BINARY will swap the order of bytes in multi-byte data types read from the file. (Default: “native” = perform no byte swapping.)
FLOAT16
Set this keyword to treat the input data as 16-bit "half-precision" numbers. The data is assumed to be in IEEE 754 binary16/float16 format. If this keyword is set then the DATA_TYPE keyword is ignored. Once the data is read in, it will automatically be converted using the FLOAT16_DECODE function, and an array of 32-bit floating-point numbers will be returned.
TEMPLATE
Set this keyword to a template structure (created using the BINARY_TEMPLATE function) describing the file to be read. The TEMPLATE keyword cannot be used simultaneously with keywords DATA_START, DATA_TYPE, DATA_DIMS, or ENDIAN.
When a template is used with READ_BINARY, the return value is a structure containing fields specified by the template. If a template is not used, the return value is an array.
Additional Examples
Reading in a float16/binary16 data file
First construct a binary file containing every possible binary16/float16 number:
openw, lun, 'myfloat16.dat', /get_lun
writeu, lun, uindgen(65536)
free_lun, lun
Now read in those numbers as 16-bit "half-precision" binary16 numbers, automatically converting them to 32-bit floats:
data = read_binary('myfloat16.dat', /float16)
help, data
print, data[[0, 1, 0x8001, 0x3ff, 0x3c00, 0xbc00, 0x7bff, 0x7c00, 0xfc00, 0x7fff]]
IDL prints:
DATA FLOAT = Array[65536]
0.00000 5.96046e-08 -5.96046e-08 6.09756e-05 1.00000 -1.00000 65504.0 Inf -Inf NaN
Tip: If you wanted to save the data back out as float16, you could use the FLOAT16_ENCODE function to convert the 32-bit floats back to 16-bit unsigned integers.
Working with a Binary Data Structure
The following example returns a structure containing the data in the surface.dat file, found in the examples/data subdirectory of the IDL installation directory.
Enter the following statement at the IDL command line to open the Binary Template dialog:
sTemplate = BINARY_TEMPLATE()
Complete the steps described in Using the BINARY_TEMPLATE Interface to define the format of the data.
Use READ_BINARY to access the data using the template, and then display it as a surface:
data = READ_BINARY(FILEPATH('surface.dat', $
   SUBDIRECTORY=['examples', 'data']), TEMPLATE = sTemplate)
s = surface(data.marbells)
Tip: Use the help command to display the sTemplate and data structures.
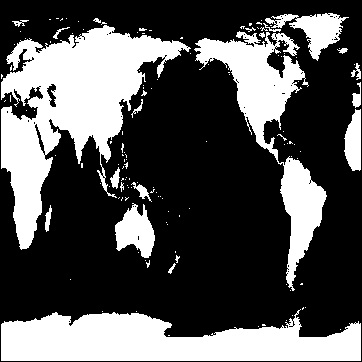
Displaying Binary Images
Binary images are composed of pixels having one of two values, usually zero or one. With most color tables, pixels having values of zero or one are displayed with almost the same color, such as with a the default grayscale color table. Thus, a binary image is usually scaled to display the zeros as black and the ones as white.
The following example imports a binary image of the world from the continent_mask.dat binary file. In this image, the oceans are zeros (black) and the continents are ones (white). This type of image can be used to mask out data over the oceans. The image contains byte data values and is 360 pixels by 360 pixels. The data is then displayed by scaling the values from 0 (off) to 255 (on).
file = FILEPATH('continent_mask.dat', SUBDIRECTORY = ['examples', 'data'])
data = READ_BINARY(file, DATA_DIMS = [360, 360])
i = image(data * 255)
Displaying a Grayscale Binary Image
Features within grayscale images are created by pixels that have varying intensities. Pixel values range from least intense (black) to the most instance (white). Since a grayscale image is composed of pixels of varying intensities, it is best displayed with a color table that progresses linearly from black to white. The following example imports a grayscale image from the convec.dat binary file. This grayscale image shows the convection of the Earth’s mantle. The image contains byte data values and is 248 pixels by 248 pixels. Since the data type is byte, this image does not need to be scaled before display. If the data was of any type other than byte and the data values were not within the range from 0 to 255, the image would need to be scaled prior to being displayed.
file = FILEPATH('convec.dat', SUBDIRECTORY = ['examples', 'data'])
data = READ_BINARY(file, DATA_DIMS = [248, 248])
i = image(data)

Version History
|
5.3 |
Introduced |
| 9.1 |
Added FLOAT16 keyword
|
See Also
BINARY_TEMPLATE, FLOAT16_DECODE, FLOAT16_ENCODE