Select Output Parameters
This tool requires a separate license for the ENVI Photogrammetry Module; contact your sales representative for more information.
Follow these steps to select an output filename, format, pixel size, and projection for the orthorectified product, and to preview the result before creating an output file.
- In the Enter Output Filename field, select an output location and rootname for the output. ENVI will create a GeoTIFF file or band-interleaved-by-line (BIL) raster file in ENVI format, along with an output summary text file that lists the data used in the project.
- From the File Format drop-down list, select GeoTIFF or ENVI for the output image. If you reproject a BigTIFF file, the output will be in ENVI format.
- Select the Auto Color Adjust option to perform automatic color and contrast adjustment in the output mosaic. Spacemetric developed the underlying method, which uses a least-squares adjustment to ensure radiometric consistency among the scenes that comprise the mosaic. Results will vary when running the same workflow more than once because the color adjustment is based on a randomized statistical calculation.
- Enter an output Pixel Size (m), and press Enter. The projection information in the Output Parameters panel updates to show your changes. Pixels in orthorectified output are square, so this value is used for both the x and y dimensions of the pixel. By default, the pixel size is set to the smallest pixel size of the input images. The pixel size is always based on the initial UTM projection used in the workflow. A larger pixel size will result in a lower resolution image with faster processing time, while the default pizel size will result in the highest resolution image with slower processing time.
- Set the output projection.
- The Preview button allows you to create a reduced-resolution version of the orthorectified product so that you can look for potential problems before creating the full-resolution product. When you click Preview, ENVI performs orthorectification, creates the reduced-resolution mosaic, adds the mosaic to the Layer Manager, and automatically loads it into a new display group. The reduced-resolution mosaic is georeferenced to UTM WGS-84 and shows you the results of your cutline selection, auto color adjustment (if you previously selected the Auto Color Adjust option), and overall appearance of the final product. You can also use the reduced-resolution mosaic to check geolocation accuracy of the orthorectified product before creating a full-resolution version.
- If you are satisfied with the preview results, you can choose to display the output by selecting Display Result on Finish. When processing is complete (after you click Finish), the Wizard closes and the orthorectified output image loads into a new display group.
- Click Finish to create the orthorectified product.
Set the Output Projection
The Post Processing Reprojection section of the Output Parameters step allows you to change the projection of the base image. The base image is defined as the orthorectified image before any post-processing occurs. It always has a UTM WGS-84 projection with a square pixel size set in the Model Grid Output section of the Output Parameters step. By default, the base image is not reprojected.
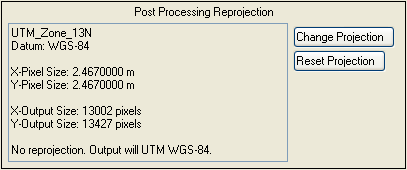
The current output projection is shown at the top. The default projection in the example is shown as follows:
UTM_Zone_13N
Datum: WGS-84
The UTM zone number will vary, depending on the geographic location.
By default, the initial projection pixel size is the same (when viewed in meters) as the pixel size of the base output image. To change the projected pixel size and output number of pixels, follow these steps:
- Click Change Projection. The Convert Map Projection Parameters dialog appears.
- The X/Y Pixel Size fields indicate the projected pixel size in the standard units of that projection type. The Output X/Y Size fields indicate the output image size in pixels (by default). Change these values as needed, and press Enter. For best results, the projection pixel size should be greater than or equal to the base output pixel size.
- Click OK in the Convert Map Projection Parameters dialog. The new projection information is shown in the Post Processing Reprojection section.
- To reset the orthorectified image to the default UTM projection and minimum pixel size of the input images, click Reset Projection in the Output Parameters step.