In this step, you optionally define which areas between two or more overlapping images that you want to appear in the final output. With each input image, you perform two steps: (1) define the hierarchy of the image relative to the others, and (2) define an optional cutline for the image.
This tool requires a separate license for the ENVI Photogrammetry Module; contact your sales representative for more information.
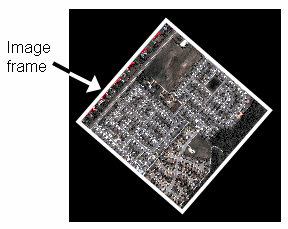
You may choose to bypass this step by clicking Next. If you do not specify a cutline for a given image, ENVI uses the image frame by default. The image frame is the area of usable data within an image, excluding any background pixels.
You can only define one cutline per image, but they can be complex inclusion polygons encompassing detailed paths across the entire image.
Set the Image Order
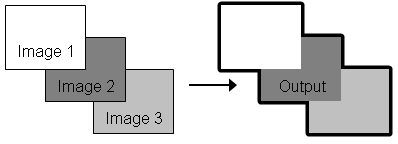
Use the Image order list to define how multiple images are ordered in the final output. This list is populated with the image filenames you added to the workflow. The image at the top of the list will be ordered first, followed by the second image, and so forth. Image ordering only pertains to areas of overlap between two or more images. The following figure shows an example.
Follow these steps to reorder images:
- Click Reorder. The Reorder Input Images dialog appears.
- Click-and-drag image filenames in the preferred order.
- Click OK. The Image Order list updates to show the new hierarchy.
You can also set the image order in the Layout Manager, as described in Layout View Area.
Draw Cutlines
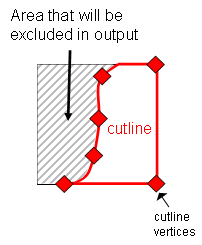
Cutlines are polygons that are used in combination with image ordering to define areas that you want to keep in the final output. They are typically used to hide seams in the final mosaic or to exclude poor quality regions and instead use higher quality regions that are lower in the image stack. A cutline is an inclusion polygon, similar to a cookie cutter applied to one or more images. Cutlines are often defined by drawing a line along a geographic feature such as a river or street, and snapping to the nearest image edges or corners to define a polygon. The following example shows a cutline for a single image:
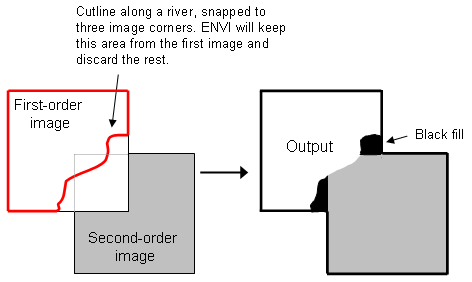
Following is an example of applying a cutline to the first-order (top-most) image when you have multiple images:
If you do not specify a cutline for a given image, ENVI uses the image frame by default. The image frame is the area of usable data within an image, excluding any background pixels:
Follow these steps to define cutlines:
- From the Active Image list, select an image that the cutline will apply to. Or, Shift-click on an image boundary in the Layout Manager to select an active image; it is shown with a red border. ENVI loads the corresponding display group.
- Click the
 button. A new cutline name is added to the Cutlines list.
- In the Layout Manager, enable the Cutline option to view cutlines.
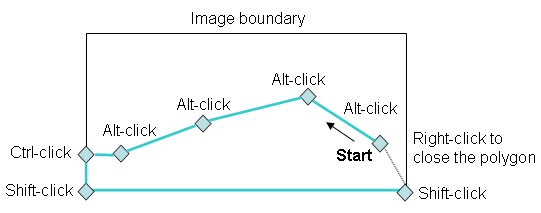
In the Scroll window of the ENVI display group, draw a cutline using Alt-click to define the vertices. Use Ctrl-click to snap to the nearest image edge. Use Shift-click to snap to the nearest corner. Click the middle mouse button (if available) to delete the last vertex. Right-click to close the polygon. The cutline is shown in the Layout Manager. You can only add one cutline per image. Following is an example:
A suggested method is to draw the cutline in the Scroll window of the display group because you can see the entire image. However, if you need to more precisely draw a line along a geographic feature, you can follow these steps:
- Click to center the Image window over a specific location.
- Add vertices (Alt-click) for your cutline in the Image window.
- Use Ctrl-click and Shift-click to snap to the nearest edge and corner, respectively. Right-click in the Scroll window to to close the cutline polygon.
- To remove a cutline, select the cutline name from the Cutlines list and click the
 button.
- To change the default color of cutlines as they appear in the display group, click the Set cutline color button
 . The Point Color dialog appears. Left-click to cycle through various colors, or right-click to select a specific color.
- If the active image is intially displayed as a grayscale image in the display group, you can click the MB button in the ENVI Orthorectification Wizard to display a multispectral image of Bands 3, 2, and 1. Click the MB button again to display a grayscale image. See Selecting Bands.
- Restoring a project during Step 4 (cutline selection) means that all GCPs and tie points will be turned on by default. See Save and Restore Projects for more information.
- When you are done drawing cutlines, click Next in the ENVI Orthorectification Wizard.
Next Steps
Proceed to Select Output Parameters.