This topic describes how to label features of interest with rectangle annotations, for training object detection models.
Use the Deep Learning Labeling Tool to define your output classes and to manage project files, annotations, and training rasters. It automatically creates object detection rasters once you define a set of annotations for each training raster. The object detection rasters are automatically passed to the training step. You do not have to take any extra steps to build object detection rasters.
See the following sections:
Start the Labeling Tool
Choose one of the following options to start the Labeling Tool:
-
In the ENVI Toolbox, select Deep Learning > Deep Learning Labeling Tool.
-
In the Deep Learning Guide Map, click this button sequence in the first panel: Object Detection > Train a New Object Model > Label Rasters.
Set Up a Deep Learning Project
Projects help you organize all of the files associated with the labeling process, including training rasters and annotations. They also keep track of class names and the values you specify for training parameters.
Define Classes
Use the Class Definitions section of the Labeling Tool to define the features you will label. The feature names determine the class names in the output classification image.
- Click the Add button
 in the lower-left corner of the Class Definitions section.
- Enter a Name for the first feature that you will label, then click the
 button. The feature is added to the Class Definitions list.
- Optional: Click in the Color column to change the color of the class.
- If you will be extracting multiple features, repeat Steps 1-3 as needed for additional classes/features.
Next, you will select the rasters to use for training.
Add Training Rasters
- Click the Add button
 below the Rasters section of the Labeling Tool. The Data Selection dialog appears.
- Select one or more training rasters and click OK.
- All training rasters must have the same number of bands. If one image has a different number of bands than the others, you can select that image in the Data Selection dialog and click the Spectral Subset button, then select the appropriate number of bands.
- To use pre-trained model weights for object detection, click the Spectral Subset button and select three bands for input. The benefit of pre-trained weights is faster training time and having a rigorously-tested set of parameters that are ideal for object detection. If you do not spectrally subset the training rasters, all bands will be used, and the model will use randomly initialized weights.
- The training rasters are listed in the Rasters section.
- To remove all training rasters, click the Select All button
 , then the Remove Selected button
  .
.
- Optional: Select a training raster and click the Rename Selected button
 to provide a name that is more meaningful than its filename. You can only rename one raster at a time.
Now you are ready to label the features in your training rasters using rectangle annotations.
Draw Rectangles
For each training raster, the "Classes" column shows the fraction of classes/features drawn to the total number of classes. Follow these steps to draw rectangle annotations around features.
-
Select a training raster from the list and click the Draw button  . The training raster is displayed.
-
To the right of the Draw button is a drop-down list with the classes you have defined. Select the class to label. The cursor changes to a crosshair symbol.
-
Click and drag the cursor to draw a box around a feature for the specified class. Here are some drawing tips:
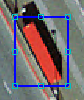
- When features are displayed at an angle, you do not have to rotate the image to make them horizontal or vertical. Keep the rotation angle at 0 degrees and draw rectangles around the entire rotated object; for example:
- Use the cyan-colored selection handles to resize the rectangle.
- To accept a rectangle that has been drawn, click outside of it. The selection handles disappear.
- To delete a rectangle that you just drew (with the selection handles visible), press the Del key on your keyboard. Or, click the Undo button in the ENVI toolbar to undo the last object drawn.
- To delete an existing rectangle, click the Select button
 in the ENVI toolbar. Select the rectangle. When the selection handles appear, press the Del key.
- To delete all rectangles for a given class, select the class name in the Class Definitions tab. Then click the Remove Selected Labels button.
- To label features for a different class, select that class in the Class Definitions tab.
- Draw rectangles around as many examples of the feature as possible within the training raster. For the most accurate results with object detection, try to label several hundred examples.
- To use a different training raster for drawing, select its name in the Labeling Tool and click the Draw button.
- Continue labeling the image in this manner for each feature/class. Your progress is automatically saved to the current project, even if you close the Labeling Tool.
Note: The Labeling Tool synchronizes the names and colors of classes and their associated annotations. Do not change the names and colors of annotations outside of the Labeling Tool.
Optional: Import Annotations
Use the Import Annotations option to import rectangle annotations created in one project into a new project so that you do not have to redraw them in the new project.
Note: The Import Vectors option is disabled for Object Detection projects. It only applies to Pixel Segmentation projects.
Follow these steps:
- Define classes, as described earlier.
- Add training rasters, as described earlier.
- In the Deep Learning Labeling Tool, select the training raster for which you want to import an annotation file.
- In the Deep Learning Labeling Tool, click the Options button
 and select Import Annotations. The Select Annotation Filename dialog appears.
- Navigate to a deep learning project directory for which you previously labeled training rasters with rectangle annotations. Within this directory is a subdirectory containing the label rasters. Select the annotation file named annotations.anz in this subdirectory, and click Open. The Match Input Annotations to Class Definitions dialog appears. The Input Annotations list on the left side of the dialog shows the input annotation classes.
- Click on an item in the Input Annotations list, then click on the matching class in the Class Definitions list. A line is drawn between the two items. Repeat this step with the remaining classes.
- Click OK. The annotations are imported into the deep learning project.
Optional: View Project and Labeling Statistics
Click the Options drop-down list and select Show Labeling Statistics to view information about the current project and number of labels.
The top of the Project Statistics dialog provides general information about the project, including:
- Project name and location
- Project type: Object Detection
- Number of classes and their names
- Number of bands in each training raster (this should be the same for all training rasters)
- Number of training rasters
- Number of rectangles drawn for each class
To save the project statistics to a text file, click the Save button  in the Project Statistics dialog. Then select a location to save the text file. The default filename is report.txt.
To copy the project statistics to your system's clipboard, click the Copy button  in the Project Statistics dialog.
Optional: Create Label Rasters Without Training
You can create object detection rasters (also called label rasters) without proceeding with training. To do this, click the Options drop-down list and select Generate Label Rasters. ENVI automatically creates object detection rasters for training and populates the "Label Raster" column with "OK" for each training raster.
See Also
Object Detection Overview, Deep Learning Object Classification