ENVI Deep Learning includes two pre-built models that you can run in the ENVI Modeler. The ENVI Modeler is a visual programming tool that lets you build custom data-processing workflows in ENVI. Refer to the Visual Programming with the ENVI Modeler topic in ENVI Help for more information.
Note: The pre-built "models" described here are not deep learning models but rather model files that work with the ENVI Modeler.
You can access the pre-built models from the Tools menu in the Deep Learning Guide Map. One model provides a simple workflow for training a deep learning model, and the other generates random values for various training parameters. Follow the instructions below.
Train a Deep Learning Model
The model file named Deep_Learning_Tutorial.model trains a deep learning model to find multiple features. It prompts you for an input training raster and ROI file and uses them to train a deep learning model. It classifies the input raster using the trained model. This sample model provides a way to run through all of the steps at once in ENVI Deep Learning without having to select and run tools separately.
- In the ENVI Toolbox, select Deep Learning > Deep Learning Guide Map.
-
From the Deep Learning Guide Map menu bar, select Tools > Train a Deep Learning Model Using the ENVI Modeler. The ENVI Modeler window appears with the Deep_Learning_Tutorial model displayed.

-
Each yellow node in the model is based on a specific ENVITask. In this case, the model will run the following tasks:
- Build Deep Learning Raster
- Build Label Raster from ROI
- Train Deep Learning Pixel Model
- Deep Learning Pixel Classification
- Click the
 button in any of the task nodes to view the parameters for that task. Change the values of parameters as desired.
- Click the Run button in the ENVI Modeler. The Input Parameters dialog appears.
- In the Input Raster field, select a training raster.
- In the Input ROI field, select an ROI file (.xml) that contains labeled examples of the features you are interested in.
- In the Number of Classes field, enter the number of output features/classes.
- Click OK.
The model runs for several minutes. When it is finished, the resulting classification raster is displayed in the Image window and added to the Data Manager.
Randomize Training Parameters
An ENVI Modeler file named Deep_Learning_Randomize_Training.model is provided that runs ENVI Deep Learning multiple times, each with a different set of randomized training parameters. It accepts an input deep learning model and training and validation rasters. Each training run produces a new deep learning model, which is used to classify an image. Each result is displayed separately so that you can decide which training run produced the best deep learning model. Running this ENVI Modeler model file provides an effective way to train a deep learning model when you are not familiar with the optimal training parameter values to use for your data.
- In the ENVI Toolbox, select Deep Learning > Deep Learning Guide Map.
- From the Deep Learning Guide Map menu bar, select Tools > Randomize Training Parameters Using the ENVI Modeler. The ENVI Modeler window appears with the Deep_Learning_Randomize_Training model displayed.
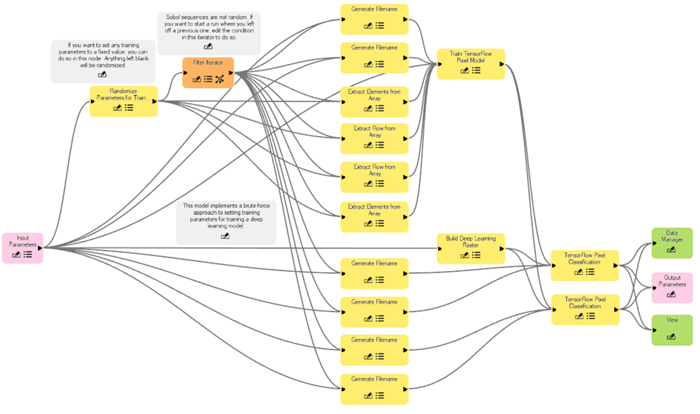
Each yellow node in the model is based on a specific ENVITask. The gray nodes provide tips on using and modifying the model.
- Optional: You can set how much "randomness" the model will employ for training parameters. Click the button in the Randomize Parameters for Training node. In the Randomize Parameters dialog, select an option from the Method drop-down lists:
- Sobol Sequence (default): This option ensures an even distribution over the parameter space with local perturbations. It always produces the same sequence of parameter values, so it is not purely random. This allows you to start at different points in the sequence; for example, to continue where you left off in a sequence or to run different parts of a sequence on different systems.
- Random Uniform: This option chooses parameters according to a random uniform distribution.
- Although the purpose of this model is to generate random values for training parameters, you can still set any of them to fixed values by entering them in the appropriate fields in the Randomize Parameters dialog.
- Optional: Click the button in the Filter Iterator node. The Iterator dialog displays.
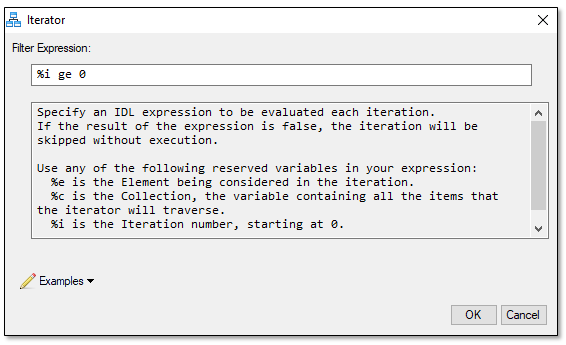
The purpose of this node is to set conditions on which the ENVI Modeler model will run. For example, you can choose to run the model only if the input raster meets certain criteria such as being multispectral, having a rational polynomial coefficient (RPC) spatial reference, or having a data type of "byte." To view and select any of these conditions, click the Examples drop-down list in the Iterator dialog.
The filter expression can be used to skip parts of the Sobol sequence for continuation or distribution of an experiment. For instance, if the randomizer was initially run with five iterations, then five deep learning runs will be completed, each with a different set of parameters. If those results are not acceptable, you can run five more iterations in the sequence by setting the Iterations value to 10 and typing %i ge 5 in the Filter Expression field. Similarly, you can split up runs among multiple ENVI instances (perhaps on different systems).
- To run the model, click the Run button in the ENVI Modeler. The Input Parameters dialog appears.
- In the Iterations field, enter the number of times to run ENVI Deep Learning.
- Click the Add Files button
 next to Training Rasters. Select one or more label rasters that were created using the Build Label Raster from ROI or Build Label Raster from Classification tool. Or, click the Add from Data Manager button
  to select label rasters that are currently open in ENVI.
-
Click the Add Files button next to Validation Rasters and select any label rasters that you want to use for validation. If you do not have separate label rasters, you can specify the same rasters you used for training.
-
In the Number of Bands field, enter the number of actual bands in the training rasters, excluding the mask band.
-
Enter the Number of Classes this model should learn, excluding the background class.
- Set the Augment Scale option to Yes to augment the training data with resized (scaled) versions of the data.
- Set the Augment Rotation option to Yes to augment the training data with rotated versions of the data.
- Click the Browse button
 next to Raster to Classify, and select a raster that you want to classify. It must contain at least as many bands as the raster that was used to train the model.
- Optional: Select an Output Directory for the output class activation rasters.
- Click OK in the Input Parameters dialog to resume running the ENVI Modeler model.
Because it performs a full training session for each iteration, this model takes a long time to run. When it is finished, the resulting classification and class activation rasters are displayed in the Image window and added to the Data Manager. Color slices are applied to the class activation rasters.