This topic describes how to label features of interest with regions of interest (ROIs), for training mask-based (pixel segmentation) models.
With ENVI Deep Learning, many more ROIs are needed to identify samples of features, compared to traditional supervised classification methods that can produce good results from only a few ROIs. Although it is possible to get sufficient results from labeling only a few features, you will get much more accurate results by investing some time in this process.
See the following sections:
Label Training Rasters
This section describes how to create label rasters from one or more training rasters and ROIs that represent the features you are interested in. The easiest way to label your training rasters is to use the Deep Learning Labeling Tool. The steps used throughout this topic reflect the use of this tool. You can also use the Build Label Raster from ROI tool to create label rasters. This option is described at the end of this help topic.
The Deep Learning Labeling Tool automatically creates label rasters once you define a set of ROIs for each training raster. You do not have to take any extra steps to build the label rasters.
To get started, select Deep Learning > Deep Learning Labeling Tool in the ENVI Toolbox. You will use this tool to define your output classes and to manage project files, ROIs, and training rasters. You can also start the Deep Learning Labeling Tool from the Deep Learning Guide Map by clicking this button sequence in the first panel: Pixel Segmentation > Train a New Pixel Model > Label Rasters.
Set Up a Deep Learning Project
Projects help you organize all of the files associated with the labeling process, including training rasters and ROIs. They also keep track of class names and the values you specify for training parameters.
- Select File > New Project from the Labeling Tool menu bar. The Create New Labeling Project dialog appears.
- From the Project Type drop-down list, select Pixel Segmentation. If you accessed the Labeling Tool from the Guide Map, this option is automatically selected and you cannot change it.
- Enter a Project Name.
- Click the Browse button
 next to Project Folder and select an empty folder in which to store project files.
- Click OK.
When you create a new project and define your training rasters, ENVI creates subfolders for each training raster that you select as input. Each subfolder will contain the ROIs and label rasters created during the labeling process.
ENVI also creates a file named source_raster.json in each subfolder. This is a simplified version (also called a dehydrated form) of the training raster, where all of its information is condensed into JSON code. If you move the project folder to a different location, the source_raster.json file in each project subfolder tells ENVI where to find the training raster. This way, you do not have to keep track of file locations yourself.
To restore a previously created project, select File > Open Project in the Labeling Tool menu bar. Navigate to your project folder and select the file deep_learning_labeling.json.
After setting up a project, the next step is to define your output classes.
Define Classes
Use the Class Definitions section of the Labeling Tool to define the features you will label. The feature names determine the class names in the output classification image.
- Click the Add button
 in the lower-left corner of the Class Definitions section.
- Enter a Name for the first feature that you will label, then click the
 button. The feature is added to the Class Definitions list.
- Optional: Click in the Color column to change the color of the class.
- If you will be extracting multiple features, repeat Steps 1-3 as needed for additional features (classes).
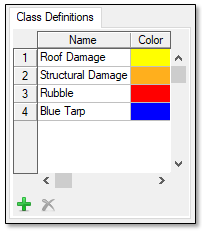
The following figure shows an example of four classes that represent different types of property damage to residential homes (from the ENVI Deep Learning Tutorial: Extract Multiple Features):
Next, you will select the rasters that you want to use for training.
Add Training Rasters
- Click the Add button
 below the Rasters section of the Labeling Tool. The Data Selection dialog appears.
- Select one or more training rasters and click OK.
- All training rasters must have the same number of bands. If one image has a different number of bands than the others, you can select that image in the Data Selection dialog and click the Spectral Subset button. Then select the appropriate number of bands.
- The training rasters are listed in the Rasters section.
- To remove all training rasters, click the Select All button
 , then the Remove Selected button
  .
.
- Optional: Select a training raster and click the Rename Selected button
 to provide a name that is more meaningful than its filename. You can only rename one raster at a time.
Now you are ready to label the features in your training rasters by drawing ROIs in them.
Draw ROIs
For each training raster, the "ROI(s)" column shows the fraction of ROIs drawn to the total number of classes. Follow these steps to begin drawing ROIs:
- Select a training raster from the list and click the Draw button
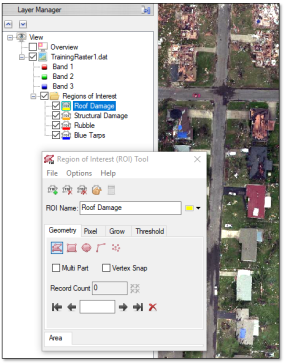
 . The training raster is displayed. ENVI creates a new set of ROIs with the same names and colors as the classes that you defined. The ROIs are listed in the Layer Manager and Data Manager. The Region of Interest (ROI) Tool appears, with the first ROI selected. The following image shows an example.
The cursor changes to a crosshair so that you can begin drawing ROI polygons.
The Labeling Tool synchronizes the names and colors of classes and their associated ROIs. If you change the name or color of a class, the ROI name or color will automatically update (and vice-versa). You can also add or remove ROIs as needed.
Note: Do not use the ROI Tool to change file locations of ROIs, to create or remove ROIs, or to change their colors. Instead, use the Labeling Tool to make these changes so that they can be applied to all of the training rasters.
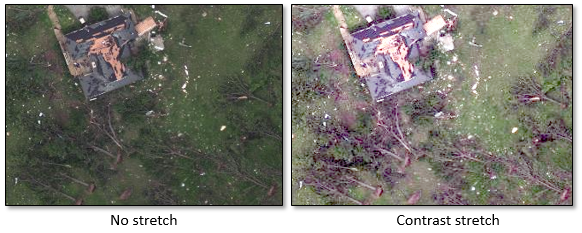
- Optional: Experiment with different contrast stretches using the Stretch Type drop-down list in the ENVI toolbar to ensure that the features of interest are clearly distinguishable from the background. Training images that are saturated, "washed out," or have low contrast will make the labeling process more difficult. The image below shows an example of applying a contrast stretch to an image of uprooted trees after a tornado. Trying to label trees in the left image would be too difficult.
- Draw ROIs on as many examples of the feature as possible within the image. See Pixel Segmentation and Feature Labeling Tips.
- To label a different training raster, select its name in the Labeling Tool and click the Draw button. The "ROI(s)" column in the previous training raster is updated to show the fraction of ROIs drawn to the total number of ROIs defined.
- Continue labeling the image in this manner for each ROI/class. Your progress is automatically saved to the current project, even if you close the Labeling Tool.
Optional: Import Existing ROIs
You can import an existing ROI file into your project for one or more training rasters. The ROI names do not have to match the class names that you specify. Follow these steps:
- Define classes, as described earlier.
- Add training rasters, as described earlier.
- In the Labeling Tool, select the training raster for which you want to import an ROI file. Then click the Options button
 and select Import ROIs.
- Select an ROI file (.xml) and click Open. The Match Input ROIs to Class Definitions dialog appears.
- Select an ROI name under the Input ROIs column, then select the class name (under the Class Definitions column) that the ROI represents. Or, do this vice-versa. A line connects the ROI with the associated class name.
- Repeat with the remaining ROIs and classes, then click OK. The ROIs are imported into the project.
Optional: Import Vectors
You can import vector files into your project for one or more training rasters; for example, if you already have a shapefile of features that you want to use for labeling. Follow these steps:
- Define classes, as described earlier.
- Add training rasters, as described earlier.
- In the Labeling Tool, select the training raster for which you want to import a vector file and click the Draw button to display the training raster.
- In the Labeling Tool, click the Options button and select Import Vectors. The Import from Vector dialog appears.
- Click the Browse button next to Input Vector and select a vector file. See the Supported Data Types topic in ENVI Help for a list of supported vector formats.
The Attribute Name drop-down list is populated with the attribute columns in the vector file. If it does not have any attributes, the only option will be <none>.
- Select an attribute from the Attribute Name drop-down list. The Record Selection dialog appears.
- Click OK in the Record Selection dialog. The vector records are imported into the current project for the selected training raster.
View Project and Labeling Statistics
Click the Options drop-down list and select Show Labeling Statistics to view information about the current project and how much labeling was performed.
The beginning of the report in the Project Statistics dialog provides general information about the project, including:
- Project name and location
- Number of classes and their names
- Number of bands in each training raster (this should be the same for all training rasters)
- Number of training rasters
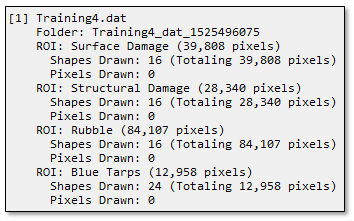
Following this are details about the ROIs used to label each training raster. The purpose of this section is to report how much labeling you have done in each training raster. You can quickly determine if some training rasters do not have enough ROIs or if others have a higher balance of ROIs. The following image shows an example of the ROI statistics for one training raster:
To save the project statistics to a text file, click the Save button  in the Project Statistics dialog. Then select a location to save the text file. The default filename is report.txt.
To copy the project statistics to your system's clipboard, click the Copy button  in the Project Statistics dialog.
Optional: Use the Build Label Raster From ROI Tool
If you choose not to use the Deep Learning Labeling Tool to create label rasters, you will need to define and organize your training rasters and ROIs on your own without the benefit of project files that the labeling tool offers. Then use the Build Label Raster from ROI tool to create label rasters. Those steps are described here.
You can also write a script to build a label raster from ROIs using the BuildLabelRasterFromROI task.
Label Training Rasters
- Prepare the training rasters.
- Open a training raster in ENVI. Then right-click its name in the Layer Manager and select New Region of Interest. The Region of Interest (ROI) tool appears.
- Change the ROI Name to the name of the first feature that you want to label; for example, Roads or Buildings. Press the Enter key to accept the name. ROI names will determine the class names in the output classification image.
- Optionally change the ROI color.
- Draw polygon, polyline, or point ROIs over the features of interest in your training raster. See Pixel Segmentation and Feature Labeling Tips.
- If you are extracting multiple features, click the Add ROI button
 to create an ROI for the next feature. Then repeat Steps 3-5 for that feature.
- When you are finished drawing ROIs for the training raster, select File > Save As from the ROI Tool menu bar. Select a filename and location for the ROI file (.xml) and click OK. If you have multiple training rasters, you must create separate ROI files for each raster and label each raster separately.
Build Label Rasters
Follow these steps for each training raster and associated ROI file.
- Open the Build Label Raster from ROI dialog using one of the following options:
- In the ENVI Toolbox, select Deep Learning > Pixel Segmentation > Preprocessing > Build Label Raster from ROI.
- In the Deep Learning Guide Map, click this button sequence: Pixel Segmentation > Train a New Pixel Model > Build Label Raster from ROI.
- In the Input Raster field of the Build Label Raster from ROI dialog, select a training raster.
- In the Input ROI field, select an ROI file (.xml) that indicates the labeled pixels for the desired classes in the training raster. The ROI must fall within the boundary of the input raster.
- In the Class Names field, enter the names of the classes that you defined in the ROIs, one per line. The best way to do this is to click the Import ROI Name(s) button
 , then select the individual ROIs from the Input ROI file. The output classification image will use these names.
- In the Output Raster field, select a location and filename for the output label raster (.dat).
-
Enable the Display result check box to display the output in the view when processing is complete.
-
To reuse these task settings in future ENVI sessions, save them to a file. Click the down arrow  next to the OK button and select Save Parameter Values, then specify the location and filename to save to. Note that some parameter types, such as rasters, vectors, and ROIs, will not be saved with the file. To apply the saved task settings, click the down arrow and select Restore Parameter Values, then select the file where you previously stored your settings.
-
To run the process in the background, click the down arrow and select Run Task in the Background. If an ENVI Server has been set up on the network, the Run Task on remote ENVI Server name is also available. The ENVI Server Job Console will show the progress of the job and will provide a link to display the result when processing is complete. See the ENVI Servers topic in ENVI Help for more information.
- Click OK. When processing is complete, ENVI adds the label raster to the Data Manager. The label raster contains the original image bands plus an additional band called "Label Mask." The mask band indicates which pixels in the training raster correspond to the features of interest, with each feature represented by an integer (1 to the number of features). A value of 0 indicates the background.
- Pass the label raster to the Train Deep Learning Pixel Model tool. See the Train Deep Learning Pixel Models topic for instructions.
See Also
Build Label Rasters From Classification Images, Deep Learning Pixel Classification