Post-process Classification Vectors
Use the Postprocess Classification Vectors tool to refine an object classification result.
You can also write a script to classify a raster using the PostProcessObjectClassification task.
If the output shapefile does not accurately identify features, this tool lets you test and preview different parameter values. When the previewed result looks better, you can then output a new shapefile.
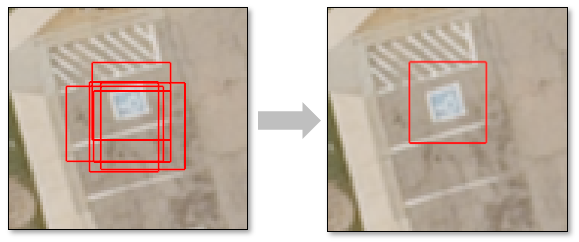
The following example shows how this tool can clean up overlapping bounding boxes around a feature:
Follow these steps:
- Display the output shapefile from Deep Learning Object Classification, along with the image that you classified.
-
In the ENVI Toolbox, select Deep Learning > Object Detection > Postprocessing > Postprocess Classification Vector. The Input Vector field lists the output shapefile from Deep Learning Object Classification, if you displayed it in Step 1. If more than one vector file is open, you must specify which one to use as the input vector. The Postprocess Classification Vector dialog appears.
You can also access the dialog through the Deep Learning Guide Map with the following button sequence: Object Detection > Postprocess Classification Vector.
- Adjust the Confidence Threshold value using the slider bar or up/down arrow buttons. The Deep Learning Object Classification topic describes this parameter.
- Adjust the Intersection Over Union Threshold value using the slider bar or up/down arrow buttons. The Deep Learning Object Classification topic describes this parameter.
- Enable the Intersection Over Self Filter option to filter out bounding boxes that have an Intersection over Self (IOS) value larger than the Intersection Over Self Threshold.
- Adjust the Intersection Over Self Threshold value using the slider bar or up/down arrow buttons. This parameter fixes any overlapping bounding boxes that remain after applying the Intersection Over Union Threshold, particularly smaller boxes inside of larger ones. The default value is 0.8.
- In the Output Classification Vector field, select a path and filename for the output shapefile (.shp).
- Enable the Preview option. A new "Preview" shapefile layer is displayed and added to the Layer Manager. It shows the changes you made to Confidence Threshold and Intersection Over Union Threshold.
Tip: Toggle the original shapefile layer on and off in the Layer Manager, to compare it with the Preview shapefile layer.
- Enable the Display result check box to display the output in the view when processing is complete.
-
To reuse these task settings in future ENVI sessions, save them to a file. Click the down arrow  next to the OK button and select Save Parameter Values, then specify the location and filename to save to. Note that some parameter types, such as rasters, vectors, and ROIs, will not be saved with the file. To apply the saved task settings, click the down arrow and select Restore Parameter Values, then select the file where you previously stored your settings.
-
To run the process in the background, click the down arrow and select Run Task in the Background. If an ENVI Server has been set up on the network, the Run Task on remote ENVI Server name is also available. The ENVI Server Job Console will show the progress of the job and will provide a link to display the result when processing is complete. See the ENVI Servers topic in ENVI Help for more information.
- Click OK. ENVI adds the output shapefile to the Data Manager and Layer Manager. If you enabled the Display Result option, the shapefile appears in the display.
See Also
Deep Learning Object Classification, Train Deep Learning Object Models, Deep Learning Optimized Object Classification, Object Detection Overview