In this tutorial, you will learn how to integrate external deep learning models in the ONNX format with ENVI Deep Learning for advanced object detection and pixel-based segmentation processing.
This tutorial is compatible with ENVI Deep Learning and ENVI Deep Learning Runtime, version 4.0 and higher.
This tutorial requires one of the following: a separate installation and license for ENVI Deep Learning, or a separate installation for ENVI Deep Learning Runtime (no additional license required); contact your sales representative for more information.
See the following sections:
System Requirements
Refer to the System Requirements topic.
Files Used in This Tutorial
Sample data files are available on our ENVI Tutorials web page. Click the Deep Learning link in the ENVI Tutorial Data section to download a .zip file containing the data. Extract the contents to a local directory. The training files are located under the configure_onnx folder.
The two images provided for object detection classification are from the HERIDAL dataset. See files LICENSE.txt and README.txt for details. The ONNX model for object detection is based on RT-DETR and trained with data from the HERIDAL dataset. See TRAINING_DATA_LICENSE.txt, TRAINING_DATA_README.txt, TRAINING_WEIGHTS_LICENSE.txt, and TRAINING_WEIGHTS_README.txt for details.
|
File |
Description |
|
In the \configure_onnx\object_detection folder:
|
|
data\test_BLI_0006.jpg
|
HERIDAL image (4000 x 3000 pixels) used for classification.
|
|
data\test_CAP_0004.jpg.xml
|
HERIDAL image (4000 x 3000 pixels) used for classification.
|
|
model\search_and_rescue.onnx
|
Trained object detection model to configure.
|
|
processing\preprocessor.py
|
Preprocessor script for object detection.
|
|
processing\postprocessor.py
|
Postprocessor script for object detection.
|
|
In the \configure_onnx\pixel_segmentation folder:
|
|
data\ImageToProcess.dat
|
Sample image (1731 x 1273 pixels) used for classification.
|
|
data\ImageToProcess.hdr
|
Sample image header file.
|
|
model\landcover.onnx
|
Trained pixel segmentation model to configure.
|
|
processing\preprocessor.py
|
Preprocessor script for pixel segmentation.
|
|
processing\postprocessor.py
|
Postrocessor script for pixel segmentation.
|
Overview
This tutorial supports two installation options. References to "ENVI Deep Learning" in the instructions refer to either of these options:
- ENVI Deep Learning Runtime, which is optimized for classification tasks.
- ENVI Deep Learning (Full Version), which supports both training and classification workflows.
ENVI Deep Learning and its Runtime version provide support for ONNX (Open Neural Network Exchange) model format, a common format for deep learning models. ONNX enables you to configure and use models trained in other tools, such as PyTorch, TensorFlow, or JAX, in ENVI Deep Learning’s classification workflows. Models built in these environments can be exported and deployed within ONNX-compatible systems like ENVI Deep Learning.
Configuring an ONNX model involves the following steps:
- Select a Suitable Model: Identify an ONNX-compatible model that addresses your specific object detection or pixel segmentation task.
- Develop a Python Preprocessor: Create a preprocessing script to format input data appropriately for the selected model, including normalization, resizing, or channel adjustments.
- Develop a Python Postprocessor: Implement a postprocessing script to interpret the model’s output, such as extracting bounding boxes, class labels, or segmentation masks.
- Integrate the Model in ENVI Deep Learning: Use ENVI Deep Learning tools to configure the ONNX model, link the pre/postprocessors, and configure runtime parameters for classification workflows.
Model Configuration
For ONNX models to run in ENVI Deep Learning, the following information is needed to translate data between ENVI Deep Learning and the ONNX model:
- Map the raster data from ENVI to the inputs of the ONNX model.
- Map the outputs from the ONNX model to ENVI Deep Learning’s expected format.
To do this, you will use Python scripts called preprocessors and postprocessors. Preprocessors and postprocessors provide seamless integration of your ONNX models with the ENVI Deep Learning tools, provided you follow the specifications outlined in the next sections.
Runtime Environment
Your scripts will need the following Python runtime environment to run:
- Python: 3.12
- ONNX libraries: ONNX == 1.18.0; ONNX Runtime == 1.20.2
- CUDA runtime: CUDA 12.9; cuDNN 9.10
You can also import the following Python libraries to work with your scripts. The list is limited as the libraries NV5 Geospatial Solutions ships with ENVI Deep Learning must ensure a secure runtime environment. The following are allowed Python imports:
- collections.abc
- dataclasses
- functools
- itertools
- json
- logging
- logging.config
- logging.handlers
- math
- random
- typing
- numpy
- opencv (cv2)
- onnx
- onnxruntime-gpu
- Pillow (pil)
- scipy
Background: Preprocessor
The preprocessor is a user-defined function that prepares raster data from ENVI to match the input for the ONNX model. It typically performs operations such as resizing, normalization, or dimension conversion (channels first/last).
Function Signature
Your preprocessor must follow this function signature:
def preprocessor(
data: list[np.ndarray],
metadata: dict[str, Any],
shared: dict[str, Any],
**kwargs
) -> list[np.ndarray]:
You can store this function in any module (e.g., preprocessor.py) as long as it adheres to the signature above.
Inputs
Examples (different per model):
Object Detection
{
'inputs': [
_NodeMetadata(name='images', dtype=dtype('float32'),
shape=['N', 3, 640, 640]),
_NodeMetadata(name='orig_target_sizes',
dtype=dtype('int64'), shape=['N', 2])],
'outputs': [
_NodeMetadata(name='labels', dtype=dtype('int64'),
shape=['Modlabels_dim_0', 'Modlabels_dim_1']),
_NodeMetadata(name='boxes', dtype=dtype('float32'),
shape=['GatherElementsboxes_dim_0',
'GatherElementsboxes_dim_1',
'GatherElementsboxes_dim_2']),
_NodeMetadata(name='scores', dtype=dtype('float32'),
shape=['TopKscores_dim_0', 'TopKscores_dim_1'])]
}
Pixel Segmentation
{
'inputs': [
_NodeMetadata(name='arg_0.1', dtype=dtype('float32'),
shape=[1, 464, 464, 3])],
'outputs': [
_NodeMetadata(name='2417', dtype=dtype('float32'),
shape=[1, 464, 464, 5])]}
- shared: A dictionary shared between the preprocessor and postprocessor. Use this to pass intermediate values or context between the two. This is an empty dictionary, e.g., {} unless data is provided.
- **kwargs: Reserved for future extensions or optional parameters.
ENVI Input Tensor
Provide input data to the model preprocessor in this layout:
[BATCH_SIZE, ROWS, COLUMNS, CHANNELS]
- BATCH_SIZE: Number of patches in the batch. ENVI supplies a single full patch for each inference call, so the batch size is typically 1.
- ROWS: Number of pixel rows (image height) expected by the model.
- COLUMNS: Number of pixel columns (image width) expected by the model.
- CHANNELS: Number of spectral bands or channels expected by the model.
During inference, raster data is tiled to match the spatial dimensions required by the model input layer. The input layer is the model node that receives the image tensor; its shape determines the required ROWS, COLUMNS, and CHANNELS. You can inspect the model’s input node and dimensions with model visualization tools such as https://netron.app.
Outputs
The function must return a list:
- For example, if the model expects [BATCH, CHANNEL, HEIGHT, WIDTH] the preprocessor would need to transpose input data[0] dimensions converting from [BATCH, HEIGHT, WIDTH, CHANNELS]
- The processed input(s), ready for model inference.
- Optional context or values to pass to the postprocessor (e.g., original image sizes, scaling factors, etc).
Background: Postprocessor
The postprocessor is a user-defined function that maps the outputs from the ONNX model into the format that ENVI expects. The mapped value depends on the type of model and includes:
- For pixel segmentation, returning the channels-first softmax output.
- For object detection, returning the bounding boxes, classes, confidence scores, and number of valid boxes in each patch.
Function Signature
Your postprocessor must follow this exact function signature:
def postprocessor(
data: list[np.ndarray],
metadata: dict[str, Any],
shared: dict[str, Any],
**kwargs
) -> list[np.ndarray]:
This ensures compatibility with ENVI’s model execution pipeline.
Inputs
- data: The list of outputs from the model, specific to the model and type.
Object Detection Example
ModelData = [CLASSES(1, 300), BOXES(1, 300, 4), SCORES(1, 300), N_VALID(300)]
Expected = [BOXES, CLASSES, SCORES, N_VALID_DETECTIONS]
Pixel Segmentation Example
ModelData = [(1, 464, 464, 5)]
Expected = [(BATCH-1, HEIGHT-464, WIDTH-464, CLASS-5)]
See Preprocess Inputs for example metadata.
- shared: A shared dictionary between the pre and post processors.
- **kwargs: Reserved for future extensions or optional parameters.
Outputs
Pixel Segmentation
- Return Type: list[numpy.ndarray] of length 1.
- Array Shape: [BATCH_SIZE, ROWS, COLUMNS, CLASS].
- Meaning: Softmax outputs in channels/classes last format.
Example:
Dimensions - [(1, 464, 464, 5)]
[array([[[[1.18536853e-04, 1.21547580e-01, 3.02895606e-01,
3.70718211e-01, 2.04720110e-01],
[1.04202620e-04, 5.60543276e-02, 2.68907726e-01,
3.64784122e-01, 3.10149580e-01],
[3.20770778e-05, 2.32344344e-02, 3.10726345e-01,
4.64255482e-01, 2.01751709e-01],
...,
[1.47114779e-05, 1.90786645e-02, 1.40136227e-01,
3.02593410e-01, 5.38176954e-01],
[3.33875432e-05, 3.85736786e-02, 1.45650536e-01,
2.90546656e-01, 5.25195718e-01],
[1.21219535e-04, 1.14989698e-01, 2.16579273e-01,
3.16215932e-01, 3.52093786e-01]]]],
shape=(1, 464, 464, 5), dtype=float32)]
Object Detection
-
Return Type: list[numpy.ndarray] of length 4 containing the following:
[BOXES, CLASSES, SCORES, N_VALID_DETECTIONS].
-
BOXES
- Shape: [BATCH_SIZE, N, 4].
- Format per box: [COLUMN_MIN, ROW_MIN, COLUMN_MAX, ROW_MAX].
-
CLASSES
- Shape: [BATCH_SIZE, N].
- Meaning: Class index for each detection.
-
SCORES
- Shape: [BATCH_SIZE, N].
- Meaning: Confidence score for each detection.
-
N_VALID_DETECTIONS
- Shape: [BATCH_SIZE].
- Meaning: Number of valid detections per batch element.
Example
Dimensions - [BOXES(1, 300, 4), CLASSES(1, 300), SCORES(1, 300), N_VALID(300)]
[array([[[632.0895 , 405.58017 , 639.54004 , 413.54337 ],
[342.95657 , 631.4062 , 348.89407 , 639.4244 ],
[622.6154 , 515.33655 , 630.9005 , 522.0283 ],
...,
[133.81116 , 488.96042 , 142.03894 , 496.4721 ],
[625.1688 , 12.029791, 634.35443 , 19.44848 ],
[ 37.398766, 624.30835 , 46.88846 , 637.5815 ]]],
shape=(1, 300, 4), dtype=float32),
array([[0, 0, 0, 0, 0, 0, 0, 0, 0, 0, 0, 0, 0, 0, 0, 0, 0, 0, 0, 0, 0, 0,
0, 0, 0, 0, 0, 0, 0, 0, 0, 0, 0, 0, 0, 0, 0, 0, 0, 0, 0, 0, 0, 0,
...,
0, 0, 0, 0, 0, 0, 0, 0, 0, 0, 0, 0, 0, 0]], dtype=uint16),
array([[0.47195983, 0.22185153, 0.21922374, 0.20314497, 0.17565197,
0.17126817, 0.16761473, 0.16636562, 0.16389927, 0.16190436,
0.16040409, 0.15729287, 0.15347278, 0.14907572, 0.14669368,
0.1459013 , 0.143938 , 0.14047873, 0.13763243, 0.13720432,
...,
0.01301247, 0.01271346, 0.01165175, 0.00733671, 0.00460282]],
dtype=float32),
array([300], dtype=uint16)]
Configure ONNX for Object Detection
To configure an ONNX model for object detection in ENVI Deep Learning, you will need the following components:
- An ONNX model file
- A Python preprocessor script
- A Python postprocessor script
For this tutorial, all required files are included in the \configure_onnx\object_detection folder where you extracted the ENVIDeepLearningTutorialData.zip archive on your local system.
Configure ONNX Model
- Start the IDL Workbench.
- Open the IDL script provided with the tutorial data. From the IDL Workbench select File > Open, The Open File dialog appears.
- Navigate to \configure_onnx\object_detection and select configureobjectdetectiononnxmodel.pro, then click Open. This script is designed to run on your system without modification. After performing the following steps, you will have access to an ENVI-configured ONNX model that can be used in deep learning workflows.
-
In the IDLDE toolbox, click the Compile button  . When the script is compiled, the IDL Console reports the following:
.compile -v ‘…\configureobjectdetectiononnxmodel.pro’
% Compiled module: CONFIGUREOBJECTDETECTIONONNXMODEL.
-
In the IDLDE toolbox, click the Run button  to generate a configured ENVI ONNX model for object detection workflows. ENVI will launch, and the following progress dialogs appear while Python script validation and model configuration is performed:
- The Inspect Module progress dialog appears, showing progress of the behind-the-scenes inspection of the preprocessor and postprocessor script. It checks for issues related to the function signature, potential arbitrary code execution, and required Python libraries. For more details, refer to the Model Configuration section.
- After inspection, the Validate ONNX Model dialog appears. During validation, ENVI Deep Learning determines whether inputs and outputs of the pre- and post-processors are compatible with the model’s inputs and outputs.
- After validation succesfully completes, the Configure ONNX Model progress dialog appears. This process embeds the information needed to ensure the model can be used with ENVI Deep Learning classification workflows.
- When all processing is complete, the IDL Console reports the configured ONNX model file location: Generated Model: …\object_detection.envi.onnx. You will use this file in the next section with Deep Learning Object Classification.
Run Object Classification
ENVI Deep Learning classification tasks are ONNX-based, offering different options depending on the classifier. To run object classification with the Search & Rescue model you configured (object_detection.envi.onnx), do the following:
- From the ENVI Toolbox, select Deep Learning > Object Detection > Deep Learning Object Classification. The Deep Learning Object Classification dialog appears.
- Click the Browse button
 next to the Input Raster field. The Data Selection dialog appears.
- Click the Open button
 at the bottom of the Data Selection dialog. The Open dialog appears.
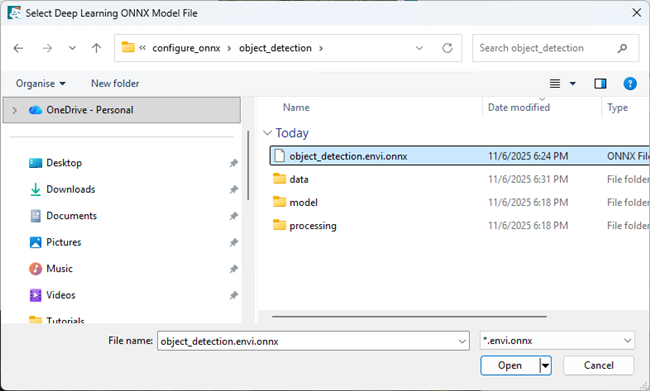
- Select the \configure_onnx\object_detection\data\test_CAP_0004.jpg file and click Open. The raster name displays in the Data Selection dialog.
- Click OK. The Input Raster field shows test_CAP_0004.jpg as the raster for classification.
- Click the Data Manager button
 in the ENVI toolbar. The Data Manager opens and shows test_CAP_0004.jpg.
- Right click the raster in the Data Manager and select Load Default. The raster is displayed in the ENVI view, and the Layer Manager shows test_CAP_0004.jpg.
-
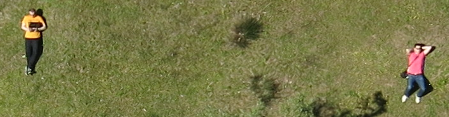
In the Layer Manager right click test_CAP_0004.jpg and select Zoom to Layer Extent. ENVI zooms to the raster’s extents. Near the center are two people; one is wearing a yellow-colored shirt, the other is wearing a pink shirt. These are the target features for the model to detect.
-
In the Deep Learning Object Classification dialog, click the Browse button next to the Input Model field. The Select Deep Learning ONNX Model File Manager appears.

-
Click the Open button . The Select Deep Learning ONNX Model File dialog appears. Navigate to the model file object_detection.envi.onnx that was generated by IDL in the previous section, select it, and click Open.
-
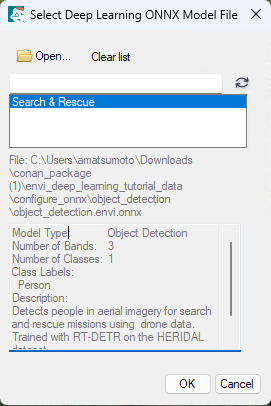
The Select Deep Learning ONNX Model File Manager populates with details about the configured ONNX model. Click OK. After several seconds, the model is loaded into the File Manager.
-
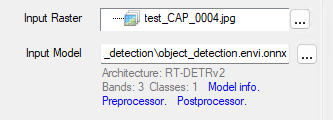
Optionally, you can explore additional information in the Deep Learning Object Classification dialog by clicking the blue links below the Input Model field.
- Set the Confidence Threshold to 0.80. This model is confident, and this threshold should limit detections to just the desired features.
- Leave the Intersection Over Union Threshold parameter set to the default value. Since the features of this image are sparse and not closely aligned, there will not be intersecting bounding boxes to worry about.
-
Select Yes for Enhance Display and leave the Visual RGB default value of No. Enhance Display will perform a small linear stretch to the raster before running classification, which helps improve visual clarity for the model. Visual RGB is not necessary because the raster image is already a three-band RGB.
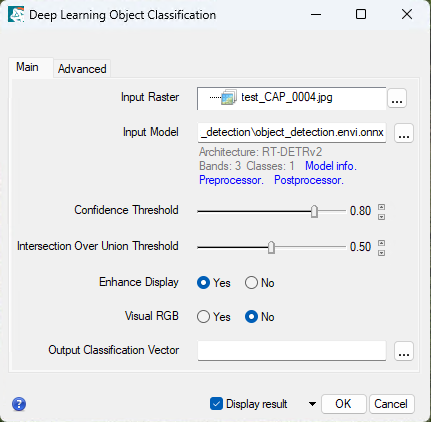
- Optionally, specify a filename and path to save the Output Classification Vector to. If you do not specify a filename and the Display raster check box is selected, ENVI will create and display a temporary vector file with the results. If the Display result check box is not selected, the temporary file will be added to the Data Manager where you can load it into the view.
-
Click OK to start classification. Progress dialogs appear during the classification process, showing the following stages:
- After the linear stretch is applied to the data, an Export Raster process dialog appears while ENVI Deep Learning creates a temporary raster to use for classification.
- When the classification process begins, the Object Classification process dialog appears. During this step, ENVI Deep Learning provides raw data to the preprocessor which is then ingested by the model. Classification is very fast, and the progress dialog displays the number of steps being inferred.
- When the classification process is complete, the Classification GeoJSON to Shapefile progress dialog appears. This step converts the model output processed by the postprocessor into a shapefile for visualization.
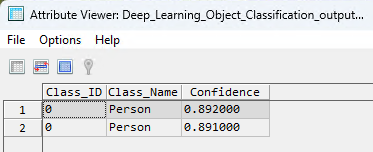
The processed output is a vector containing two detections. Because there are only two people in the scene, this is the expected outcome.

- Optionally, from the Layer Manager right click the vector file and select View/Edit Attributes.
-
The Attribute Viewer appears and displays two attributes with confidence values above 80% confidence.
- Optionally, run the classification again using the image \configure_onnx\object_detection\data\test_BLI_0006.jpg
Configure ONNX for Pixel Segmentation
To configure an ONNX model for pixel segmentation in ENVI Deep Learning, you will need the following components:
- An ONNX model file
- A Python preprocessor script
- A Python postprocessor script
For this tutorial, all required files are included in the \configure_onnx\pixel_segmentation directory where you extracted the ENVIDeepLearningTutorialData.zip archive on your local system.
Configure ONNX Model
- Start the IDL Workbench.
- Open the IDL script provided with the tutorial data. From the IDL Workbench select File > Open, The Open File dialog appears.
- Use the file explorer to navigate to \configure_onnx\pixel_segmentation and select configurepixelsegmentationonnxmodel.pro, then click Open. This script is designed to run on your system without modification. After performing the following steps, you will have access to an ENVI-configured ONNX model that can be used in deep learning workflows.
-
Click the Compile button in the IDLDE toolbox, located in the top left of IDL’s development environment. After compiling the script, the IDL Console reports compilation of the script:
.compile -v ‘…\configurepixelsegmentationonnxmodel.pro’
% Compiled module: CONFIGUREPIXELSEGMENTATIONONNXMODEL.
-
In the IDLDE toolbox, click the Run button to generate a configured ENVI ONNX model for pixel segmentation workflows. ENVI will launch, and the following progress dialogs appear while Python script validation and model configuration is performed:
- The Inspect Module progress dialog appears, showing progress of the behind-the-scenes inspection of the preprocessor and postprocessor script. It checks for issues related to the function signature, potential arbitrary code execution, and required Python libraries. For more details, refer to the Model Configuration section.
- After inspection, the Validate ONNX Model dialog appears. During validation, ENVI Deep Learning determines whether inputs and outputs of the pre- and post-processors are compatible with the model’s inputs and outputs.
- After validation succesfully completes, the Configure ONNX Model progress dialog appears. This process embeds the information needed to ensure the model can be used with ENVI Deep Learning classification workflows.
- When all processing is complete, the IDL Console reports the configured ONNX model file location: Generated Model: …\pixel_segmentation.envi.onnx. You will use this file in the next section with Deep Learning Pixel Classification.
Run Pixel Classification
ENVI Deep Learning classification tasks are ONNX-based offering different options depending on the classifier. To run pixel classification with the New Zealand Landcover model you configured (pixel_segmentation.envi.onnx), do the following:
- From the ENVI Toolbox, select Deep Learning > Pixel Segmentation > Deep Learning Pixel Classification. The Deep Learning Pixel Classification dialog appears.
- Click the Browse button next to the Input Raster field. The Data Selection dialog appears.
- Click the Open button at the bottom of the Data Selection dialog. The Open dialog appears.
- Select the \configure_onnx\pixel_segmentation\data\ImageToProcess.dat file and click Open. The raster displays in the Data Selection dialog. Click OK. The Input Raster field shows the ImageToProcess.dat file as the raster for classification.
- Click the Data Manager button in the ENVI toolbar. The Data Manager shows ImageToProcess.dat.
- Right-click the raster and select Load Default. The raster is displayed in the view, and the Layer Manager shows ImageToProcess.dat.
- Change the stretch to create a more visually appealing display. From the Stretch tool on the ENVI toolbar, select Optimized Linear. The display applies an Optimized Linear stretch to enhance the raster image. Use this enhanced view to explore the scene and identify areas where the classes Water, Vegetation, Trees, and Urban are most appropriately represented.
- In the Layer Manager right click on ImageToProcess.dat and select Zoom to Layer Extent. ENVI zooms to the raster’s extents.
-
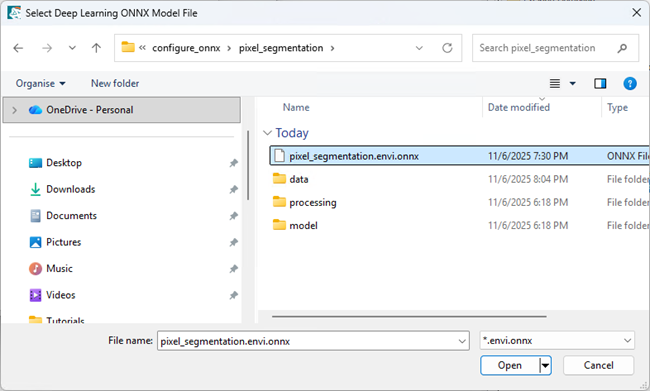
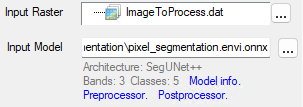
Click the Browse button next to the Input Model field. The Select Deep Learning ONNX Model File Manager appears.
-
Click the Open button . The Select Deep Learning ONNX Model File dialog appears. Navigate to the model file pixel_segmentation.envi.onnx that was generated by IDL in the previous section, select it and click Open.
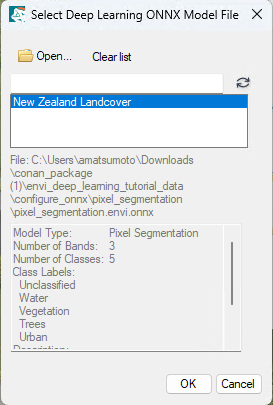
-
The Select Deep Learning ONNX Model File Manager populates with details about the configured ONNX model. Click OK. After several seconds, the model is loaded.
-
Optionally, you can explore additional information in the Deep Learning Pixel Classification dialog by clicking the blue links below the Input Model field.
-
Select Yes for Enhance Display and leave the default value for Visual RGB to No Enhance Display will perform a small linear stretch to the raster before running classification, which helps to improve visual clarity for the model. Visual RGB is not necessary because the raster image is already a three-band RGB.
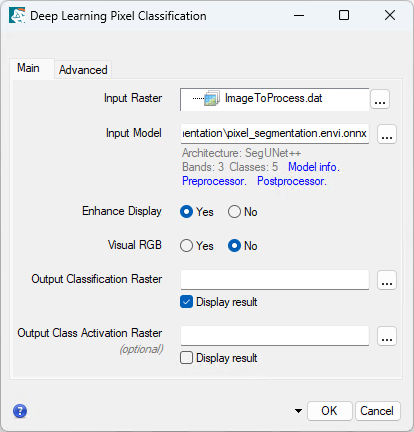
- Optionally, specify a filename and path to save the Output Classification Raster and Output Class Activation Raster to. If you do not specify filenames and the Display raster check box is selected, ENVI will create and display temporary classification raster and class activation raster files with the results. If the Display result check box is not selected, the temporary files will be added to the Data Manager where you can load them into the view.
-
Click OK to start classification. Progress dialogs appear during the classification process, showing the following stages:
- After the linear stretch is applied to the data, an Export Raster process dialog appears while ENVI Deep Learning creates a temporary raster to use for classification.
- When the classification process begins, the Pixel Classification process dialog appears. During this step, ENVI Deep Learning provides raw data to the preprocessor which is then ingested by the model. Classification is very fast, and the progress dialog displays the number of steps being inferred.
- When the classification process is complete, the resulting classification raster appears in the Layer Manager and overlays the original raster. It displays color-coded segments based on the class colors defined during the model configuration process.
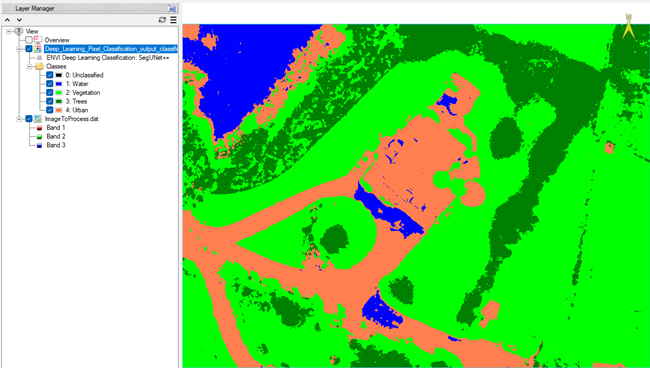
-
Optionally, experiment with toggling the classification raster classes on and off to evaluate where the model performed well or struggled in identifying learned classes. By default, all classes in the classification raster are enabled. To hide a class color from the view, select the classification raster in the Layer Manager and uncheck the box next to the desired class. In the example below, the Urban class has been hidden.
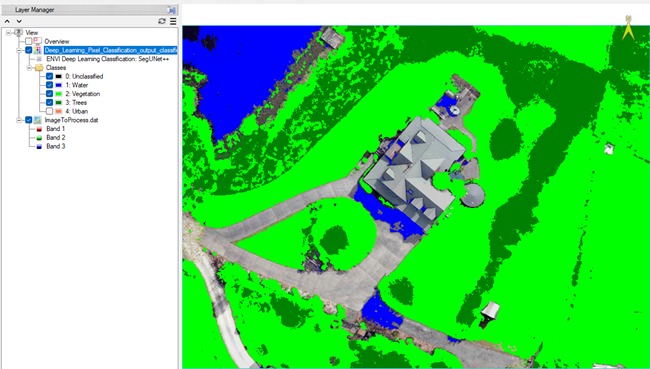
Overall, the model did a good job of segmenting the defined classes in the image. However, Water is sometimes misclassified as Urban, indicating some confusion between those two classes.
Troubleshooting
This section is intended to help you identify and resolve common problems while configuring your ONNX model. The issues can be unexpected behavior during model setup or errors related to pre/post-processing scripts.
The first steps to troubleshooting are to ensure your model meets ENVI Deep Learning compatibility requirements and that any custom scripts are properly validated.
Model Input Size vs Image Resolution
As a best practice, your ONNX models should be configured to have the same input size as the model expects. We strongly recommend this because it simplifies the connection between ENVI and ONNX.
This means that, if you need a lower-resolution representation of a dataset, that you should use *ENVI* to resample the imagery instead of increasing model input size and down-sampling tiles at classification time.
As an example: If you have an ONNX model that needs 50-75 cm input data, and you are provided with an image with 30 cm pixels, use the ENVI Resample Raster tool to create a 60 cm image that meets the ONNX models data requirements.
Model Unable to Detect Features in ENVI
By using ONNX in ENVI Deep Learning, you have full control over the deep learning process. This means that there are additional considerations to make sure models perform as designed in ENVI Deep Learning.
If you have a model configured for ENVI Deep Learning that cannot detect features, here are some common tips for you and the users of your model:
-
Ensure all data is prepared to what the model expects:
- Example: If you trained on RGB byte data, then RGB byte images need to be provided in ENVI Deep Learning.
- Example: If you trained on surface reflectance data with pixel values from 0 to 10,000, then make sure that users provide surface reflectance data in ENVI Deep Learning.
-
Check band order of datasets:
- Not all satellite images deliver data in the same band order (RGB vs BGR vs MSI).
- You may need to swap band order depending on the source image and the model you are using.
-
Check resolution of input imagery
- Deep learning models have a maximum size of features they can detect depending on the architecture.
- The resolution of imagery you process should match the resolution of imagery you trained with.
- Being off by a factor of 2 or more with regards to the resolution of your dataset can prevent models from accurately detecting features.
With these considerations, ENVI and the ENVI Deep Learning module provide tools to help prepare data:
-
Use the ENVI Deep Learning Build Deep Learning Raster tool to prepare data for analysis:
- Always apply a stretch to datasets that emulate the first-look display of imagery in the ENVI view.
- Optionally, use the Visual RGB parameter in the Build Deep Learning Raster to ensure you get three-band data from any input (Pan, MSI, CIR, etc.).
-
Add wavelength metadata to configured ONNX models. ENVI will pick the right bands from an image if both the raster and ONNX model have wavelength information.
-
Use the ENVI Resample Raster tool for adjusting the resolution of imagery.
-
If you need additional or more advanced data preparation, create the steps into an ENVI Modeler Workflow and share that and your ONNX model in the Analytics Repository to help model's users.
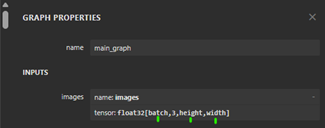
Model Contains Variables for Input Dimensions
Some ONNX models use variables to define one or more input dimensions. These are strings and not discrete numbers (which ENVI Deep Learning expects).
The following is an example of an ONNX model with such inputs.
Tip: netron.app makes it easy to check this.
When you have a model like this, you will need to replace the input shapes. Use Python and the ONNX library to do this. An example script follows.
# Import the ONNX libraries
import onnx
from onnx import shape_inference
# Define the input and output model
input_model = "input_model.onnx"
output_model = "output_model.onnx"
# Load the model
model = onnx.load(input_model)
# Get the input tensor
input_tensor = model.graph.input[0]
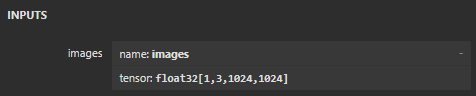
# Modify the shape dimensions
input_tensor.type.tensor_type.shape.dim[0].dim_value = 1 # batch size
input_tensor.type.tensor_type.shape.dim[1].dim_value = 3 # channels
input_tensor.type.tensor_type.shape.dim[2].dim_value = 1024 # height
input_tensor.type.tensor_type.shape.dim[3].dim_value = 1024 # width
# Apply shape inference to propagate changes
model = shape_inference.infer_shapes(model)
# Save the modified model
onnx.save(model, output_model)
After running the above script, your model will look correct in the Netron app:
Invalid Function Signature
The *processor module is expected to provide signature -
While the filename for your processing logic (ending in .py) can be arbitrary, the function names used for preprocessing and postprocessing must follow ENVI’s required naming conventions and function signatures. If these conventions are not met, the script will fail validation. This can occur if the wrong processing script was selected for preprocessing or postprocessing.
Refer to the Model Configuration section for guidelines on how to structure these functions correctly.
Parameter is Missing a Value
Invalid parameter named “*”
This error occurs when a required parameter is missing a value, and no default has been defined for it within the task. To resolve this, locate the parameter that has not been assigned and provide a valid value.
Unsupported Imports
Processor (*processor.py) Error – Unsupported import >> “MODULE”
This error may occur during validation of your preprocessing or postprocessing script if it attempts to import a Python library that is not supported. ENVI Deep Learning uses a restricted Python environment to ensure safety, performance, and compatibility, which limits the set of allowable imports.
To resolve this issue, review your script and remove or replace unsupported libraries. For a full list of permitted imports, refer to the Model Configuration section.
Unauthorized Operation
Processor (*processor.py) Error – Unauthorized operation >> “exec”
This error occurs during validation when a preprocessor or postprocessor script attempts to execute arbitrary code using restricted operations like “exec.” To maintain security and performance, ENVI Deep Learning prohibits arbitrary code execution within processing scripts.
Review your script and remove any unsupported operations. For guidance on supported functionality, refer to the Model Configuration section.
Processor Error
Processor Error - *processor Line> #, Code> *, Problem> *
This error occurs when ENVI Deep Learning attempts to validate the compatibility of your ONNX model and associated processing scripts after you click OK in the Configure ONNX Model dialog. The error message includes the script name, line number, the specific line of code, and a description of the problem, which are important clues for diagnosing the issue.
Because processing scripts can vary widely in complexity and content, the root cause of this error may differ from case to case. However, the most common issues fall into a few general categories, listed below.
Common Causes and Fixes
-
Syntax Errors
- Missing colons, unmatched parentheses, or incorrect indentation.
- Fix: Double-check Python syntax, especially around the reported line.
-
Invalid or Undefined Variables
- Using variables that have not been declared or are out of scope.
- Fix: Ensure that all variables are properly initialized and accessible.
-
Unsupported Libraries or Imports
- Importing modules not allowed in ENVI Deep Learning’s restricted Python environment.
- Fix: Refer to the Model Configuration section for the list of allowed Python imports and remove or replace unsupported modules.
-
Invalid Input or Output Shapes
- Mismatch between the model’s expected input/output dimensions and what is defined in the script.
- Fix: Verify that the input and output shapes are explicitly defined and match the model’s requirements.
-
File or Path Errors
- Referencing files or directories that don’t exist or are inaccessible.
- Fix: Ensure that all file paths are valid and accessible from the ENVI environment.
-
Data Type Mismatches
- Passing incompatible data types to model inputs or processing functions.
- Fix: Use numpy or supported processing modules to cast or reshape data appropriately.
Tips for Debugging
-
Received an Error: If you receive an error, read the full error message carefully; it often points directly to the problem.
- Start Small: Test your processor script with minimal logic first. Confirm that ENVI Deep Learning accepts a basic structure before layering in complexity.
-
Setup Logging: Add logging to the processing scripts to trace variable values and execution flow. This helps pinpoint where things go wrong.
Example:
import logging
# Configure logging
LOGFILE = 'C:\\preprocessor_log.txt'
# Create and configure a named logger
logger = logging.getLogger("preprocessor")
logger.setLevel(logging.DEBUG) # DEBUG, INFO, WARNING, ERROR, CRITICAL
logger.propagate = False # Prevent messages from reaching the root logger
# Create a file handler for writing logging to file
handler = logging.FileHandler(LOGFILE)
handler.setFormatter(logging.Formatter('%(asctime)s - %(levelname)s - %(message)s'))
logger.addHandler(handler)
def preprocessor(data, metadata, shared, **kwargs):
logger.info(‘Data[0] Shape: %s’, data[0].shape)
logger.info(‘Metadata:\n%s’, metadata)
- Validate Outside ENVI: Run your script independently in a standard Python environment (e.g., Jupyter Notebook or VS Code) using mock data to isolate issues.
- Check for Silent Failures: Some errors may not crash the script but still produce incorrect results. Validate outputs carefully, especially shapes and types.
- Inspect ONNX Model with Netron: Use Netron to visually inspect your model’s input/output layers, tensor shapes, and node connections.
- Confirm Input/Output Consistency: Ensure your processor script matches the model’s expected input/output dimensions and data types exactly.
- Avoid Hardcoding Paths: Use relative paths or environment-aware logic to avoid file-not-found errors when deploying in ENVI Deep Learning.
- Watch for Type Mismatches: ENVI Deep Learning often expects NumPy arrays or specific formats. Use np.asarray() or np.float32() to cast data appropriately.
- Check for Hidden Characters: Copy-pasted code may include invisible characters or incorrect indentation. Reformat manually if needed.
- Use Try/Except Blocks: Wrap risky operations in try/except to catch and log errors gracefully without crashing the entire script.
Final Comments
In this tutorial, you learned how to use ENVI Deep Learning to configure an externally trained ONNX model for object detection and pixel-based segmentation, then generate classification results within ENVI Deep Learning. This workflow demonstrates ENVI Deep Learning’s growing flexibility in supporting models trained outside its native environment whether developed in PyTorch, TensorFlow, or other deep learning frameworks.