Configure ONNX Model
Tutorial: Configure ONNX Tutorial
Use Configure ONNX Model tool to configure Deep Learning ONNX models for use in ENVI. It includes parameter settings are for metadata, model structure requirements, preprocessing and postprocessing scripts, and inputs and outputs. Configuring ONNX models ensures they are properly prepared for integration, execution, and documentation in ENVI.
You can also write a script to Configure Deep Learning ONNX models for the ENVI Repository using the ConfigureOnnxModel task.
From the ENVI Toolbox, select Deep Learning > Configure ONNX Model. The Configure ONNX Model dialog appears, divided into tabs for Inputs, Model, and Outputs.
Input Parameters
Set the following parameters in the Inputs tab.
- Click the Browse button
 next to the Input Model field. The Select Input Model dialog appears.
- Select a model and click Open.
- In the Input Preprocessor field, specify the Python script (.py) that implements the preprocessing logic required for preparing the input data to match the expected format of the ONNX model.
- In the Input Postprocessor field, specify the Python script (.py) that implements the postprocessing logic required to interpret or transform the raw output of the ONNX model into a usable format.
- Specify the Number of Bands (spectral or data) in the input data. This defines the dimensionality of the input data.
- Specify the Image Width (in pixels) of the input image data required by the model. The Image Width and Image Height parameters ensure that the input data dimensions are compatible with the model's architecture and preprocessing pipeline.
- In the Image Height field, specify the height (in pixels) of the input image data required by the model. The Image Height and Image Width parameters ensure that the input data dimensions are compatible with the model's architecture and preprocessing pipeline.
- Specify a filename (.envi.onnx) and location for the Output Model.
Model
-
From the Type drop-down list, specify the deep learning model to use. This determines the method and output format of the analysis or processing. The options are:
- Grid
- Object Detection
- Pixel Segmentation
- In the Architecture field, provide a general description of the architecture used to train the model converted to the ONNX format. This description is for reference purposes; it does not effect the processing logic.
-
In the Name field, enter a short, descriptive name that reflects what the model does. This helps recognize the model when viewing results or reusing the model later.
-
In the Author field, specify the name of the individual or team responsible for developing or training the model. This parameter identifies the contributor(s) to document their ownership, efforts, and expertise.
-
Enter a Version number for the model (example: 1.0.0). This parameter is used to track the iteration or release of the model for documentation, debugging, and compatibility purposes. This number can be incremented if the model already exists and you are publishing a new version of it.
- Optionally, enter the Date when the ONNX model version was created.
-
Specify the License under which the model is distributed. This parameter ensures compliance with the legal and permitted use requirements associated with the model.
- In the Description field, enter a summary of the ONNX model, including purpose, key features, and relevant details about training or application. The description is documentation intended for the users of the model.
Outputs
-
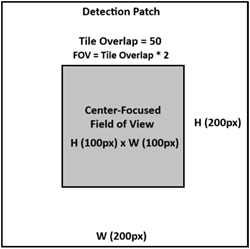
In the Tile Overlap field, enter the number of pixels that will define a margin on all sides of each detection patch, forming a center-focused field of view (FOV). For example:
- In the Class Names field, enter the class labels that the ONNX model was trained to recognize. Each label corresponds to a specific feature or category in the dataset used for training.
- The Class Colors correspond to the Class Names; this field defines the colors to represent the corresponding class. To set class colors, click the Add button
 next to the Class Colors field. A color definition is added to the field. To change the color used for that definition, double-click on it and choose a different color from the color picker. Class colors are used for visualization purposes, such as rendering segmentation masks or labeling detected objects.
- Wavelength Specify an array raster spectral wavelength values, one per band for the number of bands the model was trained with. Bands with matching wavelengths for the input raster will be used during classification, if provided.
-
From the Wavelength Units drop-down list, specify one of the following:
This is typically based on the type of data the model was trained with.
-
To reuse these task settings in future ENVI sessions, save them to a file. Click the down arrow  next to the OK button and select Save Parameter Values, then specify the location and filename to save to. Note that some parameter types, such as rasters, vectors, and ROIs, will not be saved with the file. To apply the saved task settings, click the down arrow and select Restore Parameter Values, then select the file where you previously stored your settings.
-
To run the process in the background, click the down arrow and select Run Task in the Background. If an ENVI Server has been set up on the network, the Run Task on remote ENVI Server name is also available. The ENVI Server Job Console will show the progress of the job and will provide a link to display the result when processing is complete. See the ENVI Servers topic in ENVI Help for more information.
- Click OK to save the configuration.
See Also
Publish ENVI ONNX Model