This tutorial describes how to create a custom task using the ENVI application programming interface (API). You will learn how to create and deploy custom task files, how to add and customize a simple user interface, and how to run the custom task as an extension from the ENVI Toolbox.
A custom task is a program that performs a specific data-processing task in ENVI, using the ENVITask framework. The custom task in this tutorial will create vegetation indices from Sentinel-2A Level-1C imagery.
See the following sections:
Files Used in This Tutorial
The custom task files usd for this tutorial are available in following folder of the ENVI installation path:
- Windows: C:\Program Files\INSTALL_DIR\ENVIxx\examples\tasks\sentinelexample
- Linux: /usr/local/INSTALL_DIR/envixx/examples/tasks/sentinelexample
|
File |
Description |
|
sentinelvegindices.pro
|
This is an IDL program that processes and creates vegetation indices from Sentinel-2A Level-1C imagery.
|
|
sentinelvegindices.style
|
This is a style sheet used to disable subsetting in the dynamic user interface.
|
|
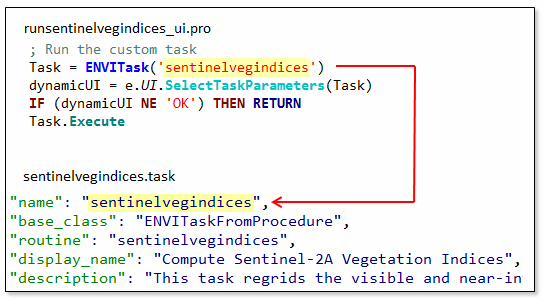
sentinelvegindices.task
|
This is a task template in JSON format.
|
|
runsentinelvegindices_ui.pro
|
This is an IDL program that adds the custom task as an extension to the ENVI Toolbox so that you can run the custom task.
|
The custom task was tested with Sentinel-2A Level-1C imagery downloaded from USGS EarthExplorer.
When you extract the .zip file containing Sentinel data, the name of the extracted folder may be too long for ENVI to read correctly. If this is the case, we recommend renaming the folder to a shorter name; for example:
Original: S2A_OPER_MTD_SAFL1C_PDMC_20160319T135821_R004_V20160319T040941_20160319T040941
Renamed: ThailandScene
See the Earth Resources Observation and Science (EROS) Center web site for more information about the USGS distribution of Sentinel-2 products, including the data policy and citation.
Before You Begin
In this tutorial, you will copy sample data files to the custom_code and extensions folders of the ENVI installation path. You must have administrator privileges to copy files directly to these folders. If you do not have administrator privileges, copy the sample data files to a temporary folder, then to the custom_code and extensions folders as instructed.
Also, if you plan to edit the sample data files in IDL outside of this tutorial, then you need to start IDL as an administrator in order to save your edits.
Summary of the Custom Task Used in This Tutorial
The custom task in this tutorial will create vegetation indices from Sentinel-2A Level-1C imagery. ENVI reads the S2A*.xml file distributed with the data. The data are organized into three bands groups with different spatial resolutions:
- 10-meter:
- B2: Blue (490 nm)
- B3: Green (560 nm)
- B4: Red (665 nm)
- B8: Near-infrared (842 nm)
- 20-meter:
- B5: Red Edge (705 nm)
- B6: Red Edge (740 nm)
- B7: Red Edge (783 nm)
- B8A: Red Edge (865 nm)
- B11: SWIR snow/ice/cloud discrimination (1610 nm)
- B12: SWIR snow ice/cloud discrimination (2190 nm)
- 60-meter:
- B1: Aerosol detection (443 nm)
- B9: Water vapor (945 nm)
- B10: SWIR cirrus cloud detection (1375 nm)
Vegetation indices only require bands in the visible through near-infrared wavelengths. You will not use the 60-meter bands because they are unnecessary for computing vegetation indices.
The custom task will resample the 20-meter bands to 10 meters. It will combine all of the bands (except B1, B9, and B10) into a single image. Since these are Level-1A files, the imagery has already been radiometrically calibrated so that the pixel values represent top-of-atmosphere reflectance. The imagery has been georeferenced to a UTM projection with a WGS-84 datum, so you do not need to georeference the data.
The custom task will also apply dark subtraction correction to the pixel values to simulate a basic atmospheric correction. The task scales the reflectance values from 0 to 1, then it computes five vegetation indices and creates an output image with one index per band.
The next few sections describe the components you need to create a custom task.
Data Processing Program
The first step in designing a custom task is to write a program in IDL that contains the data-processing steps. For this tutorial you can use the file sentinelvegindices.pro, which has already been created for you. Copy this program to the custom_code folder of the ENVI installation path. The default paths are as follows:
Windows:
From C:\Program Files\INSTALL_DIR\ENVIxx\examples\tasks\sentinelexample
To C:\Program Files\INSTALL_DIR\ENVIxx\custom_code
Linux:
From /usr/local/INSTALL_DIR/envixx/examples/tasks/sentinelexample
To /usr/local/INSTALL_DIR/envixx/custom_code
This program only processes the input data that you provide. It does not start the ENVI application, nor does it display the output raster. Those steps are reserved for the IDL program that runs the custom task. The sentinelvegindices.pro code:
- Resamples the 20-meter raster to 10 meters.
- Creates a layer stack of all bands.
- Applies dark-object subtraction as a simple alternative to atmospheric correction.
- Scales the pixel values from 0 to 1.
- Computes a select group of vegetation indices.
Task Template
The next step in designing a custom task is to create a task template, which is a JSON-formatted text file. It is used to map keywords in the IDL data-processing program to task parameters. You can create a task template using IDL or any text editor. Name the file with a .task extension.
For this tutorial you can use the file sentinelvegindices.task, which has already been created for you. Copy this program to the custom_code folder of the ENVI installation path. The default paths are as follows:
Windows:
From C:\Program Files\INSTALL_DIR\ENVIxx\examples\tasks\sentinelexample
To C:\Program Files\INSTALL_DIR\ENVIxx\custom_code
Linux:
From /usr/local/INSTALL_DIR/envixx/examples/tasks/sentinelexample
To /usr/local/INSTALL_DIR/envixx/custom_code
The purpose of a task template is to map keywords in the IDL data-processing program to task parameters. We will discuss this in more detail later in How the Files Work Together.
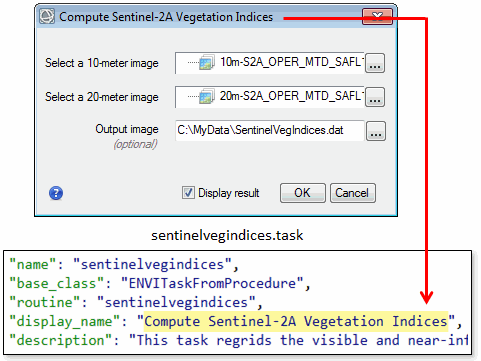
The routine value in the task template should refer to the name of the IDL data-processing program (without the .pro file extension). In this example, the data-processing program is sentinelvegindices.pro:
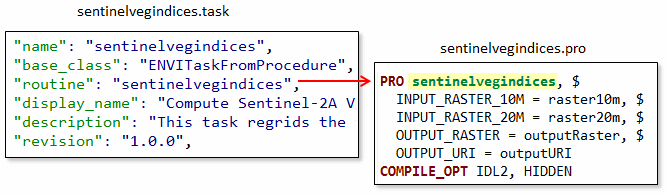
Note the revision key in the task template. The revision number provides a way for custom task developers to keep track of the changes in a task over time. The revision number is represented by semantic versioning, which uses a convention of X.Y.Z, where:
- X represents the major version. An incremented value indicates that task additions and updates are not backward-compatible.
- Y represents the minor version. An incremented value indicates that task additions and updates are backward-compatible.
- Z represents the patch number. An incremented value indicates bug fixes that do not affect the task.
In this example, the revision number is 1.0.0 for the custom task. Let's say for example that you update a parameter description in a future version. You would increment the revision number to 1.0.1. In the next version, you add some new parameters to the task. The revision number will increment to 1.1. Perhaps in a future version, you decide to rewrite the task completely and remove all input parameters except for INPUT_RASTER. This is a breaking change (the task is not backward-compatible), and the revision updates to 2.0. By looking at the revision number, users can quickly assess compatibility issues with past versions of the task.
Executable Program
The next step in designing a custom task is to write an IDL program that runs the task. For this tutorial you can use the file runsentinelvegindices_ui.pro, which has already been created for you. Copy this program to the extensions folder of the ENVI installation path. The default paths are as follows:
Windows:
From C:\Program Files\INSTALL_DIR\ENVIxx\examples\tasks\sentinelexample
To C:\Program Files\INSTALL_DIR\ENVIxx\extensions
Linux:
From /usr/local/INSTALL_DIR/envixx/examples/tasks/sentinelexample
To /usr/local/INSTALL_DIR/envixx/extensions
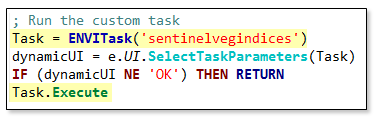
At the core of this program are the commands that invoke the custom task (highlighted in yellow):
The string inside of the ENVITask command must match the name key in the task template, for example:
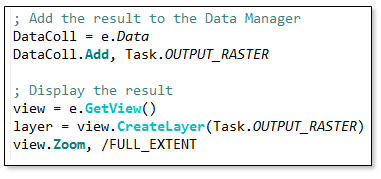
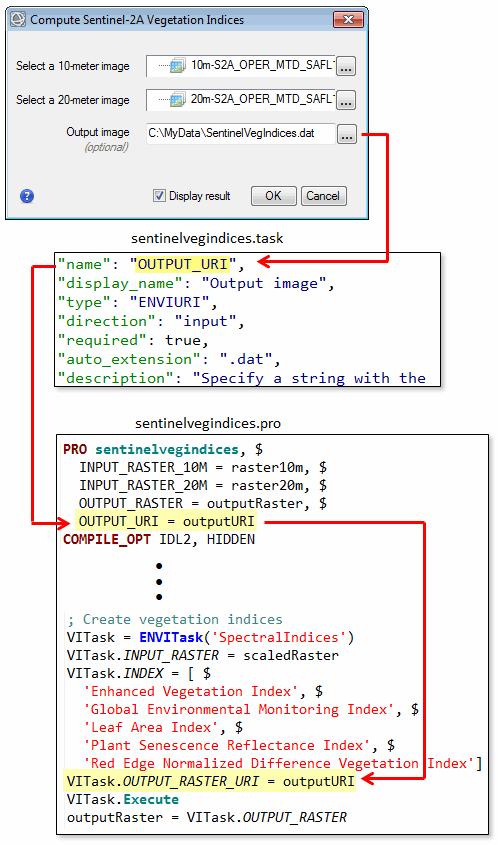
This program also adds the output raster from the custom task to the Data Manager, and it displays the output raster:
We will discuss this in more detail later in How the Files Work Together.
With these basic components, you could run the executable program at the command line while providing the required input arguments. However, a better user experience would be to display a dialog for selecting input and output files.
Dynamic User Interface
With ENVITasks, you can display a user interface (UI) by adding a few extra lines of code. This is one of the benefits of writing a custom task in ENVI: a simple UI is provided so that you do not have to design one. Use the ENVIUI::SelectTaskParameters API method to display the UI:
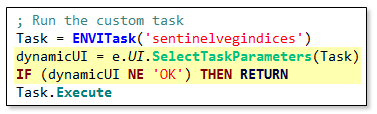
The IF statement returns you to the executable program if you dismiss the dialog.
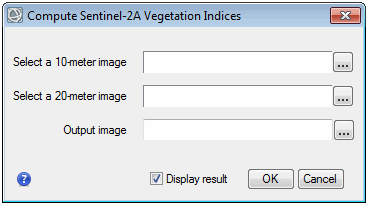
Later when you run the custom task, the SelectTaskParameters method will display a dynamic UI that looks like this:
It is called a dynamic UI because it dynamically maps UI elements to task parameters. We will discuss this in more detail later in How the Files Work Together.
Create a Style Sheet to Disable Subsetting
The custom task in this tutorial will create a layer stack from images that originally have different pixel sizes (10 and 20 meters). Allowing a user to spatially subset either one will result in images with different spatial dimensions, which will prevent a layer stack from being created. Also, you need all of the available spectral bands in the 10-meter and 20-meter images in order to compute vegetation indices. So you need to disable spatial and spectral subsetting in the dynamic UI. You can use a style sheet to do this.
A style sheet is a JSON-formatted text file that maps task parameters to UI elements. ENVI and IDL provide many different UI elements that you can include in a custom task such as file selection widgets, slider bars, and color pickers that you can include in a custom task. See the Style Sheets for User Interface Elements topic in ENVI Help for details. In this example, you will not add any new UI elements but you will modify the raster selection widgets to disable subsetting.
For this tutorial you can use the file sentinelvegindices.style, which has already been created for you. Copy this program to the custom_code folder of the ENVI installation path. The default paths are as follows:
Windows:
From C:\Program Files\INSTALL_DIR\ENVIxx\examples\tasks\sentinelexample
To C:\Program Files\INSTALL_DIR\ENVIxx\custom_code
Linux:
From /usr/local/INSTALL_DIR/envixx/examples/tasks/sentinelexample
To /usr/local/INSTALL_DIR/envixx/custom_code
Here are some tips for using style sheets:
- The parameters code blocks control the individual elements in the dynamic UI.
- The value for the name key must exactly match the parameter name in the corresponding task template.
- The value for the type key must match a UI element name. See the User Interface Elements topic in ENVI Help for a complete list.
- Style sheets must have a .style file extension.
- They must have the same root name as the task template.
- They must reside in the same folder as the task template and data-processing program.
- Setting the show_display_result key to true will add a Display result option to the dynamic UI.
Example:
{
"schema": "envitask_3.2",
"show_preview": false,
"show_display_result": true,
"parameters": [
{
"name": "INPUT_RASTER_10M",
"type": "ENVIRaster_UI",
"keywords": {
"DISABLE_SUB_RECT": true,
"DISABLE_BANDS": true
}
},
{
"name": "INPUT_RASTER_20M",
"type": "ENVIRaster_UI",
"keywords": {
"DISABLE_SUB_RECT": true,
"DISABLE_BANDS": true
}
}
]
}
Once the data-processing program, task template, executable program, and style sheet are in the appropriate folders, you could run the custom task at the IDL command line. For this tutorial, however, you will create an extension in the ENVI Toolbox that runs the custom task.
Deploy the Custom Task as an Extension to the ENVI Toolbox
The beginning of the executable program (runsentinelvegindices_ui.pro) contains the following code:
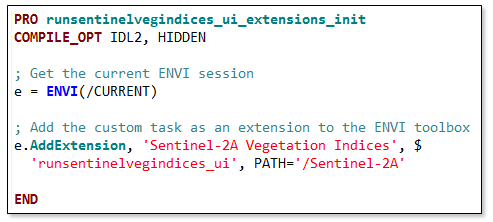
This code will make the custom task available in the ENVI Toolbox. When it is available in the Toolbox it is called an extension. When you double-click the extension, ENVI will run the program runsentinelvegindices_ui.pro. Notice how the declaration statement has the same name as runsentinelvegindices_ui but with _extensions_init appended to it. When you create your own toolbox extensions, you must add the _extensions_init code to the beginning of the executable program.
The e.AddExtension method specifies the following:
- What to name the extension (Sentinel-2A Vegetation Indices)
- What program to execute (runsentinelvegindices_ui.pro)
- Where to put the extension in the Toolbox folder structure (in a Sentinel-2A folder)
Create IDL Save Files
If you will run the extension from the ENVI application only (without using IDL), you must create IDL save files (.sav) for both the data-processing program and the executable program. Follow these steps to create save files for the programs in this tutorial:
- Start IDL.
- Type .RESET at the IDL command line.
- Compile sentinelvegindices.pro.
- Type the following at the IDL command line. This example is for Windows platforms; if you are using Linux, then modify the path as needed. Replace xx with the correct ENVI version:
IDL> SAVE, /ROUTINES, FILENAME='C:\Program Files\INSTALL_DIR\ENVIxx\custom_code\sentinelvegindices.sav'
If you do not have permission to write to this folder, specify a different folder and copy the .sav file from that folder to the custom_code folder.
- Type .RESET at the IDL command line.
- Compile runsentinelvegindices_ui.pro.
- Type the following at the IDL command line. This example is for Windows platforms; if you are using Linux, then modify the path as needed. Replace INSTALL_DIR with the correct installation path and xx with the correct ENVI version:
IDL> SAVE, /ROUTINES, FILENAME='C:\Program Files\INSTALL_DIR\ENVIxx\extensions\runsentinelvegindices_ui.sav'
If you do not have permission to write to this folder, specify a different folder and copy the .sav file from that folder to the extensions folder.
- Save all of your files, then exit IDL.
If other users will run your custom task, you must give them copies of the IDL save files to put into the appropriate folders.
Run the Custom Task
Now you can run and test the custom task to ensure it works correctly. Follow these steps:
- Start runtime ENVI.
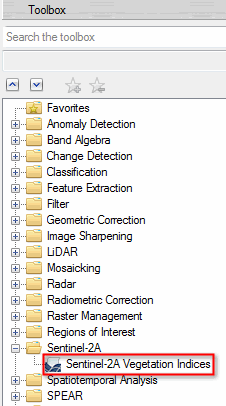
- When ENVI starts, expand the Sentinel-2A folder in the Toolbox. Double-click Sentinel-2A Vegetation Indices.
The dynamic UI displays:
- Click the
 button next to Select a 10-meter image. The Data Selection dialog appears.
- Click the Open File button
 .
.
- Select a *.xml Sentinel-2A Level-1C file, and click Open.
- Select the 10m-S2* image and click OK. For example:
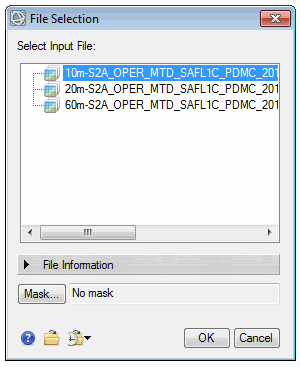
- Click the button next to Select a 20-meter image. A File Selection dialog appears.
- Select the 20m-S2* image and click OK.
- Click the button next to Output Image. Select an output path and filename with a .dat extension.
- Enable the Display result option.
- Click OK in the Compute Sentinel-2A Vegetation Indices dialog.
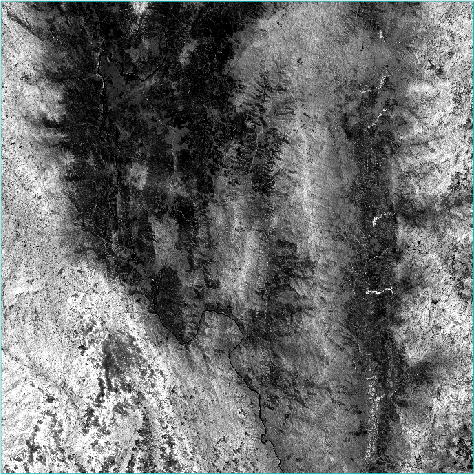
The process will take several minutes to complete. A vegetation index image appears in the display. The following example shows an Enhanced Vegetation Index (EVI) image zoomed out to its full extent:
Tip: Open the Data Manager to see the full list of vegetation indices that were created. Refer to the Spectral Indices topic in ENVI Help for more information about the different indices.
In the next section, you will learn how the data-processing program, task template, and executable program work together to run the custom task.
How the Files Work Together
The sequence of defining input data, processing the data, and creating output involves many different program components. This section describes the process.
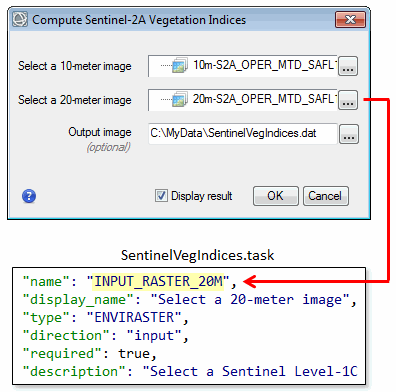
When you double-clicked the Sentinel-2A Vegetation Indices tool in the Toolbox, a dynamic UI displayed. The UI elements map to specific parameters in the task template; for example:
The UI title bar is set by the display_name key:
The input field to select a 10-meter image is associated with the INPUT_RASTER_10M parameter:
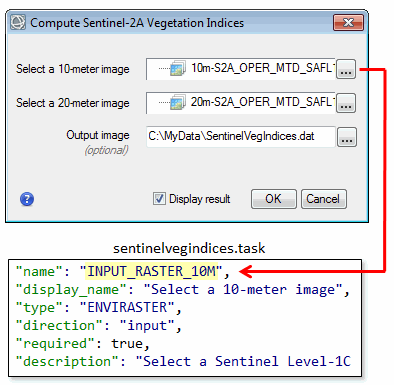
The input field to select a 20-meter image is associated with the INPUT_RASTER_20M parameter:
When the custom task runs, the INPUT_RASTER_10M parameter in the task template passes an object reference to the INPUT_RASTER_10M input argument in the data-processing program. This object is assigned to a variable named raster10m. The same process happens with the INPUT_RASTER_20M input argument; it is assigned to a variable named raster20m. Input arguments are in the program declaration statement.
Processing occurs on the raster10m and raster20 objects within sentinelvegindices.pro. Processing includes the steps for regridding, layer stacking, dark subtraction correction, and others. The final processing step in this program is to create a vegetation index raster. The next section describes how the custom task manages the vegetation index output.
Manage the Output
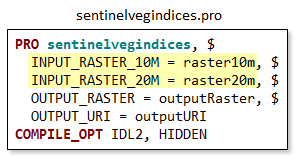
The output consists of two components: a uniform resource indicator (URI) and the vegetation index raster.
When the dynamic UI displayed, you selected a path and filename for the output. The Output Image field is actually an input field that accepts a URI, which is a string that includes the full path and filename of the output file that will be created; for example, C:\MyData\SentinelVegIndices.dat. The URI does not contain any data; it is just a reference to the location of the output data.
The Output Image field maps to the OUTPUT_URI parameter in the task template, which is assigned an ENVIURI object named outputURI. Before the spectralindices task executes, we set the OUTPUT_RASTER_URI task property to the outputURI object.
If you do not specify an output raster filename, ENVI creates the output raster in your system's temporary directory.
When the SpectralIndices task runs, it creates a vegetation index raster that you can access using the OUTPUT_RASTER task parameter. Here, we set the VITask.OUTPUT_RASTER task parameter to an object named outputRaster. This in turn, maps back to the OUTPUT_URI custom task parameter. ENVI writes the output raster to disk using the URI that was provided. Finally, the runtime program (runsentinelvegndices_ui.pro) adds the output raster object to the Data Manager and displays it in the ENVI interface.
Ideas for Improving the Custom Task
Now that you have finished the tutorial, here are some optional suggestions for improving the custom task even further:
- Add error-handling steps; for example, issue an error message if the user does not select a valid image for the 20-meter or 10-meter image. See Error Handling for different error-handling options.
- Create and apply cloud or water masks to the layer-stacked image before processing it.
- Down-sample the 10-meter bands to 20 meters.
- Apply QUAC atmospheric correction using QUAC Task. This method is more rigorous and therefore takes longer to run.
- Choose other vegetation indices. See QuerySpectralIndices Task and SpectralIndices Task for instructions on determining the spectral indices that are available for a given image.