Use pixel-based mosaicking to assemble a variety of non-georeferenced, non-overlapping images and/or plots for presentation output. You can mosaic individual bands or entire files. You can use your mouse or pixel-based coordinates to place images in mosaics and you can apply a feathering technique to blend image boundaries. You can save the mosaicked images as a virtual mosaic to avoid having to save an additional copy of the data to a disk file. Mosaic templates can also be saved and restored for other input files.
See the following sections:
Run the Pixel Based Mosaicking Tool
From the Toolbox, select Mosaicking > Pixel Based Mosaicking. The Pixel-Based Mosaic window appears.
Import Images
Use the Import menu to choose input bands for the mosaic.
- Select either Import > Import Files or Import > Import Files and Edit Properties from the Pixel-Based Mosaic menu bar. Use the second option if you want to enter a background see-through value, perform feathering, position the image on input, select which bands appear in the mosaic display, or perform color balancing. The Input File dialog appears.
-
Select an input file and perform optional spatial and spectral subsetting, then click OK. You can mosaic individual bands or entire files.
To select individual bands, click the Select By toggle button in the Input File dialog to select Band.
-
Click OK.
- If you selected Import Files and Edit Properties, an Entry dialog for each selected file appears that allows you to set the following parameters:
-
Enter a Data Value to Ignore. This is the background see-through value to make pixels with that value transparent so that the underlying image is visible. (Use for mosaicking of images with constant DN value borders).
The background value mask is built from the first band used in the file. If a pixel in the first band used contains this background value, then that pixel will be masked out for all bands in the mosaicking process.
- Enter feathering parameters as needed.
- Enter the upper-left coordinates (in pixels) in the Xoffset and Yoffset fields to position the image in the mosaic, or optionally click the Use x/ystart in Positioning? toggle button to select Yes. This option uses the x,y start values from the header to compose a relative start location.
- Click the Mosaic Display toggle button to select a Gray Scale or RGB color image display in the mosaicking window. For RGB, enter the desired band numbers to display in the Red, Green, and Blue fields. Enter a Linear Stretch percentage.
- Select whether to apply color balancing to the images by clicking No, Fixed, or Adjust.
- Click OK.
- The Select Mosaic Size dialog appears. Enter the desired output size (in pixels) of the mosaic image in the Mosaic Xsize and Mosaic Ysize fields, and click OK. A subsampled image appears in the Pixel Mosaic window for each file imported.
- Import other files as needed. Each image name and the outline color are listed below the mosaic image.
Position Images
The coordinates for the upper-left corner of the input image are listed in the X0 and Y0 fields at the bottom of the Pixel Mosaic dialog. Images with xstart and ystart values in their headers are automatically placed in the mosaic with the defined offset. Select from the following options:
-
To enable editing of the position coordinates, select any listed image in the Pixel Mosaic dialog and enter the desired upper-left coordinates in the X0 and Y0 fields. Press the Enter key.
The number of the currently selected image is shown in the # field. Any changes to the X0 and Y0 fields are applied to this item.
- You can also position the images in the Pixel Mosaic dialog by left-clicking on an image and dragging it to the desired location.
- To automatically place the images into a grid, select Options > Position Entries into Grid from the Pixel Mosaic dialog menu bar. The Position Images dialog appears. Enter values for Grid Columns, Grid Rows, Border Pixels (the number of border pixels to place around the images), and Separation Pixels (the number of pixels to place between the images). Click OK. The mosaic image is resized to fit the grid.
- To center the images, keeping their relative positioning within the defined mosaic size, select Options > Center Entries from the Pixel Mosaic dialog menu bar.
- To lock the relative positions of the images and move them as a group, select Options > Positioning Lock On from the Pixel Mosaic dialog menu bar. Now click and drag the images to the desired position.
Other Options
- Right-click in the mosaicking window to access options for changing image layer levels, editing image parameters, or removing an image from the mosaic.
- To change the mosaic size, select Select Options > Change Mosaic Size from the Pixel Mosaic dialog menu bar. Enter the desired size, in pixels, in the Mosaic Xsize and Mosaic Ysize fields.
- To enable or disable the thumbnail images displayed in the mosaic window, select Options > Use Thumbnail Images from the Pixel Mosaic dialog menu bar.
- To turn the colored graphic frames around the images in the mosaic off or on, select Options > Image Frames from the Pixel Mosaic dialog menu bar.
- To clear all the entries from the mosaic, select Options > Clear All Entries from the Pixel Mosaic dialog menu bar.
Build the Mosaic
Use Apply to build a mosaic after all of the images for the mosaic are positioned. Building the mosaic outputs the mosaic to a file.
You do not need to save the mosaic to an output file unless you apply feathering or color balancing. You can save the mosaic as a virtual mosaic to save time and disk space. If you decide to save the mosaic to disk, follow these steps:
- Select File > Apply from the Pixel Mosaic dialog menu bar. The Mosaic Parameters dialog appears.
- Edit the Output X/Y Pixel Size values as needed.
- Select an interpolation method from the Resampling drop-down list. The choices are Nearest Neighbor, Bilinear, or Cubic Convolution.
- Select output to File or Memory.
-
Enter a Background Value (a DN value for areas outside of the mosaic).
The background value mask is built from the first band used in the file. If a pixel in the first band used contains this background value, then that pixel will be masked out for all bands in the mosaicking process.
- If color balancing is selected, use the toggle button to select whether to use the entire image or to use only the overlapping areas for statistic calculations.
- Click OK. ENVI adds the resulting output to the Layer Manager.
Feather Images
Use Feathering to blend the edges of overlapping areas in input images. The two types of feathering in ENVI are edge feathering and cutline feathering.
Note: To use feathering when mosaicking images, import the bottom image without feathering. Import the overlapping images with edge or cutline feathering as desired.
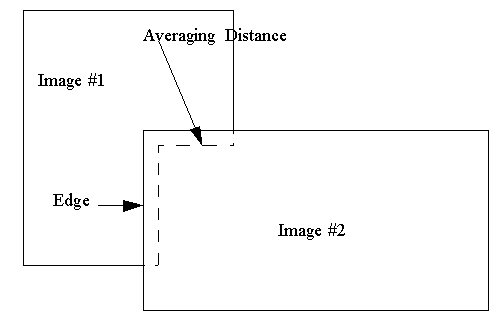
Using Edge Feathering
Use edge feathering to blend the edge of a top image with the bottom image based on a specified blending distance (see the figure below). The distance specified creates a linear ramp that averages the two images across that distance. For example, if the specified distance is 20 pixels, 0% of the top image is used in the blending at its edge and 100% of the bottom image is used to make the output image. At the specified distance (20 pixels) into the image from the edge, 100% of the top image is used to make the output image and 0% of the bottom image is used. 50% of each image is used to make the output at 10 pixels in from the edge.
- From the Pixel Mosaic or Map Based Mosaic dialog menu bar, select Import > Import Files and Edit Properties. A Mosaic Input Files dialog appears. Select the image to feather and click OK. An Entry dialog appears.
- Or, right-click on the image and select Edit Entry. The Entry dialog appears.
- In the Feathering Distance field, enter the number of pixels over which to blend the images.
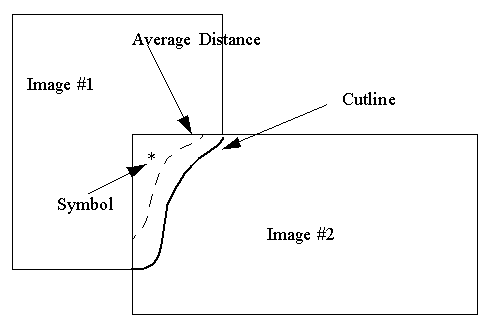
Using Cutline Feathering
Use Cutline feathering to blend the boundary between two overlapping images based on a user-defined cutline. A specified blending distance is used to blend the images along the cutline.
Cutlines must be defined using annotation tools prior to mosaicking. The annotation file must contain a polyline defining the cutline that is drawn from edge-to-edge and a symbol placed in the region of the image that will be cut off.
The distance specified is used to create a linear ramp that averages the two images across that distance from the cutline outwards. For example, if the specified distance is 20 pixels, 100% of the top image is used in the blending at the cutline and 0% of the bottom image is used to make the output image. At the specified distance (20 pixels) out from the cutline, 0% of the top image is used to make the output image and 100% of the bottom image is used. 50% of each image is used to make the output at 10 pixels out from the cutline.
-
From the Pixel Mosaic or Map Based Mosaic dialog menu bar, select Import > Import Files and Edit Properties. A Mosaic Input Files dialog appears. Select the image to feather and click OK. An Entry dialog appears.
Or, right-click on the image and select Edit Entry. The Entry dialog appears.
- Click Select Cutline Annotation File and select an annotation file.
- In the Feathering Distance field that appears in the Cutline Feathering Frame, specify the distance (in pixels) used to blend the image boundaries.
The cutline appears as a graphic overlaid on the image.
Color Balance Images
Use Color Balancing to match the statistics from one image to another (or many others) to balance the data range between different images. Gains and offsets are calculated from the fixed image and applied to the adjusted images so the adjusted images end up with the same statistical range. Gains and offsets are calculated individually for each band in the file. You can obtain the statistics from entire images or only from overlapping areas. You cannot perform color balancing with Virtual Mosaics.
If the images have data values you want to ignore, you must enter a Data value to ignore value in the Edit Entry dialog so they will not be included in the calculated statistics.
- In the Pixel Mosaic dialog, right-click on the image you want to use as the basis for statistics, and select Edit Entry. The Entry dialog appears.
- Select the Fixed radio button in Color Balancing. This image will only be used to calculate statistics and will not be adjusted. Click OK in the Entry dialog.
- In the Pixel Mosaic dialog, right-click on the image to adjust and select Edit Entry. The Entry dialog appears.
- Select the Adjust radio button in Color Balancing. Click OK.
- Select Fixed or Adjust for any other images, as desired.
- From the Pixel Mosaic menu bar, select File > Apply to apply the color balancing and mosaicking. The Mosaic Parameters dialog appears.
- Click the Color Balance toggle button to select whether to use the entire image or overlapping areas for statistics calculations. When there is a significant area of overlap, the best results are usually achieved by choosing only the overlapping areas for statistics calculations.
- Enter a BackgroundValue. The background value mask is built from the first band used in the file. If a pixel in the first band used contains this background value, then that pixel will be masked out for all bands in the mosaicking process.
- When creating a mosaic of gray scale and RGB images, you can apply single-band images as RGB. Doing this, in addition to color balancing, creates an RGB mosaic where the gray scale images blend well with the color images.
- Enter an output filename.
- Click OK. ENVI adds the resulting output to the Layer Manager.
Create Virtual Mosaics
ENVI treats a Virtual Mosaic file (a saved mosaic template) like an image file. When a Virtual Mosaic template file is opened, ENVI opens the individual image files that make up the mosaic and performs a quick reprojection. ENVI cannot do feathering or color balancing on-the-fly, however. You can display, annotate, stretch, and so forth the mosaic template file in ENVI, as with any other image. Using a Virtual Mosaic prevents multiple files from containing the same images and therefore saves disk space.
- Select File > Save Template from the Pixel Mosaic dialog menu bar. An Output Mosaic Template dialog appears.
- Enter an output filename with the extension .mos for consistency.
- Click the toggle button to select whether or not to open the new template as a Virtual Mosaic.
The template file is a Virtual Mosaic file in ASCII format. It contains the mosaic size, filenames, bands used, data dimensions, and mosaic information. The Info field contains the x and y offsets, edge feathering distance, cutline feathering distance, and data value to ignore.
ENVI adds the mosaic template file to the Layer Manager where you can use it it as input for processing with other functions. You can edit the template file using any text editor, for example, to change the file or the bands used in the mosaic.
Restore Saved Templates
- Select File > Restore Template from the Pixel Mosaic dialog menu bar. The Enter Mosaic Template Filename dialog appears.
-
Select the desired .mos filename to load into the mosaic and click Open.
Replace the existing input files with new images in the Mosaic dialog by editing the filenames in the ASCII .mos file.