If you chose Generate Tie Points Automatically, or Define Tie Points Interactively, or if you loaded a tie point file to edit in Step 4, Step 5 of 9 (View and Edit Tie Points) appears.
You can edit and add new tie points interactively in the left and right images and by using the button controls in the View and Edit Tie Points section of the DEM Extraction Wizard. Select a location in one or both of the images and use the controls to add, update, or delete tie points in the tie point list.
Add New Tie Point Locations
To define your tie points interactively, you must position the Zoom box in each image over the same point.
- Move the Zoom box in both images to the same location.
You can also select a point in one image and use the Auto Predict controls (Predict Left and Predict Right) to have the Wizard find the conjugate point in the other image.
- Use the Zoom windows for the two images to fine-tune the tie point location in both images.
- When the tie point location looks satisfactory, click Add to add the new tie point to the Stereo Tie Points List table.
Edit Tie Point Locations
The control buttons in Step 5 of the DEM Extraction Wizard allow you to maneuver from tie point to tie point, change the location of a point, update the list, and correct positional errors which may result from automated tie point generation.
- Use the left arrow and right arrow buttons next to the Current Stereo GCP: field to navigate through existing tie points.
- Examine the tie point location in both images looking for slight to obvious mismatch conditions. If the tie point in one or both of the images needs adjustment, use the Zoom window to fine-tune the tie point placement.
- When you are satisfied with the adjustments, click Update to update the Left/Right Stereo Image Coordinate of the tie point.
Using Auto Predict
The Auto Predict section contains three buttons (Predict Left, Predict Right, and Params) as well as the Region Elevation text field.
- Predict Left: When you select a new tie point in the right image, use Predict Left to predict the matching location in the left image. If the predicted location is not desirable, move the left tie point to the appropriate location and click Add to add the tie point as a new tie point, or click Update to have the Current Tie Point updated to the new location.
- Predict Right: Similarly, when you select a new tie point in the left image, use Predict Right to predict the matching location in the right image. If the predicted location is not desirable, move the right tie point to the appropriate location and click Add to add the tie point as a new tie point, or click Update to have the Current Tie Point updated to the new location.
- Params: When you select Params, the Predict Left/Right Parameters dialog opens. Use this dialog to adjust the Search Window Size and the Moving Window Size. If you increase the Search Window Size, this increases the chances that the automatic prediction can find the correct match; however, this increased search window requires more processing time to accomplish the auto predict task. If you increase the Moving Window Size, the auto prediction is more likely to find the correct match, but again, this requires more processing time to accomplish. Click OK to apply the changes and dismiss the dialog.
- Region Elevation: The value shown in this field is an average elevation based on the dominant elevation of the image. Adjust this value for each auto prediction based on your knowledge of the elevation of the point of interest. This value is used to guide the auto prediction process, so you should adjust it for each tie point prediction, especially if the elevation varies widely over the whole image.
View a Specific Tie Point
Use one of the following options to view a specific tie point:
- Click on a tie point number in the Likely Error Rankings list.
- Click on a tie point number in the Stereo Tie Points List table.
- Use the left arrow and right arrow buttons next to the Current Tie Point field to navigate through the tie points.
Examine the Tie Points
It is recommended that you examine tie points that were read from a file or automatically generated to determine their accuracy. Step 5 of the Wizard contains several ways to determine the accuracy of the tie points: the Maximum Y Parallax (which is a calculated from the tie points), the Likely Error Rankings of all the tie points, and the Stereo Tie Points List table.
Maximum Y Parallax Value
The Maximum Y Parallax value is only shown if there are more than nine tie points selected for the stereo pair. This number is the y-parallax value (in pixels) of all of the currently selected tie points in the output epipolar images, assuming that these points are used to compute the epipolar geometry of the stereo pair. The Maximum Y Parallax value is updated each time you edit and update one of the tie points.
The highest Maximum Y Parallax value allowed to continue with the next step of the Wizard is 10 pixels. Ideally, the y parallax value should be as close to zero as possible; however, a higher value such as 1 or 2 pixels may be acceptable.
If the value is close to 0 or 1, no further tie point adjustments are necessary. If it is much greater than 1 or 2, you should re-examine the tie points and correct those that are not good matches. When examining tie points for errors, you can use the tie points listed at the top of the Likely Error Rankings list or click the Show Table button to open the Stereo Tie Points List table. Use the Sort Table By drop-down list to select Error Rank as the sorting criteria. Tie points that are at the top of the list are those with the highest error likelihood.
The Maximum Y Parallax value is the quickest way to check how good the tie point placement is in your images. If, for instance, the Maximum Y Parallax for the automatically generated tie points was 33.7894 pixels, that would be quite a bit larger than the maximum allowable value of 10. In this case, if you declined to edit the tie points in Step 4, a warning message appears telling you that the Maximum Y Parallax value of 33.79 (in this case) exceeds the limit of 10. Use the Prev button in the DEM Extraction Wizard to go back to Step 5, and make sure all the tie points are correct before proceeding. By editing the tie points, you should be able to reduce the y-parallax value close to 0.
Likely Error Rankings
The Likely Error Rankings drop-down list displays tie points in the order of the likelihood of error; the first tie point in the list is the one with the greatest likelihood of error, and the last tie point is the least likely erroneous tie point.
The list shows the tie points followed by a number in parentheses. The number in parentheses is a value between 0.000 and 1.000, indicating the relative likelihood of error for that tie point, where 0.000 is the least likely and values close to or equal to 1.000 are the most likely. If you click on a tie point in the list, the Image window goes to that tie point number in both the left and right images. This is an easy method for editing the tie points; however, it is possible that the tie points at the top of the Likely Error Rankings list have no discernible error upon inspection. If this is the case, it is not necessary to make any further adjustments to those points; instead, check other points even if the error likelihood is lower.
Stereo Tie Points List Table
The Stereo Tie Points List table contains the Left/Right Stereo Image Coordinate data and an error rank for the tie points. The Error Rank is from the most likely error to the least; so, Error Rank 1 is assigned to the tie point pair with the highest likelihood of being a bad match.
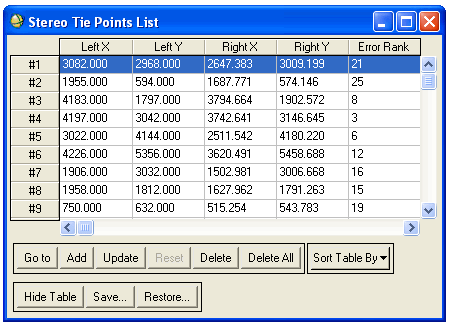
If the Maximum Y Parallax value shown in the View and Edit Tie Points section of step 5 is significantly bigger than 1, you should edit the tie points. You can click the Sort Table By drop-down button and select Error Rank as the sorting criteria. Scroll to the top of the list to see which tie points should be adjusted first.
When you click on a tie point number in the list, the Zoom boxes in both Image windows are updated to show that tie point location. You can make adjustments to the tie point location if necessary, and click Update in either the table or the Wizard to save the new location for that tie point. Whenever you update a tie point, the Error Rank in the table changes, along with the Maximum Y Parallax value.
It is possible for the Maximum Y Parallax value to not change appreciably when you adjust the one or two tie points with the highest Error Rank; and sometimes when you look in the images at the tie points listed in the table as the most likely erroneous, they appear instead to be fairly good matches. If this happens, it is best to scroll through the tie points and visually inspect the quality of each match, adjusting those which are less than optimal.
Note: If the tie points listed at the top of the error rank seem to be very good matches, but the Maximum Y Parallax value is still larger than 1, you should use the options in the View and Edit Tie Points section of step 5 of the Wizard to scroll through all of the tie points to find which points to edit.
After you have viewed your tie points and performed any adjustments necessary to reduce the Maximum Y Parallax value as close to 0 as possible, click Next to proceed to Step 6 of the Wizard.