Tutorial: Working with ENVI Servers Tutorial
This topic describes how to run multiple, concurrent ENVI processes in the background, in parallel, or distributed among different computers. You can monitor the status of processes, or jobs, and view the results when each job is complete. See the following sections:
Overview
You can designate one or more computers as ENVI Servers to run jobs. Each ENVI Server must have the following:
Each ENVI Server can be configured on a local computer or as a network resource. These options are described next.
Local ENVI Servers
You can designate a computer as an ENVI Server that will listen to requests to run jobs coming from other computers running ENVI on the same network.
When you install GSF on the local computer, select the default installation options. You do not have to configure anything else. Output files from jobs will be saved in the default GSF workspace, which is C:\GSF23\workspace on Windows systems or /opt/gsf23/workspace (installed as root) or $HOME/gsf23/workspace (not installed as root) on Linux systems. Once you submit jobs, they will run in the background. You can continue to work in ENVI or even close ENVI while the jobs run.
You can optionally increase the number of jobs, or workers, that can run at the same time. To modify this number, do one of the following:
- Set the Workers value in the Configuration: Workers panel of the GSF installer.
- After installing GSF, open the config.json file (located in the default GSF installation directory) in a text editor and edit the "workers" value; for example:
"workers": 3,
"restartWorkers": true
Stop and restart the GSF service so that the changes take effect.
Network of ENVI Servers
You can also configure one or more ENVI Servers to be used as network resources for distributed processing. For example, you may have one local ENVI Server and three additional ENVI Servers on a network. This allows you to scale jobs even further by sending them to multiple, remote computers working in parallel so that you can continue to work with ENVI on a local computer. This is a good option if the remote computers have more powerful resources that will result in faster completion times for jobs.
Creating a network of ENVI servers requires a few critical steps:
- Ensure that input data is in a shared location that the client and server computers can access. For example, if you have a raster in a Windows network location such as \\network_share\data\raster\qb_boulder_msi.dat and you submit a job that processes this raster, the remote ENVI Server must have access to the file using the exact same path.
- If the job you are going to submit to a remote server uses any custom tasks, those tasks must also be installed on the remote ENVI Server.
-
Set the location of output files (also called the workspace in GSF) to a shared network location that all computers can access. To do this, open the file config.json (located in the default GSF installation directory) in a text editor and edit the "root" value as shown below:
"workspaceManager": {
"type":"gsf-basic-workspace-manager",
"root":"shared network directory"
Note: if you're running GSF as a Service, make sure the user that is the owner of the service has proper writing permissions to this shared network location.
Then stop and restart the GSF service so that the changes take effect.
Also ensure the shared network directory is accessible by the user that is running the GSF service. By default, the GSF service runs as a local account on Windows. On Linux, this was specified during installation. If the GSF service fails to start after this configuration change, it is likely that the user running the service does not have permission to the shared network directory.
- If other people will access the network of ENVI Servers too, note the External Address that is reported in the Configuration: External Address dialog when installing GSF on those network computers. You can then share this URL with the others.
Note: When you submit a job to a remote ENVI Server, you are using a resource that is possibly being shared with other users. When you run jobs, be aware of their size and how much time you will use on that computer. It involves the same courtesy you would extend to others when using a shared network printer.
Add ENVI Servers
If you are using a local computer as a primary ENVI Server, you do not need to take extra steps to "add" it. When you run jobs in the background or in parallel, ENVI uses 'localhost' as the URL for its local ENVI Server.
The following instructions are for when you need to define remote ENVI Servers that will be used as network resources for distributed processing.
- Choose one of the following menu options:
- From the ENVI main menu bar, select Server > Add ENVI Server.
- From the ENVI Modeler menu bar, select Server > Add ENVI Server.
The Add ENVI Server dialog appears.
- In the Server URL field, enter the URL of a server computer where ENVI and GSF are installed. The URL can be just the server name. A port number is not required as long as it is the default port (9191). For non-default ports, include the port number; for example:
gsfserver:portnumber
- In the Name field, enter a custom name for the ENVI Server.
- Optional: To open the results that will be generated by a remote ENVI Server, click the Browse button
 next to Workspace Folder and select the preferred GSF workspace location where output files will be written. If you already configured the GSF workspace in the config.json file (see Network of ENVI Servers), select the same directory.
- Click OK in the Add ENVI Server dialog that appears. If the connection was successful, an information dialog will report that the new ENVI Server was successfully registered. The ENVI Server name is also available for selection when you run jobs.
- Repeat this process as needed for other ENVI Servers.
Manage ENVI Servers
After you define one or more ENVI Servers, you can manage them as follows:
- Choose one of the following menu options:
- From the ENVI main menu bar, select Server > Manage ENVI Servers.
- From the ENVI Modeler menu bar, select Server > Manage ENVI Servers.
The Manage ENVI Servers dialog appears. It lists the name of the client computer and the custom names of the ENVI Servers you have defined.
- Manage the ENVI Servers as follows:
- To add a new ENVI Server, click the Add button. The Add ENVI Server dialog appears. Follow the steps above to add a new ENVI Server.
- To edit the basic details of an ENVI Server, select the server name and click the Edit button. The Edit ENVI Server dialog appears. Update the Server URL, Name, and Workspace Folder for that ENVI Server and click OK.
- The versions of ENVI and its add-on modules should be the same between the local and remote ENVI Servers. To view the current version of ENVI and its modules, select a server name and click the Info button. A task progress window appears for a few seconds while information is retrieved, then the ENVI Server Information dialog appears. This dialog reports the details of the selected ENVI Server, including version numbers, workspace locations, etc.
- To remove an ENVI Server, select the server name and click the Remove button.
- Click OK in the Manage ENVI Servers dialog when you are finished.
Run Jobs
Once you have defined one or more ENVI Servers, you can run models or tasks on any of them. The following are some ways you can run jobs in the background or distributed among different computers.
Run Jobs in the Background
When running jobs in the background, a GSF installation is not required; however, if it is installed, background jobs will go through GSF. When GSF is used, you will have additional features, such as the ability to limit how many jobs can run in parallel, or to show progress during the job run.
If you have a local ENVI Server, you can use ENVI on that computer while submitted jobs run as different processes, completely unattended. This allows you to take advantage of powerful system hardware by using more of its processing cores and resources than a single ENVI application would.
- In the ENVI Modeler, click the down arrow
 next to the Run button and select Run Model in the Background. Or, select Server > Run Model in the Background from the ENVI Modeler menu bar. Your model should include an Output Parameters node so that you can easily view the result from the Job Console when processing is complete.
- Tools in the ENVI Toolbox that are based on ENVITasks have a down arrow in the tool dialog where you can select Run Task in the Background. An example is the Spectral Indices tool.
Run Jobs on Remote Servers
If you configured ENVI Servers on remote computers for distributed processing, you can choose to run models and tasks on those computers.
- In the ENVI Modeler, click the down arrow next to the Run button and select Run Model on remote ENVI Server name. Or, select Server > Run Model on remote ENVI Server name from the ENVI Modeler menu bar. Your model should include an Output Parameters node so that you can easily view the result from the Job Console when processing is complete.
- Tools in the ENVI Toolbox that are based on ENVITasks have a down arrow in the tool dialog where you can select Run Task on remote ENVI Server name. An example is the Spectral Indices tool.
When jobs are submitted, the ENVI Server Job Console appears so that you can monitor their progress and view results when processing is complete.
Monitor Jobs and View Results
The ENVI Server Job Console lists all of the jobs that you submitted, their progress, and a link to display the results when processing is complete. Jobs are categorized by the names of ENVI Servers that you configured; for example:

When you click Display results, the processed datasets are displayed in the ENVI view and added to the Layer Manager and Data Manager.
Click the folder icon  to open the workspace folder where the ENVI Server puts the files for that job.
You can manage the jobs that have been submitted by clicking the  button next to the name of the ENVI Server.
- Select Edit Server to edit the URL, name, and workspace folder of that ENVI Server.
- Select Cancel All Jobs to cancel all of the jobs that are currently running.
- Select Clear Completed to clear the list of jobs that have completed.
- Select Rerun Job (or click the
 icon) to rerun the last job.
- Select Display Results to display the result of the job.
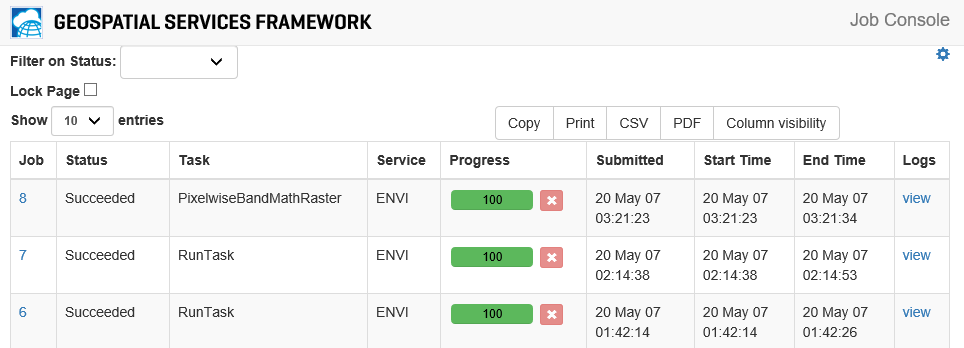
- Select Full GSF Console to display the Geospatial Services Framework job console. It shows everyone's jobs that have been submitted to the ENVI Server, not just the ones you submitted. However, note that you cannot display the processing results in this console.
See Also
ENVIServer (programming), Batch-Process Data on ENVI Servers, Visual Programming with the ENVI Modeler