In this tutorial, you will use Feature Extraction to extract rooftops from a multispectral QuickBird scene of a residential area in Boulder, Colorado. Feature Extraction provides a quick, automated method for identifying rooftops, saving an urban planner or GIS technician from digitizing them by hand. If you need more information about a particular step, click the blue Help button to access ENVI Help.
Files Used in This Tutorial
Tutorial files are available from our ENVI Tutorials web page. Click the Feature Extraction link to download the .zip file to your machine, then unzip the files. You will use the file named qb_colorado.dat for this tutorial.
This is a pan-sharpened QuickBird image (0.6-meter spatial resolution) of Boulder, Colorado, acquired on 04 July 2005. QuickBird images are courtesy of DigitalGlobe and may not be reproduced or distributed without prior written permission of DigitalGlobe.
Background
Feature Extraction uses an object-based approach to classify imagery, where an object (also called segment) is a group of pixels with similar spectral, spatial, and/or texture attributes. Traditional classification methods are pixel-based, meaning that spectral information in each pixel is used to classify imagery. With high-resolution panchromatic or multispectral imagery, an object-based method offers more flexibility in the types of features to extract.
The workflow involves the following steps:
- Dividing an image into segments
- Computing various attributes for the segments
- Creating several new classes
- Interactively assigning segments (called training samples) to each class
- Classifying the entire image with a K Nearest Neighbor (KNN), Support Vector Machine (SVM), or Principal Components Analysis (PCA) supervised classification method, based on your training samples.
- Exporting the classes to a shapefile or classification image.
Start the Workflow
- From the menu bar, select File > Open. The Open dialog appears.
- Navigate to feature_extraction, and select the file qb_colorado.dat. Click Open. The image is displayed at full resolution.
- From the Optimized Linear drop-down list in the toolbar, select Linear 2%. This type of stretch brightens the image, making it easier to see individual features.
- From the Toolbox, select Feature Extraction > Example Based Feature Extraction Workflow. The Data Selection panel appears.
- The filename is already listed in the Raster File field. Click Next. The Object Creation panel appears.
Segment the Image
Segmentation is the process of dividing an image into segments that have similar spectral, spatial, and/or texture characteristics. The segments in the image ideally correspond to real-world features. Effective segmentation ensures that your classification results are more accurate.
- Use the drop-down list in the main toolbar to zoom the image to 200% (2:1).
- Enable the Preview option. A Preview Window appears, showing the initial segments from the image, colored in green. The following image shows an example of a Preview Window centered over a residential area:
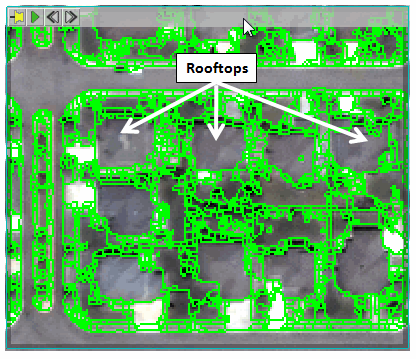
The initial segmentation shown in the Preview Window delineates the rooftops, but there are too many segments, which could potentially increase processing time. Use a combination of segmentation and merging to reduce the number of segments while providing clear boundaries around rooftops.
- The rooftops in this image appear much darker and provide better contrast against surrounding features in a near-infrared image. Applying segmentation to only the near-infrared band will produce cleaner boundaries around the rooftops. In the Object Creation panel, click the Select Segment Bands
 button. Then select the NIR band and click OK.
The Edge segmentation method draws lines along the strongest intensity gradients, making it an effective edge detector. The Full Lambda Schedule merging method then combines adjacent segments, as you increase the merging value.
You can achieve reasonable results with the following settings:
- Segment Algorithm: Edge
- Scale Level: 35
- Merge Algorithm: Full Lambda Schedule
- Merge Level: 80
The following image shows the resulting segmentation using these settings:
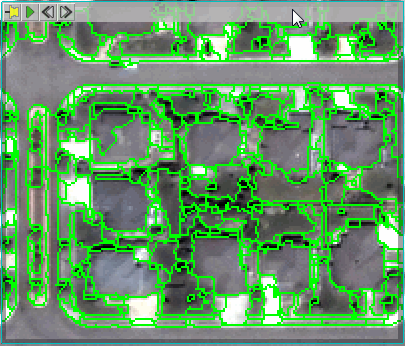
If you were to leave the Scale Value at the default value of 50, some rooftop segments would be combined with segments representing adjacent backyards or trees because they have a similar intensity. So a value of 35 works well to separate the two features.
- When you are satisfied with the segmentation, click Next. ENVI creates and displays a segmentation image (also called the Region Means image in the Layer Manager). Each segment is assigned the mean spectral values of all the pixels that belong to that segment. The Example-Based Classification panel appears.
Select Training Samples
In this step, you will select representative samples of different features and assign them to various classes before performing a supervised classification.
- To make the next steps quicker, disable the Preview option.
- In the Class Properties table, change the Class Name to Rooftop and press the Enter key.
- As you move the mouse around the segmentation image, the objects underlying the cursor are highlighted in cyan. You may need to click once on the image to activate this function. Click on at least 20 different segments that represent rooftops. Try to pick a variety of sizes, shapes, colors, and intensities. The more training samples you select, the better the results from the classification. The following image shows an example:
The following are some tips for selecting training samples:
- Click again on a segment to remove it from selection.
- If individual segments are hard to discern from each other in certain areas, enable the Show Boundaries option to draw boundaries around each segment.
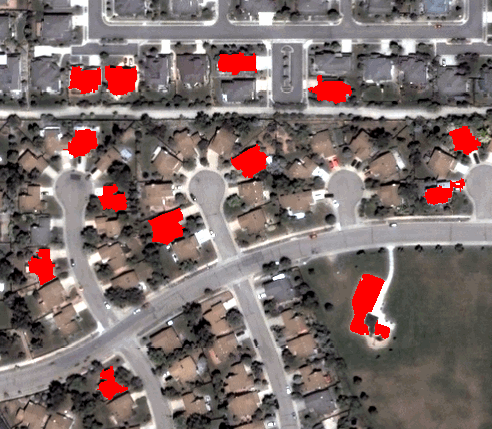
- If the segmentation image does not provide enough detail to determine if segments represent rooftops (versus a driveway or backyard, for example), uncheck the Region Means image in the Layer Manager. The original QuickBird image will display instead. The above image shows this view.
- If you pan or zoom around the image, remember to click the Select icon
 in the main toolbar before selecting training regions.
Next, define several more classes that are not rooftop.
- In the Example-Based Classification panel, click the Add Class button
 .
.
- In the Class Properties table, change the new class name to Grass and press Enter.
- Select Grass in the left side of the panel, then select at least 20 training samples from the image that represent grassy areas such as backyards, fields, and parks.
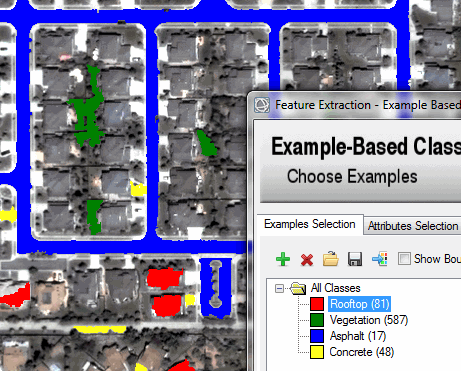
- Repeat steps 1-3 for the following classes: Concrete (curbs and driveways) and Road (asphalt only). Select at least 20 training samples each, and change the class colors as desired. The following shows an example of the classification panel; your results may be different:
- Click the Save an Example file button
 , and select an output folder and filename for the training regions you have defined. You can restore this file later if you want to continue where you left off.
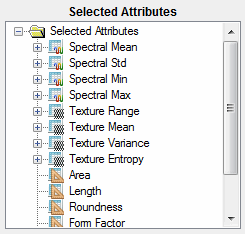
Select Attributes for Classification
For each segment, ENVI computes various spatial, spectral, and texture attributes. In this step, you can choose which attributes to use in the supervised classification. By default, all attributes will be used. See Spatial, Spectral, and Textural Attributes for definitions of all available attributes.
- Select the Attributes Selection tab in the Example-Based Classification panel.
- For this tutorial, you can let ENVI determine the most appropriate attributes to classify with by clicking the Auto Select Attributes button
 . After a brief moment, the Selected Attributes column updates to show which attributes will be used. The following image shows an example; your results may be different.
Select a Classification Method
Feature Extraction offers three methods for supervised classification: K Nearest Neighbor (KNN), Support Vector Machine (SVM), or Principal Components Analysis (PCA). For this tutorial, you will use KNN, which classifies segments based on their proximity to neighboring training regions. It is more rigorous than the other methods, and it more accurately distinguishes between similar classes.
- Use one of the Zoom tools in the toolbar to zoom to 100%.
- Enable the Preview option in the Example-Based Classification panel. A Preview Window appears with the current classification results. As you make changes to the training data, attributes, and classification settings, the classification results will automatically update. Move the Preview Window around the image or resize it to view results for different areas. The following image shows an example:
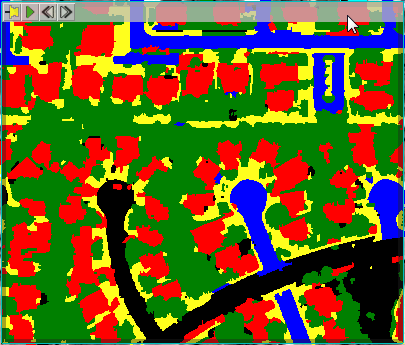
- Disable the Region Means option in the Layer Manager, to hide the segmentation image. The original QuickBird image will display underneath the Preview Window.
- Right-click inside the Preview Window and select Blend. The classification image gradually fades in and out to show the QuickBird image. Use the
 and
and  buttons to slow down or speed up the blend, respectively. Click the Pause button
  to stop the blend.
Black segments are those that the classifier could not determine a suitable class for, so they remain unclassified. In the Algorithms tab, enabling the Allow Unclassified check box will force all segments into one of the classes you defined.
You should focus on the accuracy of the Rooftop classification, since that is the feature you are extracting. The initial classification shown in the Preview Window shows many segments incorrectly identified as Rooftop. You have a couple of options to reduce these errors.
Adjust KNN Settings
- In the Algorithms tab, try increasing the Threshold value. The default value is 5 percent, which means segments that have less than 5 percent confidence in each class are set to "unclassified." As you increase the Threshold slider, the classifier will allow more unclassified segments. As you decrease the Threshold slider, the classifier forces more segments into classes, thus creating more opportunity for misclassification.
- Increase the Neighbors value to 3. A higher value takes into account more neighbors when choosing a target class and should reduce noisy or irrelevant features.
Collect More Training Samples
If segments that are persistently being misclassified, you can assign them to known classes by following these steps:
- Select the Examples Selection tab.
- On the left side of the Example-Based Classification panel, select the class name that you want to assign the segment to.
- Ensure that the Select icon is active in the toolbar.
- In the image display, click on the segment to assign it to the selected class.
Define a New Class
You will probably notice that some trees and grassy areas are incorrectly classified as Rooftop. Try creating a new class called Trees and select training samples for that class:
- In the Example-Based Classification panel, click the Add Class button .
- In the Class Properties table, change the new class name to Trees and press Enter.
- Select Trees in the left side of the panel, then select at least 20 training samples of trees, including their shadows.
Continue to experiment with these options until you are satisfied with the classification of rooftops. Then click Next. In the next step, you will export a Rooftop class to a raster file.
Set Output Options
The Output panel lets you export various components of the supervised classification to raster images and/or shapefiles. For this tutorial, you will export a classification image to ENVI raster format, then overlay the classes on the original image. By default, the classification image will include all of the classes that you defined.
- In the Export Vector tab, disable the Export Classification Vectors option.
- In the Export Raster tab, enable the Export Classification Image option, and select an output directory to save the file. Change the output filename to qb_colorado_classimage.
- Click Finish. ENVI adds a new layer called qb_colorado_classimage.dat to the Layer Manager. To view this layer over the original image, use the Transparency slider in the main toolbar to increase the transparency of the classification image.
The example-based classification did a fairly good job of extracting rooftops, but like any automated method, it did not extract every segment that represents rooftops. In some areas, the texture and brightness of rooftops was similar to adjacent yards, so the two features may have been combined into one class. Or, other features may have been misclassified as Rooftop. If you are not satisfied with your results, try experimenting with different segmentation and merging values, try a different classification method, or collect more training samples.