Use the Enhance Crops tool to create an image that enhances individual crops, for input to the Count Crops tool. You can optionally set minimum and maximum pixel value thresholds on an image, then invert the remaining pixel values. This tool is best used with high-resolution imagery from an unmanned aerial vehicle (UAV) or other airborne sensor.
If the imagery includes a near-infrared band, you do not have to use the Enhance Crops tool. Instead, use the ENVI Spectral Indices tool to highlight healthy crops prior to using the Count Crops tool. Although the Enhance Crops tool can be used with any image, it was designed for use with three-band RGB images (JPEG, PNG, and others).
This tool requires a separate license for the ENVI Crop Science Module; contact your sales representative for more information.
You can also write a script to enhance crops using the ENVIAgEnhanceCrops function.
See the following sections:
Run the Enhance Crops Tool
Follow these steps:
- From the Toolbox, select Crop Science > Enhance Crops. The Enhance Crops dialog appears.
- Select a single-band Input Raster. Examples include:
- A spectral subset consisting of a single band. If you have a multispectral image, you must define a spectral subset with one band. For example, bands in the green wavelength region (530 to 590 nanometers) or red edge region (700 to 710 nanometers) can have lower reflectance values due to the presence of chlorophyll in leaves. Either band is a good choice for highlighting healthy vegetation.
- A spectral index image that highlights healthy vegetation.
- Optional: Specify a Minimum Data Value for the input image. Pixels less than this value are set to NaN and will be ignored in subsequent processing. An example is setting a minimum value to remove dark shadows from a spectral index image (such as NDVI) or from a single-band image where Inverse Data is set to No.
- Optional: Specify a Maximum Data Value for the input image. Pixels greater than this value are set to NaN and will be ignored in subsequent processing. An example is setting a maximum value to remove shadows and soil pixels in an inverted green band image. These features have a similar brightness value to healthy vegetation and should be removed to reduce confusion in the Count Crops tool.
- Optional: Set Inverse Data to Yes if you want to invert the remaining pixel values, after setting the minimum and maximum data values. An example is to invert the values in a green band, which will enhance actively growing vegetation. The Enhance Crops tool sets any minimum and maximum data values that you specify, before inverting the pixel values.
- Select an output filename and location for the Output Raster.
-
Enable the Preview check box to preview the settings before processing the data. The preview is calculated only on the area in the view and uses the resolution level at which you are viewing the image. To preview a different area in your image, pan and zoom to the area of interest and re-enable the Preview option. Depending on the algorithm being used by the tool, the preview result might be different from the final result of processing on the full extent, full resolution of the input image in the following scenarios: 1) If you zoomed out of the input raster in the view by 50%, or a percentage less than 50%, ENVI uses a downsampled image at the closest resolution level to calculate the preview, or 2) If the entire image is not visible in the view, ENVI uses the subset in the viewable area of the input image to calculate the preview.
-
Enable the Display result check box to display the output in the view when processing is complete. Otherwise, if the check box is disabled, the result can be loaded from the Data Manager.
-
To see a model-based version of this tool that shows how the tool is constructed from individual tasks, click Open in Modeler.
-
To reuse these task settings in future ENVI sessions, save them to a file. Click the down arrow next to the OK button and select Save Parameter Values, then specify the path and filename to save to. Note that some parameter types, such as rasters, vectors, and ROIs, will not be saved with the file. To apply the saved task settings, click the down arrow  and select Restore Parameter Values, then select the file where you previously stored your settings.
-
To run the process in the background, click the down arrow next to the OK button and select Run Task in the Background. If an ENVI Server has been set up on the network, the Run Task on remote ENVI Server name is also available. The ENVI Server Job Console will show the progress of the job and will provide a link to display the result when processing is complete. See ENVI Servers for more information.
- Click OK.
Examples
Inverted Red Band - Almond Trees
This example shows how to enhance almond trees by setting minimum and maximum pixel value thresholds, and by inverting the red band in a multispectral image.
The example uses three-band (RGB) High-Resolution Orthoimagery from the U.S. Geological Survey (0.5-foot spatial resolution) to demonstrate the use of the Enhance Crops tool. More likely, you would use high-resolution multispectral imagery from an unmanned aerial vehicle (UAV) or other airborne sensor.
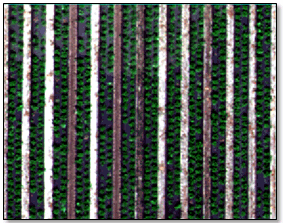
A region of interest (ROI) was created to isolate a specific field, then the RGB image was spatially subsetted to the extent of the ROI. See Examples of Subsetting by ROI in the Find Hotspots topic for steps on how to do this. The following image shows the orthophoto spatial subset that includes the field of interest. The white areas are masked pixels.
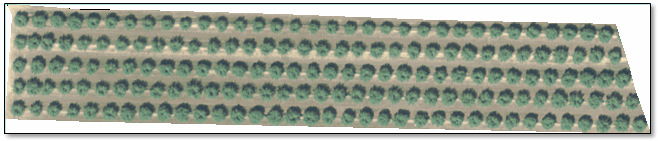
Normally, the green band is more sensitive to chlorophyll content than other bands. In this case, however, the red band provides good contrast between the crops, shadows, and background soil pixels. A spectral subset was created that included only the red band.
Tip: To create a spectral subset, select File > Save As > Save As (ENVI, NITF, TIFF, DTED) from the ENVI menu bar. In the Data Selection dialog, click the Spectral Subset button. Select a specific band for the spectral subset and click OK.
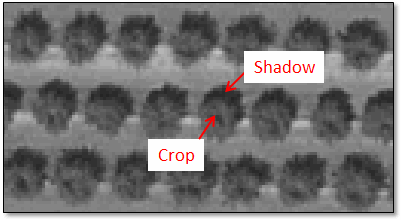
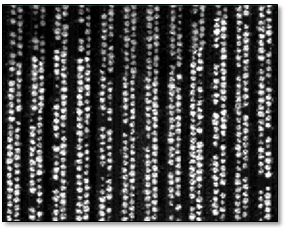
The next figure shows a magnified view of a portion of the red band. The shadow pixels are slightly darker than the vegetation pixels. Also, the soil has some bright spots.
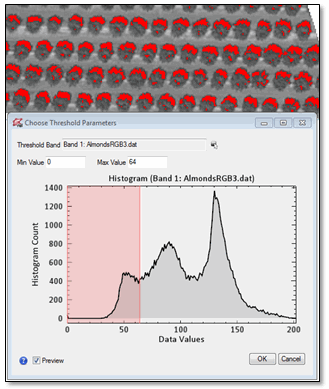
You can use a region of interest (ROI) threshold to isolate and mask the shadow pixels, along with the bright soil pixels. To do this, right-click on the image name in the Layer Manager and select New Region of Interest. In the ROI Tool dialog, click the Threshold tab. Then click the Add New Threshold Rule button  . In the Data Selection dialog, select the band name and click OK.
In the Choose Threshold Parameters dialog, enable the Preview option. Click and drag the slider along the left side of the histogram to find a range of pixel values (beginning with 0) that highlights the shadow pixels. A threshold of 64 and below works well for the red band in this example.
In the ROI Tool, click the New ROI button  . Click the Threshold tab, then click the Add New Threshold Rule button. In the Choose Threshold Parameters dialog, enable the Preview option. Click and drag the slider along the right side of the histogram to find a range of pixel values that highlights the soil pixels. A threshold of 110 and above works well for the red band in this example.
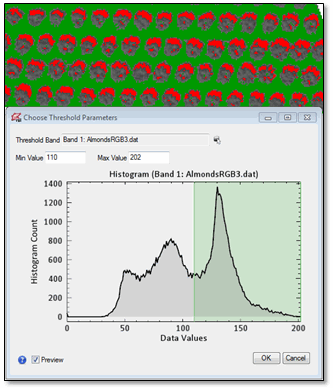
The remaining pixels are the almond trees.
Start the Enhance Crops tool, and select the single-band image for the Input Raster. Enter the Minimum Data Value (64 in this example) and a Maximum Data Value (110 in this example). Pixels values below 64 and above 110 will be set to values of NaN and masked out in the output image. Also, set the Inverse Data option to Yes. Click OK. The following image shows the result:
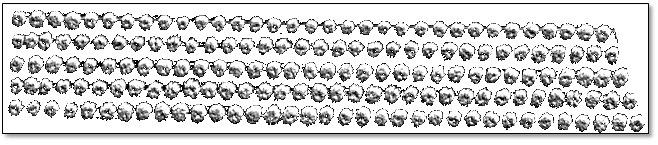
This image can now be used as input to the Count Crops tool. That tool looks for bright, circular shapes against a dark background as the basis for counting crops. In this example, the crop pixels are dark. However, since the background pixels and shadows have been masked out, the Count Crops tool identifies the circular shapes that remain, and it counts them.
Spectral Index - Strawberries
You can also create a spectral index to enhance crops. In this case, set a Maximum Data Value or Minimum Data Value (or both). Since healthy vegetation appears bright in most vegetation indices, you do not have to invert the pixel values.
This example uses AgEagle RedEdge® UAV reflectance imagery with a ground sample distance of 8 centimeters per pixel (at 400 feet). Spectral bands include blue, green, red, red edge, and near-infrared. The area of interest contains strawberry crops.
A Simple Ratio spectral index works well to highlight the crops while suppressing the background soil pixels:
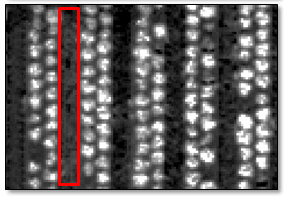
Some soil pixels still remain that are relatively bright; for example:
The ROI thresholding tool can help identify a suitable minimum pixel value threshold to use for the Enhance Crops tool. See the previous example for instructions on using the ROI thresholding tool. A pixel value range of 0 to 3 works well in this example to identify all soil pixels in the Simple Ratio image:
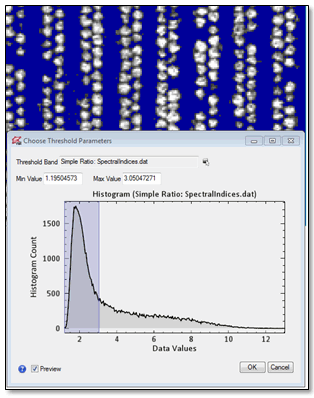
A Minimum Data Value of 3 was used in the Enhance Crops tool. The Invert Data option was set to No, and the Maximum Data Value was not set. The resulting image looks like this:
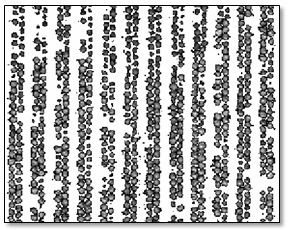
This image can now be used as input to the Count Crops tool.
See Also
Count Crops, Crop Metrics, Crop Metrics with Spectral Index