Radiometric Calibration
Use Radiometric Calibration to calibrate image data to radiance, reflectance, or brightness temperatures.
You can also write a script to perform calibration using the RadiometricCalibration task. The virtual raster associated with this task is ENVICalibrateRaster. Or, use the ApplyGainOffset task to apply custom gains and offsets to a raster that will be input to a custom calibration routine.
The following table lists the calibration options that are available by sensor type. Use the File > Open menu option to select the metadata files listed in the table.
|
Sensor
|
Calibration Options
|
Metadata File to Open
|
|
Radiance |
Reflectance |
Brightness
Temperature
|
|
ALOS AVNIR-2 and PRISM Level-1B2 data
|
• |
• |
|
HDR*.txt
|
|
AlSat-2A |
• |
|
|
.dim
|
|
DMC DIMAP |
• |
• |
|
.dim
|
|
EO-1 ALI |
• |
• |
|
Use the File > Open As > Optical Sensors > EO-1 > HDF4 menu option and select a *_HDF.L1G file. A *_MTL.L1G file must be in the same directory.
|
|
EO-1 Hyperion Level-1R
|
• |
• |
|
Use the File > Open As > Optical Sensors > EO-1 > HDF4 menu option and select an .L1R file. Calibration metadata is hard-coded into the application and not read from any metadata files.
|
|
Gaofen-1 |
• |
• |
|
Use the File > Open As > Optical Sensors > CRESDA > GF-1 menu option and select an .xml file.
|
|
GeoEye-1 |
• |
• |
|
.til
|
|
IKONOS
|
• |
• |
|
metadata.txt
|
|
KOMPSAT-3 |
• |
|
|
*_aux.xml
|
|
Landsat TM, ETM+, and Landsat-8 OLI/TIRS data
|
• |
• |
• |
*_MTL.txt, *WO.txt, *.met
|
|
OrbView-3 |
• |
• |
|
.tif
|
|
PlanetScope |
• |
• |
|
*_metadata.xml
ENVI reads and retains the original calibration metadata so that you can perform your own calibration to radiance and/or TOA reflectance if desired.
|
|
Pleiades-HR 1A, 1B Primary and Ortho (single or mosaic)
|
• |
|
|
DIM*.xml
|
|
Pleiades-HR DIMAP V2 (JPEG2000, TIFF)
|
• |
• |
|
DIM*.xml
|
|
QuickBird |
• |
• |
|
.til
|
|
RapidEye Level-1B and -3A (TIFF, NITF)
|
• |
• |
|
*_metadata.xml
A NITF/NSIF license is required to open NITF files.
|
|
ResourceSat-2 |
• |
|
|
.h5
|
|
Sentinel-2 |
• |
• |
|
*.xml
|
|
Sentinel-3 |
• |
|
|
*.xml
|
|
SkySat |
• |
• |
|
*_metadata.json
ENVI reads and retains the original calibration metadata so that you can perform your own calibration to radiance and/or TOA reflectance if desired.
|
|
SPOT DIMAP |
• |
• |
|
DIM*.xml
|
|
SSOT DIMAP |
• |
|
|
METADATA.DIM
|
|
TripleSat/DMC3 |
• |
• |
|
*.xml, *.dim
|
|
UrtheCast Theia |
• |
|
|
*.xml
|
|
WorldView |
• |
• |
|
.til
|
|
Ziyuan-1-02C |
• |
• |
|
Use the File > Open As > Optical Sensors > CRESDA > ZY-1-02C menu option. Select from the following files: *.orientation.xml opens the MUX-PAN data product with metadata, *-MUX.xml opens multispectral data with metadata, *-PAN.xml opens panchromatic data with metadata, and *.xml opens the HRC data product (images with two parallel cameras) with metadata.
|
|
Ziyuan-3A |
• |
• |
|
Use the File > Open As > Optical Sensors > CRESDA > ZY-3 menu option. Select from the following files: *.orientation.xml opens the TLC data product (images with nadir, forward, backward view) with metadata, *.xml opens multispectral data with metadata, *-NAD.xml opens TLC nadir-view data with metadata.
|
ENVI automatically calibrates the following data types as follows:
- Göktürk-2: Radiance
- MODIS/ASTER Simulator (MASTER): Radiance
- NPP VIIRS
- RASAT: Radiance
- SkySat-1 and -2 legacy radiance products
- ASTER Level-1B: ENVI converts byte-scaled radiance data into floating-point radiance units. For Level-1A data, it performs a complete calibration to radiance. The units of the output ASTER radiance are W/m2/μm/sr.
- MODIS Level-1B through 4 (HDF-EOS): ENVI converts the 16-bit data to radiance floating-point data in units of W/m2/μm/sr. It also automatically computes emissivity and reflectance data without units.
Follow these steps to perform radiometric calibration:
- From the Toolbox, select Radiometric Correction > Radiometric Calibration.
- Select an input raster and perform optional spatial and spectral subsetting and/or masking. Click OK.
- If you are using Landsat data, choose one of the following options:
-
From the Calibration Type drop-down list, select one of the following options:
-
Radiance: This option is available if the image has gains and offsets for each band. ENVI reads these values from metadata from the sensors listed above. Radiance is computed using the following equation:

ENVI expects gains and offsets to be in units of W/(m2 * sr * µm). If so, then radiance will be in units of W/(m2 * sr * µm).
WorldView-3 calibration coefficients are defined in the sensor_attributes.json file, located in the ENVIxx\resource\filterfuncs directory.
-
Reflectance: Top-of-atmosphere (TOA) reflectance (0 to 1.0). This option is available if the image has gains, offsets, solar irradiance, sun elevation, and acquisition time defined in the metadata. ENVI reads these values from metadata from the sensors listed above.
If the input file contains metadata for reflectance gains and offsets, ENVI uses those values to calibrate the data to TOA reflectance. With Landsat-8 files, ENVI scales the reflectance gains and offsets by the sine of the sun elevation.
If the input file does not contain metadata for reflectance gains and offsets, ENVI computes TOA reflectance using the following equation:
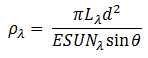
Where:
 = Radiance in units of W/(m2 * sr * µm)
 = Earth-sun distance, in astronomical units.
 = Solar irradiance in units of W/(m2 * µm)
 = Sun elevation in degrees
-
Brightness Temperature: This option is only available for Landsat-8, ETM+, and TM thermal imagery. Brightness temperatures (in Kelvin) are computed as follows:
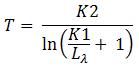
Where:
 and
and  = Calibration constants, in Kelvin. ENVI reads these values from the Landsat metadata.
Note: To edit or override values for gains, offsets, earth-sun distance, solar irradiance, sun elevation, or acquisition time (for example, if you believe the vendor metadata are incorrect), use the ENVI application programming interface (API) to read the imagery, then set the METADATA_OVERRIDE keyword to ENVI::OpenRaster to set your own metadata values.
- To output radiance in different units than W/(m2 * sr * µm), enter a multiplicative Scale Factor to get the calibrated image in your desired units. Otherwise, leave the default value of 1.
-
From the Output Data Type drop-down list, select a data type for the calibrated image:
- Specify a filename and location for the output raster.
- Enable the Display result check box to display the output in the view when processing is complete. Otherwise, if the check box is disabled, the result can be loaded from the Data Manager.
To reuse these task settings in future ENVI sessions, save them to a file. Click the down arrow next to the OK button and select Save Parameter Values, then specify the path and filename to save to. Note that some parameter types, such as rasters, vectors, and ROIs, will not be saved with the file. To apply the saved task settings, click the down arrow  and select Restore Parameter Values, then select the file where you previously stored your settings.
-
To run the process in the background, click the down arrow next to the OK button and select Run Task in the Background. If an ENVI Server has been set up on the network, the Run Task on remote ENVI Server name is also available. The ENVI Server Job Console will show the progress of the job and will provide a link to display the result when processing is complete. See ENVI Servers for more information.
- Click OK.