If you chose Define GCPs Interactively or loaded a GCP file to edit in Step 2 of the DEM Extraction Wizard, the stereo image pairs are loaded into two display groups and Step 3 of 9 appears, allowing you to collect GCPs interactively.
You can edit and add new GCPs in any of several different ways:
Whenever you make a change to an existing point that you want to keep, you must click the Update button in either the View and Edit Stereo GCPs section of the Wizard, or in the Stereo GCP Table. This updates the map coordinates and location information for that GCP.
If you decide that the current GCP is not what you want, click Delete to erase the current GCP.
If you make changes to a GCP but then decide you do not want to keep the changes, click Reset to return the GCP to its location prior to the editing changes.
Left/Right Stereo Image Coordinates
The Left/Right Stereo Image Coordinate fields show the currently selected pixels in the left and right images.
- You can type known values into the Left X, Left Y, Right X, and Right Y fields and click Enter to move the Zoom box to the coordinates on the images.
- Enter or modify the Map (x, y, z) Coordinate values of the GCP.
Optionally, before you enter the Map (x, y, z) Coordinate, you can click Predict Map to have the Map (x, y, z) Coordinate predicted from the Left X, Y, Right X, Y location and the RPCs of the images. By comparing the predicted map coordinates with the true map coordinates of the GCP, you may be able to determine whether the GCP is valid or not.
- Click Add to add the new GCP to your list of GCPs.
- Continue to add points until you have entered all the GCPs.
- If you have a GCP that needs some adjustment, make the adjustment in the Image window, and click Update to update the GCP settings.
Add Known GCP Locations
If you have GCP map (x, y, z) coordinates, use this procedure to enter the data.
- Click Change Proj to assign the projection to the map projection of your GCPs.
- Enter the Map (x, y, z) Coordinate values to specify the map location and the Elevation of the known GCP position.
- Click Predict Left/Right to have the Left/Right Stereo Image Coordinate predicted from the chosen map location and the RPCs of the images.
- Fine-tune the GCP location in both images by using the Zoom window for each image.
- Click Add to add the new GCP to your list of GCPs.
- Continue to add points until you have entered all your GCPs.
- If you have a GCP that needs some adjustment, make the adjustment in the Image or Zoom windows, and click Update to update the GCP settings.
Map (x, y, z) Coordinate
- You can also enter the Map (x, y, z) Coordinate values to specify a map location for a known GCP. The Projection Selection dialog appears, allowing you to change the projection and/or change the projection units.
- You can change the Easting and Northing fields to Latitude and Longitude map coordinates for the current GCP by clicking the toggle button next to the map projection.
- Enter the elevation in meters in the Elevation (Meters) field for the point described by the E, N (or Lat/Long) values.
- Click Add to add the new GCP to your list of GCPs.
Note: While ENVI accepts one to any number of GCPs, it is desirable to have four or more GCPs evenly distributed around the images.
Note: Information must appear in the Map (x, y, z) Coordinate section in order to use the View and Edit Stereo GCPs functionality.
Automatic Prediction
The Auto Predict buttons predict the Map (x, y, z) Coordinate from either a chosen point on the images or by entering values for the Left/Right Stereo Image Coordinate. You can also automatically predict the Left/Right Stereo Image Coordinate from given map coordinates.
Stereo GCP List Table
The Stereo GCP List contains the Left/Right Stereo Image Coordinate data, the Map (x, y, z) Coordinate data, and the error in the x, y, z directions for the GCPs.
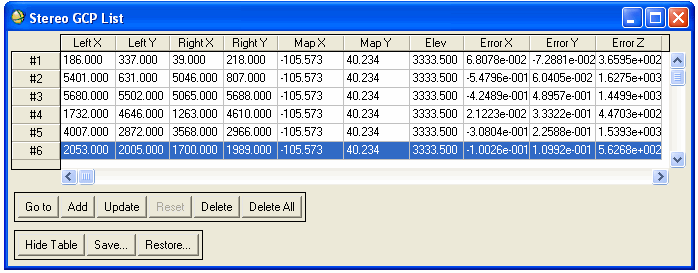
Note: The Map (x, y, z) errors in the table provide the difference between predicted map coordinates and the GCP map coordinates that you enter. Use these error values to identify gross errors in the GCPs.
The table also contains the same buttons found in the View and Edit Stereo GCPs section of the Wizard. When you click on a GCP number in the table, the left and right images are updated with the red Zoom box centered on the selected GCP. After you choose GCPs and complete editing, click Next to continue.