Calculate Viewshed Analysis
Use the Viewshed Analysis tool to determine features that can be seen from one or more observation points. ENVI LiDAR calculates results on-the-fly as you add, move, and edit observer points. You can interactively include and exclude selected observer points from the calculation; and you can show what is visible for any observer point, or only what is visible from all observer points.
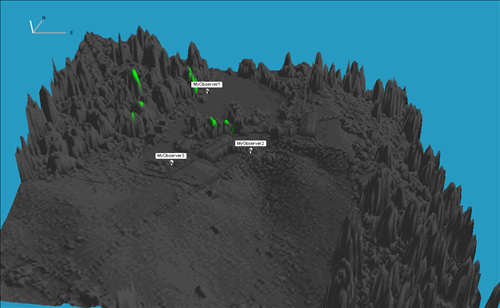
The following example shows the DSM, with three observer points marked to show what is visible to any of them:

The following example uses the same three observer points as above, but a setting was changed to show only what is visible to all of them:
Click the Viewshed Analysis button  on the toolbar to enable Viewshed Analysis mode. In Viewshed Analysis mode, point layers that are enabled in the Layer Manager automatically toggle off so that only the DSM layer is visible. You can do the following with Viewshed Analysis:
Add Observer Points
To calculate Viewshed Analysis, enable Viewshed Analysis mode, then add observer points in the Main window. The calculation is based on the location of the observer points, and the parameters set for those points.
You can add observer points interactively in the Main window, or importing observer point data from a text file. You can also save the observer points you add to a text file or shapefile file that can be used with other ENVI LiDAR projects.
Add Observer Points in the Main Window
-
In the Main window, do one of the following:
- Ctrl+click on a location.
- Double-click on a location, then select New Observer Point.
The observer point is added to the Main window, and the Add Observer Point dialog appears, with default settings for the new observer point applied.
-
Set the New Observer Point settings for an individual observer point:
- Name: The label for the observer point. The default is Observer #. The label can be shown in the Main window as an annotation if Show Name in Main Window is enabled.
- Radius (m): The radius around the observer point to include in the Viewshed Analysis calculation, in meters. The minimum radius is 1 meter, the default is 100 meters.
- Height Above Base (m): The height of the observer point from its base (the base could be on terrain, rooftop, and so forth). The default is 2 meters.
- Disabled: Hides or includes the observer point from the viewshed calculation. By default, the check box is disabled and the observer point is included. This is useful if there are multiple observer points and you want to toggle observers on and off in the calculation without deleting the points.
- Visible Color: The display color for areas visible from the observer point. The default color for the first observer point is green and remains the same until you change it. Click the Visible Color button to select a different color. If Visible From is set to All Observers, then the From All Observers Color will be applied instead.
- Observer Color: The color of the observer point. Click the Observer Color button to select a different color. The default color for the first observer point is white and remains the same for all observer points until you change it.
- Directional: Enable this check box when the observer point has a restricted field of view, or if it is an optical device.
- Observer Direction: Opens the Observer Direction dialog, to set directional properties when the observer point is an optical device such as a camera.
-
Set the Visible From settings for viewshed calculation:
- Any Observer: Shows all areas visible to any observer point.
- All Observers: Shows areas that are only visible to all of the observer points.
- From All Observers Color: The default color for areas that can be seen by all observer points. The default color is green. Click the From All Observers Color button to select a different color.
- Change the Common Properties default settings as needed.
- Click OK to add the observer point in the Main window. An Observer Points layer is added to the Layer Manager when you create the first observer point; this layer will contain all the observer points you create.
Import Observer Points from a File
If you have a text file that contains coordinates for observer points, you can import them into Viewshed Analysis. See Observer Points Text File Format for information on the required data for the import file.
-
Do one of the following:
- In the Manage Observer Points dialog, click the Export button.
- From the menu bar, select File > Import > Observer Points Text File.
The Import Observer Points dialog appears.
-
Select the Input Projection System from the drop-down list. The drop-down list options are:
- Geographic Lat/Lon. When you select this option, the UTM Zone of the first point in the list is automatically selected, and the Calculated LON LAT field displays the coordinate of that point.
- UTM
- Geocentric (ECEF). When you select this option, the UTM Zone is automatically selected, and the Calculated LON LAT field displays the coordinate of the first point in the list.
-
Arbitrary. Choose this option when you do not know the projection information for the file, but wish to continue creating the project. You must select the Input Units to use in the project. When using arbitrary coordinates, the following features are not available: product export coordinate system, cursor location coordinate system selection, and jump to location coordinate system selection.
If you do not find the projection system you need, click the Advanced button to select a projection system using the Select Coordinate System dialog.
- Select the Input Datum from the drop-down list.
- Select the Input Units from the drop-down list. The choices are:
- Meters
- Feet in International Standard
- Feet in US Survey Standard
-
Select the UTM Zone from the drop-down list.
Note: The UTM zone is required even when the Input Projection System is not UTM.
- To Skip Header Lines, select the number of lines to skip from the top of the file in the drop-down list.
- Click the headings of the table and select the data type for that column.
- Click OK.
Export Observer Points to a File
To export observer points to a comma-delimited text file or a shapefile that can be used by other ENVI LiDAR projects:
-
Do one of the following:
- In the Manage Observer Points dialog, click the Export button.
- From the menu bar, select File > Export > Observer Points.
The Select Format dialog appears.
- Select .shp or .csv format from the drop-down list.
- Click OK.
Set Common Observer Point Properties
Custom properties are shared by all observer points. You can change them in any of the Observer Point dialogs. Click the Common Properties arrow to expand the property settings, which are described below:
- Show Name in Main Window: Enable or disable this check box to display the observer names as annotations in the Main window. The check box is enabled by default.
- Show Obscured: By default, areas within the Radius that are not visible by any observer points display in the Out of Range Color color. Enable this check box to show obscured areas in a different color than what is set for the Obscured Color.
- Obscured Color: The display color for areas obscured from the observer points. The default is red. Click the button to select a different color.
- Out of Range Color: The display color for areas outside the Radius for the observer points. The default is gray. Click the button to select a different color.
- Show Range Rings: Range rings mark the distance of the visible area from the observer point in concentric circles. By default, range rings do not appear in the Main window. To show range rings, enable this check box.
- Range Rings Color: The display color for range rings. The default is black. Click the button to select a different color.
- Range Rings Radius: The intervals at which to mark range rings, in meters. The default is 50 meters.
- Show Radius Text: Enable or disable this check box to display range ring intervals as annotations in the Main window. The check box is enabled by default.
- DSM Resolution: Select the DSM grid resolution from the drop-down list. Resolution settings range from 5 centimeters to 10 meters spacing. The default is 1 meter, which generally provides good results for Viewshed Analysis. Coarser resolution settings may not provide optimal or acceptable results. This parameter can also be set in the Production Parameters tab in the DSM Grid Resolution field.
Set Directional Properties
Use the Observer Direction properties when the observer point is has field-of-view restrictions. When you click the Observer Direction button in any of the Observer Point dialogs, the Observer Direction dialog appears. Use the slider bars to adjust the settings, or enter a specific value in the field provided.
- Enter the Azimuth angle, in degrees. The Azimuth value is the number of degrees clockwise from North. It sets the horizontal orientation of the observer point.
- Enter the Pitch angle, in degrees. The pitch value is the distance up from the horizon. It sets the vertical orientation of the observer point.
- Enter the Horizontal Field of View, in degrees. This is the horizontal range of the observer point.
- Enter the Vertical Field of View, in degrees. This is the vertical range of the observer point.
- Click Apply to see what the settings look like in the Main window. Adjust the settings if necessary and click Apply again.
- Click OK to save the settings.
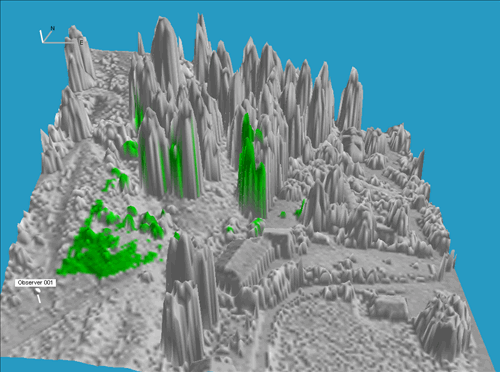
The following image shows the Viewshed Analysis calculation for a directional observer point:
Edit and Manage Observer Points
You can change settings for one or all observer points, and you can add, move, and delete observer points. Viewshed Analysis is automatically recalculated when observer points are edited.
-
Do one of the following:
- To edit properties for a single observer point, right-click an observer point in the Main window and select Edit Observer Point. The Edit Observer Point dialog appears with the settings for the selected observer point.
- To edit properties for all observer points, right-click an observer point in the Main window and select Manage Observer Points. You can also right-click the Observer Points layer in the Layer Manager and select Manage Observer Points. The Manage Observer Points dialog appears.
- If you are using the Manage Observer Points dialog to edit all observer points, click a point name in the Observer Points list to select it. The Main window view centers over the point.
To edit observer points:
- To change the values for the fields, see the descriptions in Add Observer Points.
- To delete the observer point, click Delete. You can also delete an observer point from the Main window by right-clicking the point and selecting Delete Observer Point.
- To delete all observer points, click Delete All. You can also delete all observer points by right-clicking the Observer Points layer and selecting Delete All Observer Points.
To move observer points:
- In the Main window, right-click an observer point and select Move Observer Point, then click the new location for the observer point.
- In the Manage Observer Points dialog, select the point in the Observer Points list, and click Move, then in the Main window, click the new location for the observer point.
- In the Layer Manager, right-click the Observer Points layer and select Manage Observer Points. In the Manage Observer Points dialog that appears, select the point in the Observer Points list and click Move, then in the Main window, click the new location for the observer point. This selection method is helpful if the observer point is difficult to find in the terrain.
Export Viewshed Analysis Data
You can export the Viewshed Analysis calculation to a raster format, and you can launch the Viewshed Analysis raster in ENVI.
To export the Viewshed Analysis calculation to a raster format, select File > Export > Viewshed Analysis Raster from the menu bar, then select the output format. To open the raster in ENVI, see Launch ENVI LiDAR Products in ENVI.