This topic describes how to specify the location of processing output and how to make the results available in the Data Manager and views. See the following sections:
Specify Output Files
You can specify the names and locations of processing results by adding Output Parameters nodes, Generate Filename nodes, or Data Manager nodes to a model.
Output Parameters
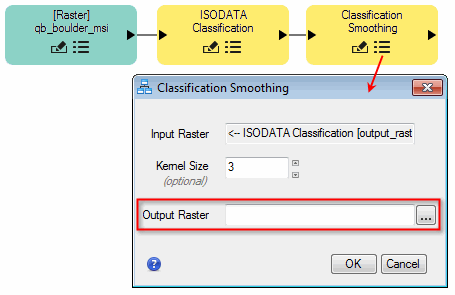
Click the  button in the Task node where you want to create output, then specify the output filename and location in the dialog for that task. For example, the Classification Smoothing node has an Output Raster parameter:
This is a good option to run a model once and save the results to disk.
If you do not specify an Output Raster, ENVI will write a temporary file to the directory specified by the Temporary Directory preference, then delete the temporary files once ENVI closes. ENVI creates the filename automatically, based on the task name; for example, ClassificationSmoothing_output_raster_<date>.dat.
Some Task nodes create virtual rasters, where no output is written to disk. Virtual rasters provide an efficient way to pass the results of one raster to the input of another task. See Virtual Rasters topic for a full list. An example is the Band Math node:
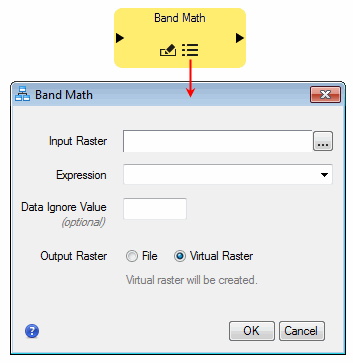
You can choose to write the output to disk by selecting the File radio button and specifying an output filename and location.
Generate Filename Nodes
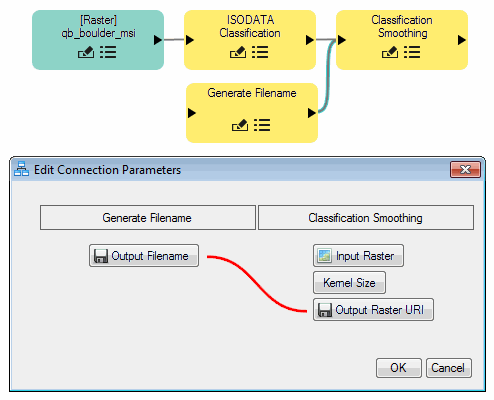
Add a Generate Filename node to your model when you want to specify filenames and locations for task output. Draw a connector between the Generate Filename node and the last task in the model. Double-click on that connector to open the Edit Connection Parameters dialog. The Output Filename parameter of the Generate Filename node should connect to the Output Raster URI parameter of the task; for example:
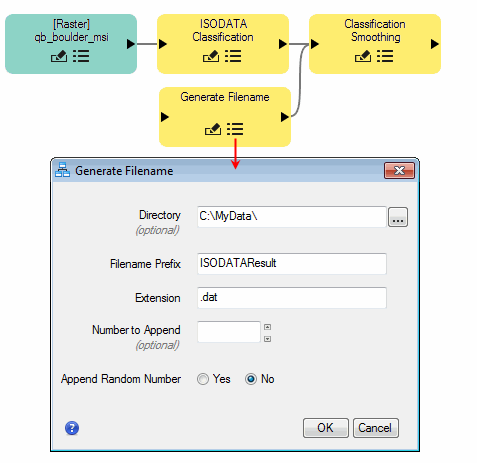
Then click the button in the Generate Filename node, and set the Directory, Filename Prefix, Append Random Number, and Extensionparameters.
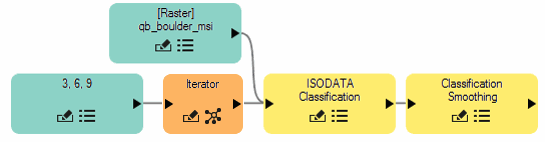
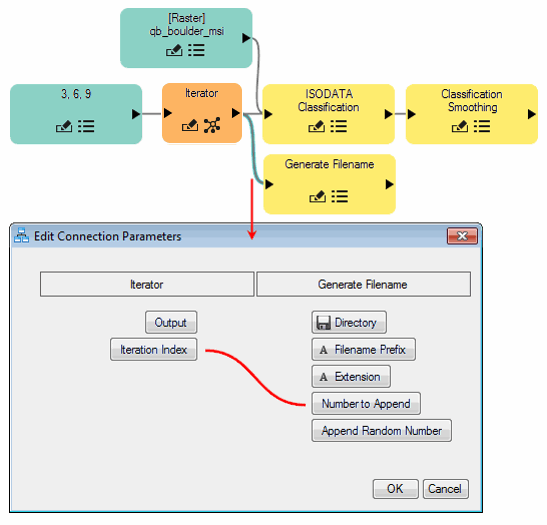
You can also use the Generate Filename node along with the Iterator node to compare results using different input values. For example, suppose you want to run the ISODATA Classification task multiple times, using a different Number of Classes value each time, for comparison. First, specify an array of integers using an Array of Values node (shown in the blue box below with values of 3, 6, and 9). Then add an Iterator node to the model. Connect the Array of Values node to the Iterator node, then connect the Iterator node to the ISODATA Classification node. In the Connect Parameters dialog that appears, draw a connector between the Iteration Index parameter and the Number of Classes parameter in the ISODATA Classification:
Now draw a connector from the Iterator node to the Generate Filename node. In the Edit Connection Parameters dialog, connect the Iteration Index parameter of the Iterator node to the Number to Append parameter of the Generate Filename node:
Next, connect the output of the Generate Filename node to the input of the Classification Smoothing node. The Output Filename parameter of Generate Filename is still connected connected to the Output Raster URI parameter of Classification Smoothing. Then click the button in the Generate Filename node, and set the Directory, Filename Prefix, Append Random Number, and Extensionparameters:
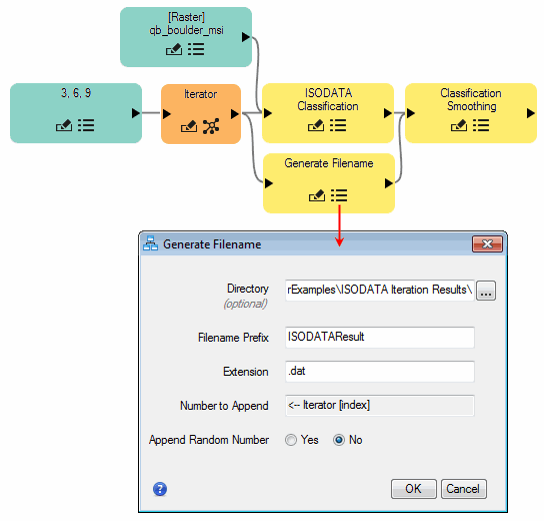
When the model runs, it creates three image files in the specified directory: ISODATAResult000.dat, ISODATAResult001.dat, and ISODATAResult002.dat.
Data Manager Nodes
Another option for creating an output file is to add a Data Manager node to the model, then connect it to the right side of the Task node. When the model runs, the output is added to the Data Manager. Use the File > Save As > Save As (ENVI, NITF, TIFF, DTED) menu option to save the output to disk. The Data Manager node is described next.
Add Processing Results to the Data Manager
Add Data Manager nodes to a model whenever you create output that you want to add to the ENVI Data Manager. Only rasters and vectors can be added to the Data Manager. Follow these steps:
- Double-click Data Manager in the Basic Nodes list.
- Add a connector between the Data Manager node and the right side of a task.
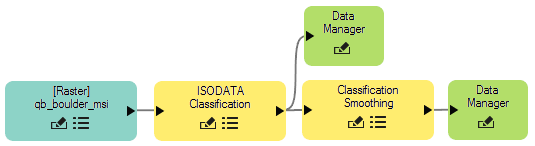
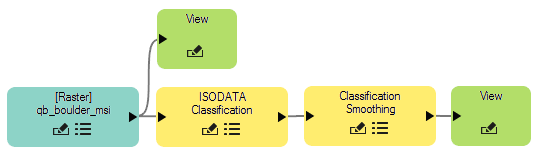
In the following example, the results of ISODATA Classification and Classification Smoothing are both added to the Data Manager:
When running a metatask, all raster and vector parameters that are connected to either a View or Data Manager node will be displayed and added to the Data Manager.
Display Processing Results
Add View nodes to display output from tasks in a model. Raster and vector data will display in the current ENVI view. Point clouds will display in the ENVI LiDAR application. Strings and numeric values will display in a simple text dialog. Follow these steps:
- Double-click View in the Basic Nodes list.
- Add a connector between the View node and the right side of a task.
For example, you may want to display the input raster along with the output from a task. This creates two layers in the Layer Manager.
See Also
Batch-Process Data Using Iterator Nodes, Specify Input Datasets and Task Parameters, Extract Elements From Arrays