This tutorial introduces you to visualization and interactive analysis tools for working with hyperspectral data. In this tutorial, you will:
Files Used in this Tutorial
Tutorial files are available from our ENVI Tutorials web page. Click the Hyperspectral link to download the .zip file to your machine, then unzip the files.
|
File |
Description |
|
CupriteReflectance.dat
|
AVIRIS reflectance image and header file
|
|
CupriteMineralROIs.xml
|
Region of interest (ROI) file with known mineral occurrences
|
You will also use some mineral spectral library files that are included with your ENVI installation.
The image used in this exercise was collected by the Airborne Visible Infrared Imaging Spectrometer (AVIRIS) sensor. AVIRIS data files are courtesy of NASA/JPL-Caltech. The sample image covers the Cuprite Hills area of southern Nevada, an area with diverse mineral types. The scene was collected from an ER-2 aircraft on August 8, 2011.
The full radiance scene is available from NASA/JPL. This image was processed as follows, resulting in the file CupriteReflectance.dat:
- Spatially subsetted
- Processed with FLAASH to remove atmospheric effects and to create a surface reflectance image in ENVI format
- 53 bands marked as "bad" in the ENVI header file. These are primarily water vapor bands that cause spikes in the reflectance curve.
- 1260 to 1560 nm (Bands 98-128)
- 1760 to 1960 nm (Bands 148-170)
See the Preprocessing AVIRIS Tutorial for the steps used to create the reflectance image.
Background
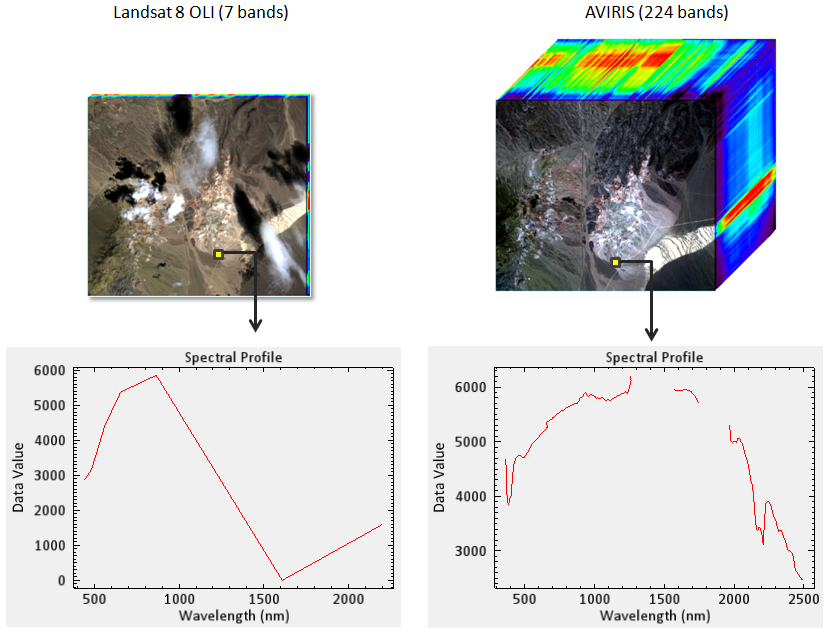
Hyperspectral sensors—more commonly known as imaging spectrometers—collect spectral information across a continuous spectrum by dividing the spectrum into many narrow spectral bands. Airborne and satellite imaging spectrometers can have up to several hundred bands with a spectral resolution of 10 nanometers (nm) or narrower. Compare this to broadband multispectral sensors such as Landsat 8 OLI, which has nine spectral bands and a spectral resolution of 106 nm.
Spectral resolution refers to the width of each band within the captured spectrum. More specifically, it refers to the width of an instrument response (band pass) at half of the band depth. This is known as the full-width-half-maximum (FWHM). Spectral sampling is a separate concept that refers to the band spacing, or the quantization of the spectrum at discrete steps. Quality spectrometers are usually designed so that the band spacing is approximately equal to the FWHM, which explains why spectral sampling is often used interchangeably with spectral resolution.
The following figure shows how a given pixel from a multispectral image only covers discrete spectral bands. Although it can have many bands covering the visible to thermal spectrum, it cannot produce a continuous spectrum of an object like a hyperspectral sensor can.
The spectral resolution required for a specific sensor depends on the spectral characteristics of the material you are trying to identify. Each material exhibits a unique spectral signature across the electromagnetic spectrum. Factors that influence a material's spectrum include composition, structure (crystallinity), grain size, viewing geometry, and mixture.
The high spectral resolution from an imaging spectrometer allows you to identify materials, whereas broadband sensors such as Landsat TM only allow you to discriminate between materials. We will demonstrate these concepts in the steps that follow.
Exercise 1: View Material Spectra
In this exercise, you will analyze spectral profiles of pixels within a reflectance image, then compare them to library spectra of known materials. Hyperspectral data analysis commonly involves apparent reflectance data, where the imagery may have variations in illumination due to topography. With reflectance data, pixel values typically range from 0 to 1 but are often scaled by some factor to yield integer data. The apparent surface reflectance image you will view next has been scaled by 10,000.
- Start ENVI.
- Click the Open button
 in the toolbar.
- Select the file CupriteReflectance.dat and click Open. Out of the 224 bands of this AVIRIS scene, ENVI automatically determines the best bands to approximate a true-color display. In this case, it assigns Band 29 to red, Band 20 to green, and Band 12 to blue. This band combination does not offer a good color contrast among the different materials within the scene. You will change the band combination in the next few steps.
- Click the Data Manager button
 in the toolbar.
- Scroll through the list of bands in the image. Click on the following band names, in order, to assign them to the red, green, and blue channels, respectively:
- FLAASH (Band 183...)
- FLAASH (Band 193...)
- FLAASH (Band 207...)
- Click the Load Data button. The resulting band combination provides a better color contrast throughout the scene.
- Close the Data Manager.
View Image Spectra
ENVI can extract horizontal (x), vertical (y), and spectral (z) profiles from any image display. Hyperspectral data analysis is primarily concerned with extracting spectral profiles, which take spectral information from the whole file and not just the bands displayed on the screen. For example, the file CupriteReflectance.dat contains 170 bands of "good" data, so a spectral profile for any given pixel will show the reflectance values for all 170 bands.
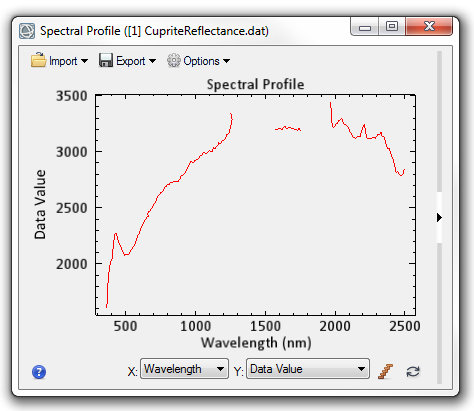
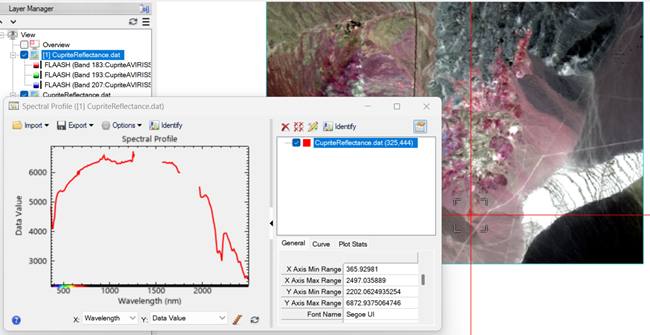
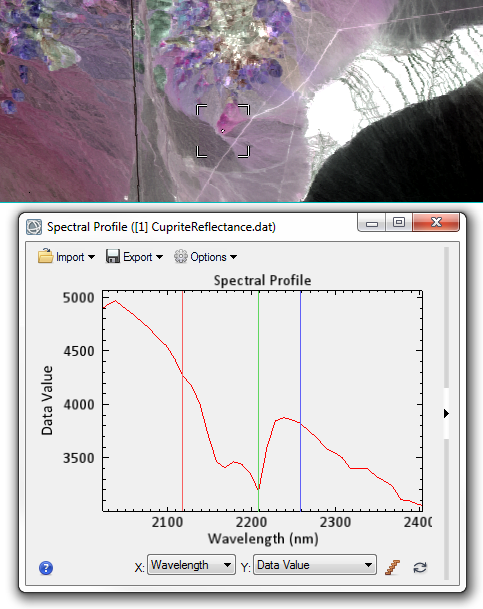
- In the Layer Manager, right-click on [1] CupriteReflectance and select Profiles > Spectral. Within the image is a small white dot surrounded by four white corners. The dot represents the selected pixel, and the Spectral Profile shows the spectrum for that pixel.
- Note the shape of the reflectance curve in the Spectral Profile window; the gaps indicate the bands marked as "bad" in the ENVI header file. These are primarily water vapor bands that would have caused spikes in the reflectance curve.
- Click anywhere inside of the image to select a different pixel. The Spectral Profile updates to show the spectrum for that pixel.
- Click the Show arrow on the right side of the Spectral Profile. A plot key appears with the spectrum name and pixel location: for example, CupriteReflectance (261, 393). You can also use this panel to set the plot properties. For more tips on working with spectral profile plot windows, see Spectral Profile.
- Click the Remove All button
 in the expanded panel to clear the Spectral Profile.
-
In the Go To field of the ENVI toolbar, type pixel coordinates 325, 444 and press the Enter key. The display centers over a pink area in the lower part of the image. The Spectral Profile updates with the spectrum of that pixel location. This spectrum represents an unknown material. Next, you will compare this spectrum to a library spectrum that represents ground-truth data.
View Library Spectra
A common workflow in hyperspectral data analysis is to compare spectra derived from image data to those collected in the field or laboratory. This lets you quickly compare image spectra to the spectra of known materials. Absorption and reflectance features are easy to compare when the spectra are plotted in the same window.
Included with your installation of ENVI are several groups of laboratory spectra from the NASA Jet Propulsion Laboratory (JPL), Johns Hopkins University (JHU), and the U.S. Geological Survey (USGS). Data provided courtesy of the Jet Propulsion Laboratory, California Institute of Technology, Pasadena, California. Copyright © 1999, California Institute of Technology. All Rights Reserved.
The aster folder contains the ASTER Spectral Library (version 2), which includes thousands of laboratory spectra from natural and man-made materials covering 400 to 1540 nm (Baldridge et al., 2009). This folder contains the JPL and JHU spectra.
Reference: Baldridge, A. M., S. J. Hook, C. I. Grove, and G. Rivera, 2009. The ASTER Spectral Library Version 2.0. Remote Sensing of Environment, Vol. 113, pp. 711-715.
Spectral libraries are stored in ENVI spectral library (.sli) format, with each line of the image corresponding to an individual spectrum and each sample corresponding to an individual spectral measurement at a specific wavelength.
- From the menu bar, select Display > Spectral Library Viewer.
- On the left side of the Spectral Library Viewer, expand the igcp264 folder.
- Expand the igcp_1.sli collection.
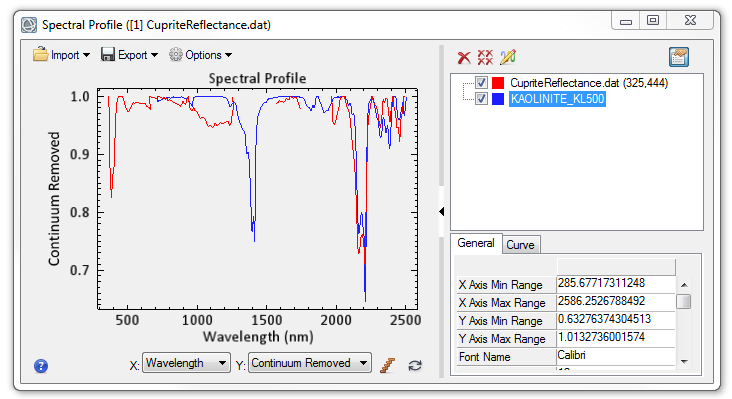
- Click on the KAOLINITE_KL500 spectrum and note the shape and detail of the reflectance curve. Also note how the X and Y units of the spectral library plot are scaled differently from those of the image spectra in the Spectral Profile.
- Click the Show arrow on the right side of the Spectral Library Viewer to expand the plot key for the kaolinite spectrum that you selected.
- Select KAOLINITE_KL500 from the plot key of the Spectral Library Viewer, and drag it to the Spectral Profile dialog. The Spectral Profile automatically scales the Y-axis to accommodate the two spectra, for direct comparison.
- In the Spectral Profile, select the KAOLINITE_KL500 spectrum in the plot key, and select the Curve tab. Change its color to blue.
- Continuum removal is a powerful visualization tool for spectral analysis, especially for absorption features. It normalizes the spectral signature so that you can compare individual absorption features from a common baseline. Select the Y: Data Value drop-down list and select Continuum Removed. The Spectral Profile should look like the following figure:
-
Zoom into the wavelength range of 2000 to 2500 nm shown in the figure below. If your mouse has a scroll wheel, click inside the plot window and roll the wheel to zoom in. Or, click-and-drag the scroll wheel to draw a box around the area you want to zoom into.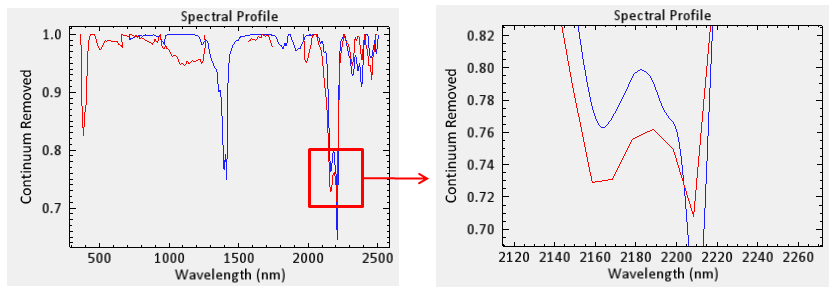
The double absorption features near 2200 nm offers a good reference point for comparing image spectra to library spectra. In the example above, the shape of the reflectance curve of the mineral kaolinite closely matches that of the image spectrum.
You could plot the spectra of other known materials from the spectral library, but with hundreds of spectra available, that process could be time-consuming. ENVI has advanced spectral tools such as Spectral Feature Fitting (SFF), Spectral Angle Mapper (SAM), and Spectral Information Divergence (SID) that can measure the similarity between an unknown material and a reference material.
Another way to extract spectral profiles from an image is to create regions of interest (ROIs). Up to this point, you have extracted image spectra from a single pixel. With an ROI, you are extracting the mean spectra from all the pixels that comprise the ROI.
-
Close the Spectral Profile and Spectral Library Viewer in preparation for the next exercise.
Exercise 2: Extract Mean Spectra from ROIs
You can use ROIs to extract statistics and average spectra from groups of pixels. You can define as many ROIs as desired in a displayed image. See Region of Interest Tool (ROI) for details on drawing ROIs.
In this exercise, you will view ROIs of known mineral types and extract mean spectra from the ROIs.
- Click the Region of Interest Tool (ROI) button
 in the toolbar.
- From the ROI Tool menu bar, select File > Open. The Open Region of Interest dialog appears.
- Select the file CupriteMineralROIs.xml and click Open. This ROI file represents pixels where specific minerals are known to occur. The Select Base ROI Visualization dialog appears.
- Select [1] CupriteReflectance, and click OK. The ROIs for each mineral type are listed in the Layer Manager. If the ENVI preference Auto Display File on Open is set to True, the ROIs will display on the image.
- Right-click on any ROI in the Layer Manager and select Statistics. An ROI Statistics Results dialog appears with an embedded plot window that shows the following:
- Mean spectrum (white)
- First standard deviation above and below the mean spectrum (green)
- Minimum and maximum envelope containing all of the spectra in the ROI (red)
- Close the ROI Statistics Results dialog.
- Right-click on the Regions of Interest folder in the Layer Manager and select Statistics for All ROIs. The plot window shows the mean spectra for all ROIs.
- Right-click inside the plot window and select Legend.
-
Zoom into the wavelength range of 2000 to 2500 nm. If your mouse has a scroll wheel, click inside the plot window and roll the wheel to zoom in. Or, click-and-drag the scroll wheel to draw a box around the area you want to zoom into. The plot should look similar to the following figure: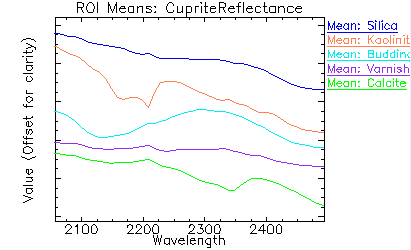
- Compare the spectral features of each spectrum, and note unique characteristics that might allow mineral identification.
- When you have finished, close the ROI Statistics View dialog, but keep the ROI Tool dialog open for the next exercise.
Exercise 3: Discriminate Mineralogy
In this exercise, you will design color images to help discriminate minerals.
- Right-click on [1] CupriteReflectance in the Layer Manager and select Profiles > Spectral Profile.
- Click the Select button
 in the ENVI toolbar.
- Click inside of the red ROI that represents kaolinite in the lower/center part of the image. The Spectral Profile shows the spectrum for that pixel location.
- Right-click inside the Spectral Profile and select RGB Bars. Red, green, and blue vertical bars appear inside of the plot to show the wavelengths assigned to each channel. This is a quick visualization tool. If you look at the [1] CupriteReflectance.dat layer in the Layer Manager (you may need to scroll to the right in the Layer Manager), you can see the specific bands assigned to red, green, and blue: 2088.4851 nm, 2188.4890 nm, and 2328.1069 nm, respectively. The colored bars in the spectral profile plot confirm this.

You can click and drag the colored bars to change them to other bands. This is a good way to enhance specific minerals by centering one color bar in an absorption feature and the other two on opposite shoulders of the feature.
- Zoom into the wavelength range of 2000 to 2500 nm. If your mouse has a scroll wheel, click inside the plot window and roll the wheel to zoom in. Or, click-and-drag the scroll wheel to draw a box around the area you want to zoom into.
- Uncheck the Regions of Interest layer in the Layer Manager to hide the ROIs.
- Click and drag the red, green, and blue bars to the location shown in the figure below.
- From the Spectral Profile menu, select Options > Load New Band Combination. Because the green channel falls within the absorption feature, green values will be low. The red and blue channels have a higher (and nearly equal) reflectance, resulting in a purple display in areas where kaolinite is abundant.
Experiment with other pixel locations, using the mineral ROIs as a guideline, to highlight those features with new color combinations. You should begin to understand how the RGB colors correspond to the spectral signature. You can also predict how certain spectra will look, given a particular pixel's color in the RGB image. Then you can design and test specific RGB band selections that maximize your ability to map certain minerals.
This is a crude way of discriminating mineralogy based on different color composites. ENVI has more advanced visualization tools such as scatter plots and the N-Dimensional Visualizer. ENVI also provides a rich set of advanced whole-pixel and sub-pixel spectral analysis algorithms to help you perform endmember extraction, spectral unmixing to estimate the abundances of materials, and target detection.