Use the Find Rows and Remove Outliers tool to identify individual rows in a field, while removing outliers from the crop count result. The tool creates polyline and polygon ROIs for each row, a new crops object with the "good" crops, and another crops object with the outlier crops. It also creates a classification image with the good crops.
This tool requires a separate license for the ENVI Crop Science Module; contact your sales representative for more information.
You can also write a script to estimate crop locations using AgFindRowsAndRemoveOutliers task.
See the following sections:
Before You Begin
Run the Count Crops tool before using Find Rows and Remove Outliers. See the Enhance Crops and Count Crops topics for guidelines on preprocessing your imagery, including instructions to create a single-band image that highlights crops against a dark background. Be sure to specify an Output Crops File in the Count Crops tool. You should strive for an accurate crop count before passing the result to the Find Rows and Remove Outliers tool.
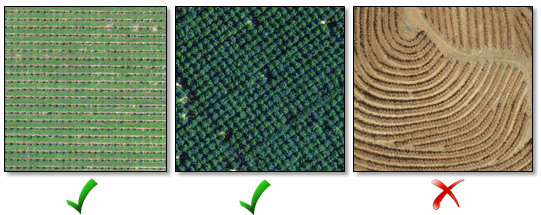
The crop locations that you pass into this tool must have structured rows in at least one direction; otherwise, the tool will not return any results. The source image from which the crops are derived should not have curved rows. This tool is designed for crop rows that are straight.
Background
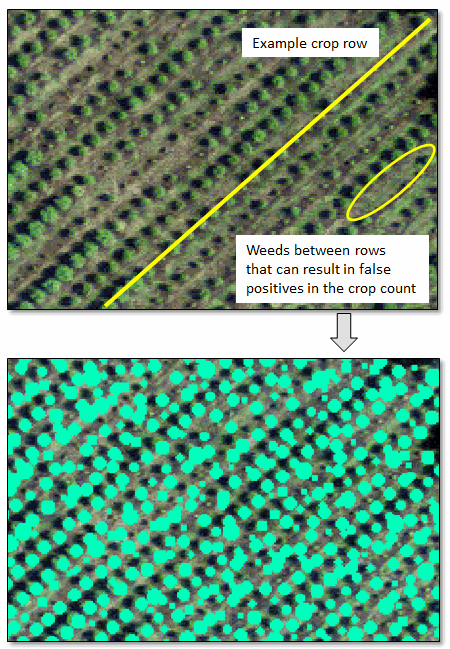
The purpose of the Find Rows and Remove Outliers tool is to produce a more accurate crop count when weeds and other non-crop vegetation exist between the crop rows. The initial crop count (from the Count Crops tool) may identify these objects as valid crops, resulting in false positives. By identifying the actual crop rows, the Find Rows and Remove Outliers tool can remove the false positives from the initial crops file that was passed in.
Another use of this tool is to get the crop canopies that belong to a given row, for spatial analysis.
You can also pass the results of this tool to the Find Crop Gaps tool to determine the locations of missing crops within the rows.
How it Works
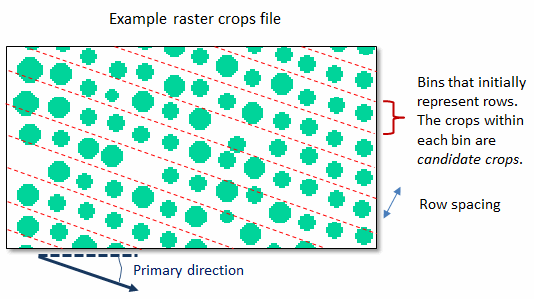
The Find Rows and Remove Outliers tool accepts an input crops file, which is a JSON-formatted text file produced by the Crop Count tool. This file provides the pixel coordinates of the crop centers that were detected in a field. The algorithm uses a fast Fourier transform (FFT) method to determine the primary direction of the crops. The algorithm also estimates the distance between crops in adjacent rows. This is referred to as row spacing. It splits the crops image into bins along the primary direction of the field. Each bin contains a number of candidate crops:
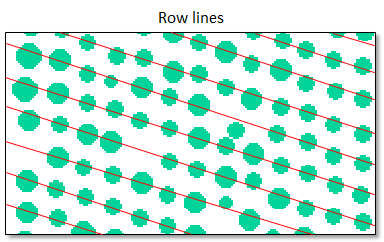
With this information, the tool can determine the best fit for a line along the crops in each row. It renders the lines as polyline regions of interest (ROIs):
Next, the algorithm must determine which crops actually belong to each row, and which ones are false positives, or outliers. Here is the process for doing that:
First, it calculates the distance from each crop center to the row line. It removes crops from that row if the distance is greater than the Distance Threshold value that you provide. If you do not specify a value, the distance threshold is one-third of the row spacing, by default.
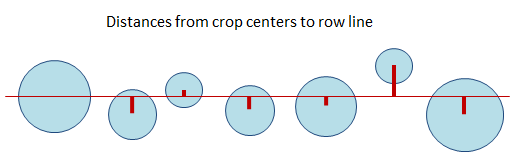
Next, it uses the Inlier Fraction value that you specify to determine how many crops that each row needs, to be considered a valid row. This parameter represents the fraction of candidate crops that should remain within the row. These crops are called inliers. The algorithm uses the Maximum Slope value that you specify to determine if each row line is still valid. Finally, it creates two new crop objects: one consisting of the "good" crops and another with the outlier crops.
Run the Tool
Follow these steps to run the Find Rows and Remove Outliers tool:
- From the Toolbox, select Crop Science > Find Rows and Remove Outliers. The Find Rows and Remove Outliers dialog appears.
- Select an Input Crops file (.json) that you created using the Count Crops tool.
- Optional: Enter a Distance Threshold value in meters. The tool calculates the distance from each crop center to the row line. It removes crops from that row if the distance is greater than the Distance Threshold value that you provide. If you do not specify a value, the distance threshold is one-third of the row spacing, by default. If the input crops object does not have a spatial reference, enter the distance in pixels.
Tip: You can use the Mensuration tool  in the ENVI toolbar to measure distances.
- Optional: Enter an Inlier Fraction value, ranging from 0 to 1.0. This is the fraction of the number of crops that each row is expected to have (relative to surrounding rows), to be considered a valid row. The default value is 0.5 (50%). Increase this value if there are many outliers and they are being identified as false rows. If the rows vary greatly from the rows surrounding them (not gradually across the field), then set this parameter to a smaller fraction. This parameter can be used in conjunction with Minimum Number of Crops Per Row, which sets an absolute minimum for all rows.
For instance, say a field gradually varies from 50 crops per row on the left to 20 crops per row on the right. With the default fraction of 0.5, rows on the left must have at least 25 crops and rows on the right must have at least 10. If there are many outliers and there are false rows with more than 25 crops on the left and 10 on the right, the inlier fraction can be increased to exclude them. On the other hand, if there was a single valid row of 20 crops on the left (next to the rows of 50), an inlier fraction of 0.5 would exclude it and the fraction would have to be lowered.
- Optional: Enter the minimum number of crops needed to be considered a row in the Minimum Number of Crops Per Row field. The minimum number is 2, and the default number is 3.
- Optional: Enter a Maximum Slope value in degrees. This is the maximum amount that the slope of a row line can differ from the primary direction that the algorithm initially determined. For example, if the field direction is 45 degrees and you enter a value of 1 for Maximum Slope, then the row lines can have a slope of 44 to 46 degrees to be valid. The default value is 2 degrees.
- Optional: Enter a Row Angle value, which is the primary angle of the rows in degrees clockwise from 0. A value of 0 represents a horizontal alignment of the field. This value is automatically determined, but you can override it. If the field is not aligned horizontally, you can use the ENVI Rotate tool to estimate its primary angle. To do this, click the Rotate View button in the ENVI toolbar, and rotate the image in a counter-clockwise direction until the crop rows align horizontally with the toolbar. Then read the rotation angle in the toolbar, including the sign. Enter the opposite value in the Row Angle field.
- Optional: Enter a Row Spacing value, which is the distance between rows, in meters. This value is automatically determined, but you can override it. If the Input Crops file does not have a spatial reference, specify the spacing in pixels.
- Optional: Select a filename (with a .xml file extension) and location for the Output Crop Row ROIs, file. This ROI consists of polylines for each row, along with polygons that are centered over each row line, whose width is determined by the Distance Threshold value.
- Optional: Select a filename (with a .json file extension) and location for the Output Crops file. This is a JSON-format text file that specifies the locations of the crops that remain after outliers have been removed.
- Optional: Select a filename (with a .json file extension) and location for the Removed Crops file. This will be a JSON-format text file that specifies the locations of outlier crops that were removed.
- Optional: Enable the Fill Raster Crops option to display filled circles instead of outlines in the classification result. The default value is No.
- Optional: Select an output filename (with a .dat file extension) and location for the Output Crops Raster. This is a classification raster showing circles that represent the good crops.
-
Enable the Display result check box to display the output in the view when processing is complete. Otherwise, if the check box is disabled, the result can be loaded from the Data Manager.
-
To see a model-based version of this tool that shows how the tool is constructed from individual tasks, click Open in Modeler.
-
To reuse these task settings in future ENVI sessions, save them to a file. Click the down arrow next to the OK button and select Save Parameter Values, then specify the path and filename to save to. Note that some parameter types, such as rasters, vectors, and ROIs, will not be saved with the file. To apply the saved task settings, click the down arrow  and select Restore Parameter Values, then select the file where you previously stored your settings.
-
To run the process in the background, click the down arrow next to the OK button and select Run Task in the Background. If an ENVI Server has been set up on the network, the Run Task on remote ENVI Server name is also available. The ENVI Server Job Console will show the progress of the job and will provide a link to display the result when processing is complete. See ENVI Servers for more information.
- Click OK.
Note: If no outliers were detected, a Removed Crops (.json) will not be created.
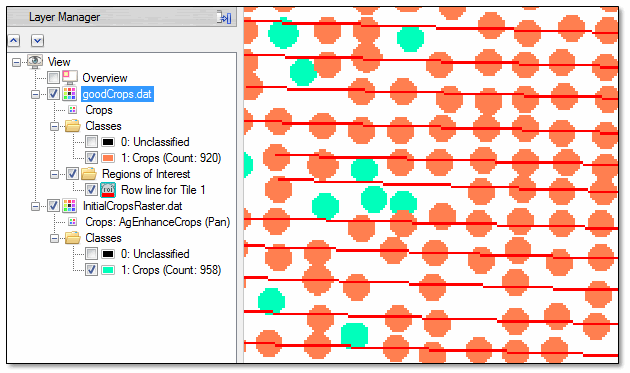
If the Display result option was selected, the following items appear in the Layer Manager and the display:
- The output crops raster. If you want to compare this result to the original crops raster from the Count Crops tool, the default color will be the same, which will make it difficult to distinguish between the two. You can change the color of the output crops raster from the Find Rows and Remove Outliers tool by right-clicking on the Classes folder in the Layer Manager and selecting Edit Class Names and Colors.
- A region of interest layer showing the row lines in red. The polygon layer is not displayed by default. It is available in the Data Manager if you want to display it.
The following image shows an example. The row lines are displayed in red, and the original crops raster (from the Count Crops tool) is displayed in cyan. The crops raster from the Find Rows and Remove Outliers tool is displayed in orange, to distinguish itself from the other crops raster. By displaying the crops rasters in different colors, you can see which outliers were removed.
Another option to display the outliers is to use the Convert Crops to Shapefile tool to convert the Removed Crops (.json) to a shapefile.
You can optionally pass the Output Crops to the Find Crop Gaps tool, to locate missing crops within each row.
See Also
Count Crops, Find Crop Gaps