Use the Create Zones tool to divide a single-band image into management zones. It creates a classification image, where the classes represent the zones, and the colors indicate the application categories they belong to. It also creates a zones output object that contains data for each individual zone.
This tool requires a separate license for the ENVI Crop Science Module; contact your sales representative for more information.
You can also write a script to create management zones using AgCreateZones task.
See the following sections:
Background
Management zones are contiguous regions within a field that respond to different management applications—such as water, pesticides, and fertilizer—in a similar way. Applying the same treatment across an entire field for the same problem is not effective for managing resources or boosting productivity. Splitting the field into different zones can help isolate problem areas, and to identify high- and low-yielding areas. Then action can be taken to apply different treatments to each zone, such as variable-rate fertilizing and seeding, irrigation, and pest control.
How a field is divided into management zones depends on the type of information provided in the input raster. Here are some common examples of input data used for management zone creation:
- Topographic information, typically from a digital elevation model (DEM)
- Soil survey maps
- Vegetation index images derived from multispectral and hyperspectral images
- Field measurements such as yield data or soil electrical conductivity data, converted to raster form using an interpolation technique (available in IDL)
The input raster must have one band, and it should be spatially subsetted and masked to include the specific site of interest. See Example of Subsetting by ROI in the Hotspot Analysis topic for instructions on subsetting a field by region of interest (ROI).
ENVI applies a Gaussian smoothing operation on the input raster. Then it uses a Jenks natural break algorithm to split the image into management zones, based on the desired number of application categories that you specify. For example, you may decide to divide your field into three different categories, each having a different level of water or fertilizer application. The chosen number of application categories is left to the experience of a grower or consultant.
The application categories are further split into zones, which are polygons that belong to the same application category but are spatially separated. See the Example section below. In some cases, the actual number of application categories may be less than the desired number that you specify. This can happen, for example, when the specified minimum area results in all of the zones in an application category being merged into another application category. The zones can, in turn, be split into smaller zones if they are larger than the specified maximum area.
Create Zones
Follow these steps:
- From the Toolbox, select Crop Science > Create Zones. The Create Zones dialog appears.
- In the Input Raster field, select a subsetted and masked single-band input image.
- Specify the desired Number of Application Categories. The default value is 3.
- Specify the Minimum Area from which to create management zones. Specify the area in square meters if the input raster has a spatial reference. Otherwise, specify the number of square pixels for the area. The default value is 2000 square meters, or approximately 1/2 acre.
Tip: 1 acre = 4046.8564224 m2
- Optional: Specify the Maximum Area of each zone. Enter a value in square meters if the input raster has a spatial reference. Otherwise, specify the number of square pixels for the area. Zones that are larger than the maximum area will be split in half.
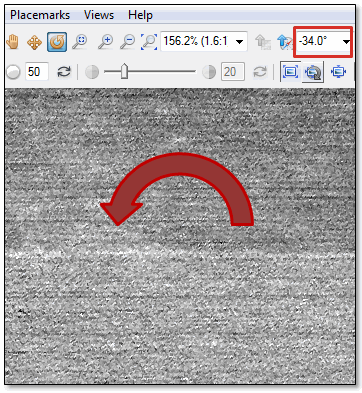
- Optional: Specify the Primary Angle of the field in degrees clockwise from 0, where a value of 0 represents a horizontal alignment of the field. Management zones that are larger than the specified Maximum Area will be split into smaller zones along this angle. If the field is not aligned horizontally, you can use the ENVI Rotate tool to estimate its primary angle. For example, here is a spectral index image of a corn field that is aligned in a diagonal direction:
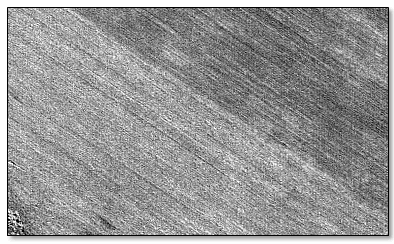
Click the Rotate View button in the ENVI toolbar, and rotate the image in a counter-clockwise direction until the crop rows align horizontally with the toolbar. Then read the rotation angle in the toolbar, including the sign. Enter the opposite value in the Primary Angle field. In this example, the rotation angle is -34 degrees, so you would enter a Primary Angle of 34 degrees.
- Select a filename and location for the Output Classification Raster.
- Select a filename and location for the Output Zones. This is an output zones object in IDL save file format (.sav) that will contain data for each zone.
-
Enable the Preview check box to preview the settings before processing the data. The preview is calculated only on the area in the view and uses the resolution level at which you are viewing the image. To preview a different area in your image, pan and zoom to the area of interest and re-enable the Preview option. Depending on the algorithm being used by the tool, the preview result might be different from the final result of processing on the full extent, full resolution of the input image in the following scenarios: 1) If you zoomed out of the input raster in the view by 50%, or a percentage less than 50%, ENVI uses a downsampled image at the closest resolution level to calculate the preview, or 2) If the entire image is not visible in the view, ENVI uses the subset in the viewable area of the input image to calculate the preview.
-
Enable the Display result check box to display the output in the view when processing is complete. Otherwise, if the check box is disabled, the result can be loaded from the Data Manager.
-
To see a model-based version of this tool that shows how the tool is constructed from individual tasks, click Open in Modeler.
-
To reuse these task settings in future ENVI sessions, save them to a file. Click the down arrow next to the OK button and select Save Parameter Values, then specify the path and filename to save to. Note that some parameter types, such as rasters, vectors, and ROIs, will not be saved with the file. To apply the saved task settings, click the down arrow  and select Restore Parameter Values, then select the file where you previously stored your settings.
-
To run the process in the background, click the down arrow next to the OK button and select Run Task in the Background. If an ENVI Server has been set up on the network, the Run Task on remote ENVI Server name is also available. The ENVI Server Job Console will show the progress of the job and will provide a link to display the result when processing is complete. See ENVI Servers for more information.
- Click OK.
- In the classification raster, the classes represent the zones and the colors indicate the application categories they belong to.
- The zones object is displayed as a shapefile over the management zone classification image. It is treated as a vector layer in the Layer Manager.
View Metadata
The raster and vector files contain metadata and attributes that describe the zones, application categories, and other information. Follow these steps to view the metadata and attributes:
- Right-click on the classification image (.dat) in the Layer Manager and select View Metadata.
- In the View Metadata dialog, click the Supplementary node. The following metadata fields are listed:
- application category id: Integer IDs of the application category corresponding to each zone, starting at 1
- application category max: The maximum pixel value for each application category
- application category min: The minimum pixel value for each application category
- application category name: Strings with the names of each application category
- homogeneity ratio: A measure of how much more similar values in a class are to each other, versus values over the whole image. A value of 0 indicates no improvement, and a value of 1.0 indicates perfect improvement.
- number of zones: The number of zones
- Right-click on the vector layer (with a .shp file extension) in the Layer Manager and select View Attributes. Each zone has a separate record in the Attribute Viewer, with the following attributes:
- CLASS_NAME: The number of the application category and zone within that category. This and the CLASS_CLRS values correspond to the class names and colors of the classification image.
- AREA: The area in square meters of each zone
- CLASS_CLRS: The red/green/blue (RGB) color values for each application category associated with each zone
- ZONE_ID: Integer IDs for each zone, starting at 1. These match the class values in the zone classification raster.
- CAT_ID: Integer IDs of the application category corresponding to each zone, starting at 1. These IDs correspond to the application category id of the classification image.
Example
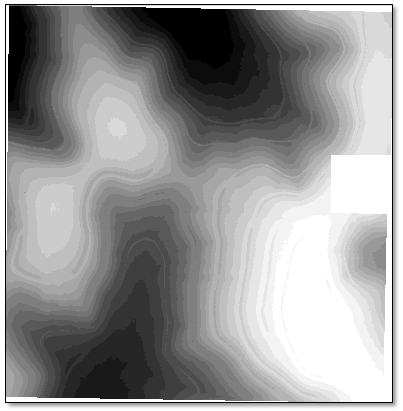
The following example uses a DEM as the basis for splitting a field into management zones. The ENVI LiDAR application was used to process point-cloud data (courtesy of the U.S. Geological Survey) into a stratified DEM with 2-meter spatial resolution. A region of interest (ROI) was drawn around a field of interest, excluding buildings. The DEM was masked and subsetted using the ROI boundary, so that the DEM covered the extent of the corn field:
Tip: This DEM (FieldDEM.dat) is available in the ENVI installation path under INSTALL_DIR\ENVIxx\data\crop_science\.
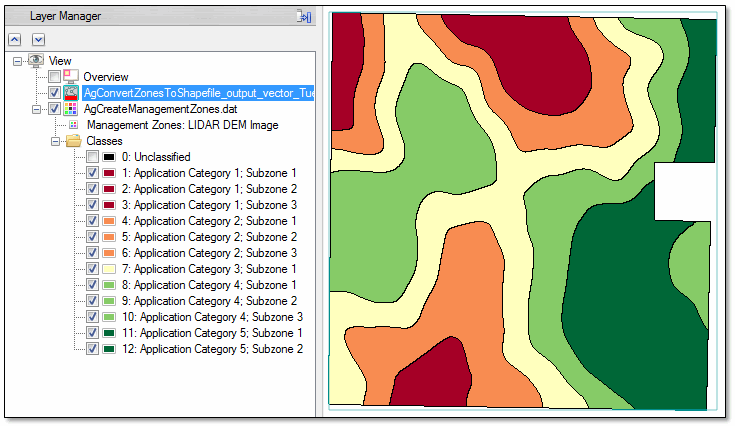
The Create Zones tool was run with the following parameter values:
- Number of Application Categories: 5
- Minimum Area: 2023 square meters (1/2 acre)
- Maximum Area: Not specified
- Primary Angle: 0 degrees
- Output Classification Raster: AgCreateZones.dat
- Output Zones: AgCreateZones.sav
The resulting image contains five colors, one for each application category. It contains 12 classes, one for each zone. For example, Application Category 4 (colored light green) consists of three zones that are spatially separated. Each of these areas can receive the same application type. The zones object (AgConvertZonesToShapefile*.shp) is a shapefile, where each zone is a separate record.
To see the attributes and their values, right-click on the vector layer in the Layer Manager and select View Attributes.

See Also
Convert Zones to Shapefile, Calculate Zone Metrics