Vector to Feature Count
Use Vector to Feature Count to convert vector records into a feature counting layer.
You can also write a script to convert vector records to a feature counting layer using the VectorToFeatureCount task.
Follow these steps:
- From the Toolbox, select Vector > Vector to Feature Count. The Convert Vector Records to Feature Count dialog appears.
- Specify an Input Raster. This raster will determine the base projection for the output feature counting layer.
- Specify an Input Vector. This can be any vector format that ENVI supports. For polylines and polygons, the centroid is used to create the feature counting locations.
- Optional: In the Attribute Name of the Feature Column field, specify the attribute name of the column containing the feature class.
- Optional: In the Attribute Name of the Description Column field, specify the attribute name of the column containing the description.
- Optional: In the Attribute Name of the Acquisition Time Column field, specify the attribute name of the column containing the acquisition time.
- In the Output Feature Count field, specify a path and filename for the output feature counting file (.efc). The default location is the directory specified by the Temporary Directory preference.
-
To reuse these task settings in future ENVI sessions, save them to a file. Click the down arrow next to the OK button and select Save Parameter Values, then specify the path and filename to save to. Note that some parameter types, such as rasters, vectors, and ROIs, will not be saved with the file. To apply the saved task settings, click the down arrow  and select Restore Parameter Values, then select the file where you previously stored your settings.
-
To run the process in the background, click the down arrow next to the OK button and select Run Task in the Background. If an ENVI Server has been set up on the network, the Run Task on remote ENVI Server name is also available. The ENVI Server Job Console will show the progress of the job and will provide a link to display the result when processing is complete. See ENVI Servers for more information.
- Click OK.
- When processing is complete, select File > Open from the ENVI main menu bar and select the feature counting file.
- When the Data Selection dialog prompts you to choose an associated raster for the feature counting file, select the same file you specified in Step 2 above.
ENVI creates a feature counting layer and displays it over the input raster. It opens the Feature Counting Tool so that you can view the attributes of the feature counting layer.
Example
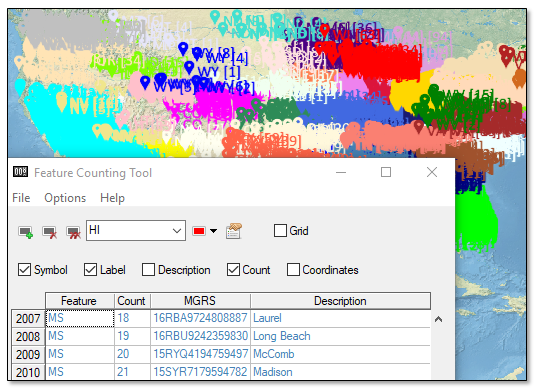
This example opens a shapefile of U.S. cities. It groups the 3,500 records into 50 different features by state. It creates an ENVI feature counting file (.efc), which you will view in the Feature Counting Tool. Follow these steps:
- From the Toolbox, select Vector > Vector to Feature Count. The Convert Vector Records to Feature Count dialog appears.
- Click the Browse button
 next to the Input Raster field.
- Navigate to the data folder in your ENVI installation path and select the file natural_earth_shaded_relief.jp2. The default path is as follows, where xx is the ENVI version:
- Windows: C:\Program Files\INSTALL_DIR\ENVIxx\data
- Linux: /usr/local/INSTALL_DIR/ENVIxx/data
- Navigate to the classic\data\vector folder in your ENVI installation path and select the file cities.shp. The default path is as follows, where xx is the ENVI version:
- Windows: C:\Program Files\INSTALL_DIR\ENVIxx\classic\data\vector
- Linux: /usr/local/INSTALL_DIR/ENVIxx/classic/data/vector
-
This shapefile contains several attribute columns. To view them, right-click on cities.shp in the Layer Manager and select View/Edit Attributes. The Attribute Viewer appears:

For this example, you will create 50 different feature counting groups based on states, using the ST field. The AREANAME field will be used to provide descriptions of each feature counting record.
- In the Attribute Name of the Feature Column field, enter ST.
- In the Attribute Name of the Description Column field, enter AREANAME.
- By default, the output feature counting file will be named VectorToFeatureCount.efc. It will be written to the directory specified by the Temporary Directory preference. The default locations are as follows:
- Windows: C:\Users\<username>\AppData\Local\Temp
- Linux: /usr/local/tmp
- Click OK.
- When processing is complete, select File > Open from the ENVI main menu bar.
- Navigate to your temporary directory and select VectorToFeatureCount.efc.
- When the Data Selection dialog prompts you to choose an associated raster for the feature counting file, select natural_earth_shaded_relief.jp2 and click OK. ENVI creates a feature counting layer and displays it over the shaded relief image. It opens the Feature Counting Tool so that you can view the attributes of the feature counting layer.
- Press the F12 key on your keyboard to view the full extent of the shaded relief image. Then zoom into the U.S. to see the feature counts; for example: