Use the Edit Classification Image tool to reassign classes in classification images. You can also use this tool with the results of viewshed analysis and thematic change detection.
This tool is best used for editing small areas when you know that pixels were assigned to the wrong class. For example, you may have ground-truth data that verifies that a group of pixels belongs to a known class. While you can alleviate most misclassification issues by experimenting with unsupervised and supervised algorithm settings, the final classification image may still need further editing.
Follow these steps to edit classification images:
- Open and display an ENVI Classification image.
- Click the Edit Classification Image button
 in the toolbar. Or, select Classification > Post Classification > Edit Classification Image in the Toolbox. This tool prompts you to select an ENVI Classification image.
- In the Edit Classification Image dialog, use the From drop-down list to select a class that you want to reassign. Then select a target class from the Into drop-down list.
- The Shape, Paint, Segments, and Merge All options provide different ways to reassign pixels to different classes. These methods are described below.
- Select File > Save As in the Edit Classification Image menu bar to save the results to a new classification image. The Save Class Edits dialog appears.
- After editing the classification image, some original classes may now be "empty" with no pixels assigned to them. Those classes are listed in the associated ENVI header file. By selecting Yes to Remove empty classes? in the Save Class Edits dialog, you can remove those classes from the output classification image and associated header file.
- Choose an output filename and click OK. A new Class Edit layer appears in the Layer Manager. If you continue to make further edits, select File > Save to save the changes to the same file.
- You cannot save changes to a file that is also being displayed. Do not select the Display result option in the Save dialog while editing, unless you are finished with all of the edits to that file.
- To create a new output file after making further edits, select File > Save As in the Edit Classification Image menu bar.
- If you enable the Display result option in the Save Class Edits dialog and click OK, the Edit Classification Image disappears. The edited classification image appears in the display and the Layer Manager.
To demonstrate these concepts, here is a Pleiades Level-1A true-color image subset (courtesy of Airbus Defence & Space). Below it is a classification image derived from the Spectral Angle Mapper (SAM) supervised algorithm with default parameters set. Eight different ROI training samples were used as input to the classification algorithm to yield eight classes, plus an Unclassified class.
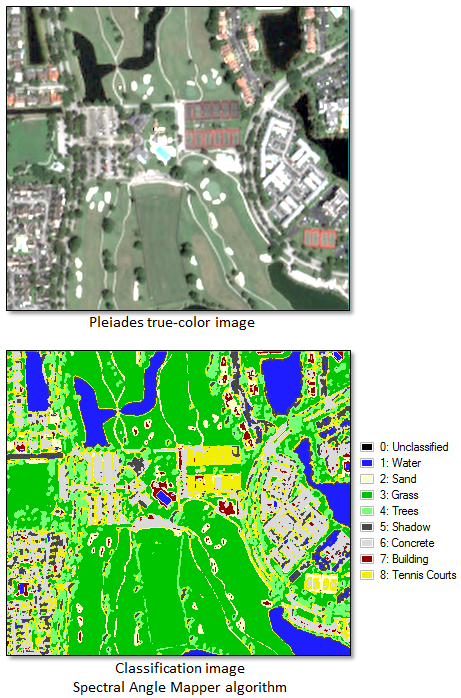
You can see from the classification image that most of the sandy areas (light tan) within the golf course have pixels that were incorrectly assigned to the Building class (dark red). Here are some different options for fixing this.
Draw Shapes
Use the Shape option to draw a polygon, rectangle, or ellipse to select the pixels of interest. This example will change the Building pixels to Sand. For the Rectangle  or Ellipse
  options, click and drag the cursor to draw a rectangle or ellipse around the Building pixels. When you let go, those pixels are reassigned to the Sand class.
For the Polygon option  , click to draw segments of a polygon. Then right-click and select Complete and Accept Polygon.
Instead of manually defining shapes, you can import regions of interest (ROIs) that contain the shapes you want. Open the ROI file (.roi or .xml) in ENVI. With the Shape option selected, click the Import ROI button  and select the ROI.
Paint
Use the Paint option to "paint" pixels into a different class. This option is good for editing a small number of pixels. Select a Brush Size from the drop-down list, then click and drag the square cursor over the pixels of interest.
The following example shows how to change multiple classes to Concrete. Select All Classes from the From drop-down list, and select Concrete from the Into drop-down list:
To change only one class, select the appropriate class from the From drop-down list:
Create Segments
Use the Segments option to partition the classification image into individual segments. This option is useful for changing large areas into a specific class, when the Draw Shapes and Paint options would be too tedious.
The following example shows that the tennis courts (colored yellow) have mixed classes, including a large segment misclassified as Sand.
Since the segment should be classified as Tennis Courts, select Tennis Courts from the Into drop-down list. Click inside the segment to change it to the target class.
Repeat these steps if needed to fix other classes inside the tennis courts.
Merge All
Use the Merge All option to change all pixels in one class to a different class. Or, use it to combine two or more classes into a more general class.
Suppose that you want to merge the Grass and Trees classes into a new "Vegetation" class. Follow these steps:
- From the Edit Classification Image menu bar, select Edit > Add New Class.
Note: You can create up to 256 new classes.
- In the Add New Class dialog, enter a class name of Vegetation and select a green color. Click OK.
- Select Trees from the From drop-down list, then select Vegetation from the Into drop-down list. Click Apply.
- Select Grass from the From drop-down list, then select Vegetation from the Into drop-down list. Click Apply.
The second image below shows the result of merging the classes.
Tips for Editing Classification Images
- To undo the last edit, select Edit > Undo Last from the Edit Classification Menu bar. Or select File > Undo All to revert back to the original classification image.
- You can define new classes if needed. Select Edit > Add Class from the Edit Classification Menu bar, then select a new class name and color.