Fire Fuel Classification
Use Fire Fuel Analysis to create a spatial map showing the distribution of fire fuels and burn hazards for a region. Fire fuel mapping can be useful for forest planners, as well as local governments attempting to mitigate fire risks within the rapidly growing forest/urban interface.
You can also write a script to do fire fuel classification using the FireFuelClassification task.
High fire fuel distributions contain dry or dying plant material, which contains less water, whereas low fire fuel distributions typically consist of lush, green plants.
If fire fuels are located beneath a closed canopy, they may not be detected by the Fire Fuel Tool. The higher greenness values caused by canopy closure automatically reduce the fire risk calculation. Additionally, dry or senescent vegetation indices are only sensitive to the top layer of the vegetation, causing the dry vegetation beneath it to be obscured by the upper layer of green vegetation. As such, dry materials under a closed canopy may not be properly detected.
Fire fuel analysis uses the following vegetation index categories:
- From the Toolbox, select Spectral > Vegetation > Fire Fuel Analysis. The Fire Fuel Classification dialog appears.
- Select an input raster, perform optional spatial and spectral subsetting and/or masking, then click OK.
- Select a broadband or narrowband Greenness Index from the drop-down list.
- Enter a Minimum Valid Greenness Value to use in the fire fuel calculation. Any values in the image less than the value you specify are masked out in the classification result. This setting, along with a proper mask selection, is useful for areas that contain different terrain types. The default value is 0.
- Select a vegetation index from the Canopy Water drop-down list.
- Select a vegetation index from the Dry or Senescent Carbon Index drop-down list.
- Enter a filename and location for the Output Raster.
- Enable the Preview check box to preview the settings before processing the data. The preview is calculated only on the area in the view and uses the resolution level at which you are viewing the image. To preview a different area in your image, pan and zoom to the area of interest and re-enable the Preview option. Depending on the algorithm being used by the tool, the preview result might be different from the final result of processing on the full extent, full resolution of the input image in the following scenarios: 1) If you zoomed out of the input raster in the view by 50%, or a percentage less than 50%, ENVI uses a downsampled image at the closest resolution level to calculate the preview, or 2) If the entire image is not visible in the view, ENVI uses the subset in the viewable area of the input image to calculate the preview.
-
Enable the Display result check box to display the output in the view when processing is complete. Otherwise, if the check box is disabled, the result can be loaded from the Data Manager.
-
To reuse these task settings in future ENVI sessions, save them to a file. Click the down arrow next to the OK button  , select Save Parameter Values, then specify the path and filename to save to. Note that some parameter types, such as rasters, vectors, and ROIs, will not be saved with the file. To apply the saved task settings, click the down arrow and select Restore Parameter Values, then select the file where you previously saved your settings.
-
You can run the process in the background on your computer or in the background on an ENVI Server (if available). Click the down arrow next to the OK button and select one of the following:
- Run Task in the Background: Runs the process on your computer. This method does not use an ENVI Server. The job progress will show in the ENVI Job Console's Background Jobs tab.
- Run Task on envi_server_name. Runs the process on the selected ENVI Server. The job progress will show in the ENVI Job Console's envi_server_name tab.
See ENVI Job Console for details on monitoring ENVI Server jobs and viewing results. See ENVI Servers for details on configuring and using an ENVI Server.
- Click OK.
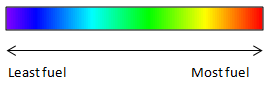
The classifications are relative to the particular input scene only and cannot be generalized to other areas or other scenes. Field examination is essential to link the classes provided by the tool with the real-world conditions they represent. You cannot compare classes between scenes, as the vegetative variability between scenes could be significant, and the actual classification values may not match. For example, a classification color of green in one scene could represent the same field conditions as a classification color of orange in another.
See Also
Spectral Indices, Burn Indices Background, Vegetation Indices, Vegetation Analysis Tools, Agricultural Stress Classification, Forest Health Classification, Vegetation and Its Reflectance Properties