This model computes a Normalized Difference Vegetation Index (NDVI) on the 10-meter bands of a Sentinel-2 Level-1C image. It then applies a color slice classification to the NDVI values. You will need to supply your own dataset for this example.
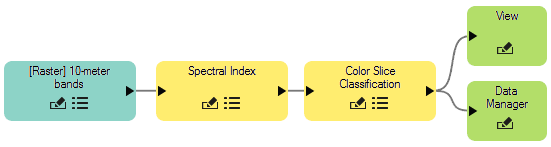
This model consists of the following nodes:
Dataset Node
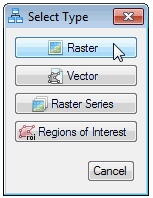
A Dataset node allows you to select a specific band group to process from a Sentinel-2 dataset. Start the ENVI Modeler, then add a Dataset node to a new model. In the Data Selection dialog, click the Open File  button and select a S2A*.xml file from a Sentinel-2 dataset. When the Select Type dialog appears, click Raster.
In the Data Selection dialog, select the 10-meter dataset.
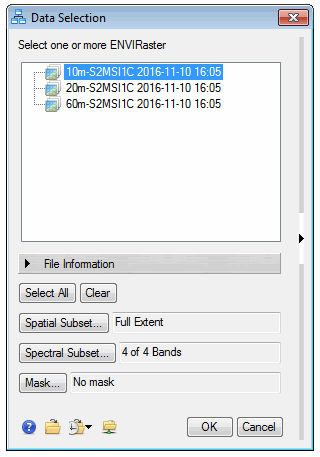
The 10-meter bands are as follows, with the wavelength centers in parentheses:
- B2: Blue (496.6 nm)
- B3: Green (560.0 nm)
- B4: Red (664.5 nm)
- B8: Near-infrared (835.1 nm)
You can optionally define a spatial subset by clicking the Spatial Subset button.
Spectral Index
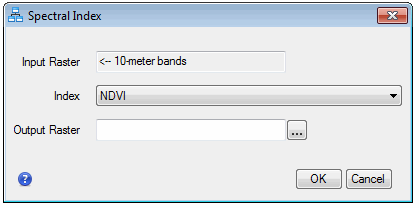
Connect a Spectral Index node to the Dataset node. Click the  button in the Spectral Index Task node to display the task parameters. Select NDVI from the Index drop-down list.
Notes about Atmospheric Correction
Before computing NDVI or any broadband spectral index on Sentinel-2 imagery, you should decide whether or not to correct for atmospheric effects. Sentinel-2 Level-1C images have already been calibrated to top-of-atmosphere reflectance and scaled by 10000, according to the following reference:
Sentinel-2 MSI Technical Guide, ESA Sentinel Online. https://sentinel.esa.int/web/sentinel/technical-guides/sentinel-2-msi. Accessed September 2017.
The images are ready for analysis, and this example proceeds directly to the Spectral Index task to compute NDVI. However, to compensate for atmospheric effects and to create an image of apparent surface reflectance, add a Task node for QUick Atmospheric Correction (QUAC) before the Spectral Index node. Using QUAC requires a separate license for the ENVI Atmospheric Correction Module. Processing a full Sentinel-2 scene can take a long time, so we recommend defining a spatial subset in the Dataset node.
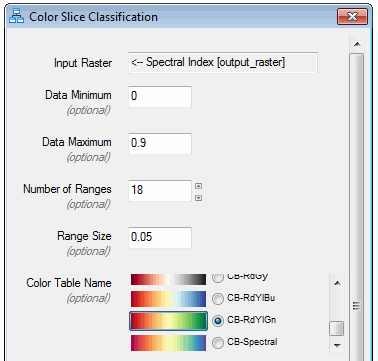
Color Slice Classification
Connect a Color Slice Classification node to the Spectral Index node. Click the button in the Color Slice Classification node to display the task parameters. Enter the following values:
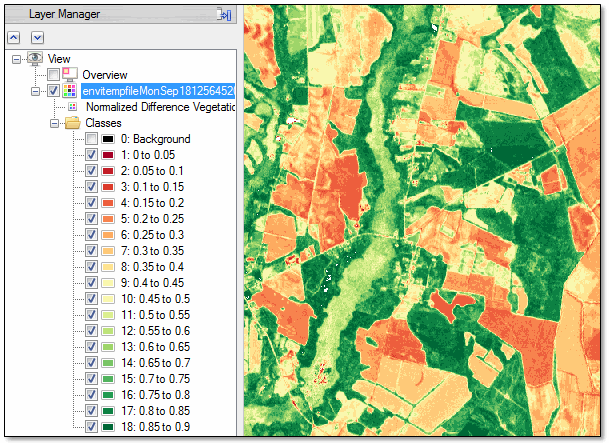
Data Manager and View Nodes
Connect a Data Manager and View node to the Color Slice Classification node, then run the model. The result is a classification image of NDVI values; for example:
Once the resulting image is available in the Data Manager, you can use the File > Save As > Save As (ENVI, NITF, TIFF, DTED) menu option to save the image to disk.