Use Find Hotspots to identify areas in an image that are relatively different than the rest of the image. ENVI calculates Getis-Ord Gi* local statistics (Getis and Ord, 1992) to group neighboring pixels of similar value into clusters. The algorithm evaluates each pixel and its surrounding pixels within a specified distance to classify the pixel as "hot" or "cold" (statistically significant clusters of high or low values, respectively) or neutral (not statistically significant). Hotspot analysis can be used to look for variations in crop health throughout an area.
This tool requires a separate license for the ENVI Crop Science Module; contact your sales representative for more information.
You can also write a script to run hotspot analysis using AgSpectralHotspotAnalysis task.
See the following sections:
Before You Begin
Two tools are available for hotspot analysis:
To use Find Hotspots for assessing crop health at a finer scale (for example, within a field), you should mask out all non-vegetation pixels such as soil and man-made objects.
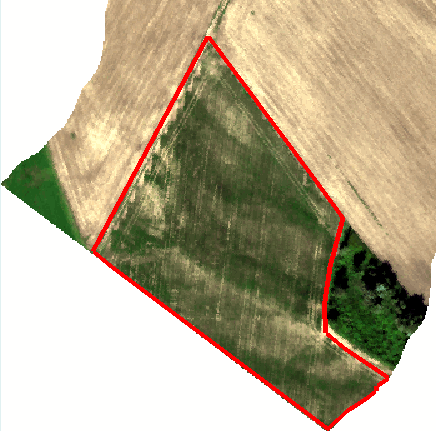
You should also spatially subset the image to only include your area of interest. If using Hotspot Analysis for a single agricultural field, create a spatial subset that includes the extent of the field, or mask out the rest of the image outside of the field extent. The following section describes how to subset by region of interest (ROI).
Example of Subsetting by ROI
You can draw an ROI around a field, mask out the pixels outside of the field, then spatially subset the image to include the extents of the field. Follow these steps:
- Right-click on the input multi-band image in the Layer Manager and select New Region of Interest.
- Draw a polygon ROI around the field of interest. Right-click and select Complete and Accept Polygon.
- From the ENVI menu bar, select File > Save As > Save As (ENVI, NITF, TIFF, DTED).
- In the Data Selection dialog, select the input image but do not click OK yet.
- Click the Mask button.
- Select the ROI that you just created, and click OK.
- Click the Spatial Subset button.
- Click the Subset by ROI button
 .
.
- In the ROI Selection dialog, select the ROI that you created and click OK.
- Select an output filename and location for the spatially subsetted image, and click OK.
The following image shows an example. Pixels outside of the field are set to values of NoData.
Background
Getis-Ord Gi* statistics (Getis and Ord, 1992) are typically used in vector feature space to look for statistically significant trends and anomalies. However, the same equations can be applied to raster data on a pixel-by-pixel basis. For rasters, hotspot analysis looks at each pixel and its surrounding pixels within a specified distance and compares them to the entire scene.
The result of Getis-Ord Gi* analysis is an array of Z-scores, one for each pixel, which is the number of standard deviations that the pixel and its neighbors are from the global mean. High Z-scores indicate more intense clustering of high pixel values, indicating hot spots. Low Z-scores indicate more intense clustering of low values, indicating cold spots. Individual pixels with high or low values by themselves might be interesting but not necessarily significant.
Find Hotspots
Use this option to run hotspot analysis using a single-band raster, without specifying a spectral index image.
- From the Toolbox, select Crop Science > Find Hotspots. The Find Hotspots dialog appears.
- Select a single-band raster for the Input Raster.
- Enter a Distance value, which is the radius of the area around each pixel used to calculate the local mean. If the input raster has a valid spatial reference, then the radius is measured in meters. Otherwise, it is measured in pixels. The radius determines the spatial resolution over which the clustering occurs. A good starting point is the pixel size of the input image.
- Specify a filename and location for the Output Raster.
-
Enable the Preview check box to preview the settings before processing the data. The preview is calculated only on the area in the view and uses the resolution level at which you are viewing the image. To preview a different area in your image, pan and zoom to the area of interest and re-enable the Preview option. Depending on the algorithm being used by the tool, the preview result might be different from the final result of processing on the full extent, full resolution of the input image in the following scenarios: 1) If you zoomed out of the input raster in the view by 50%, or a percentage less than 50%, ENVI uses a downsampled image at the closest resolution level to calculate the preview, or 2) If the entire image is not visible in the view, ENVI uses the subset in the viewable area of the input image to calculate the preview.
-
Enable the Display result check box to display the output in the view when processing is complete. Otherwise, if the check box is disabled, the result can be loaded from the Data Manager.
-
To see a model-based version of this tool that shows how the tool is constructed from individual tasks, click Open in Modeler.
-
To reuse these task settings in future ENVI sessions, save them to a file. Click the down arrow next to the OK button and select Save Parameter Values, then specify the path and filename to save to. Note that some parameter types, such as rasters, vectors, and ROIs, will not be saved with the file. To apply the saved task settings, click the down arrow  and select Restore Parameter Values, then select the file where you previously stored your settings.
-
To run the process in the background, click the down arrow next to the OK button and select Run Task in the Background. If an ENVI Server has been set up on the network, the Run Task on remote ENVI Server name is also available. The ENVI Server Job Console will show the progress of the job and will provide a link to display the result when processing is complete. See ENVI Servers for more information.
- Click OK.
Find Hotspots with Spectral Index
Use this option to run hotspot analysis using a spectral index image.
Data should be in units of reflectance before creating spectral indices. See Spectral Indices for more information.
- From the Toolbox, select Crop Science > Find Hotspots with Spectral Index. The Data Selection dialog appears.
- Select an multispectral raster for the Input Raster and click OK. See Before You Begin for considerations in selecting an input image. The Find Hotspots with Spectral Index dialog appears.
- From the Spectral Index drop-down list, select a spectral index to compute on the input raster. The spectral index image will be analyzed for hotspots. The list includes only those indices that can be computed on the input raster.
- Enter a Distance value, which is the radius of the area around each pixel used to calculate the local mean. If the input raster has a valid spatial reference, then the radius is measured in meters. Otherwise, it is measured in pixels. The radius determines the spatial resolution over which the clustering occurs. A good starting point is the pixel size of the input image.
- Specify a filename and location for the Output Raster.
-
Enable the Preview check box to preview the settings before processing the data. The preview is calculated only on the area in the view and uses the resolution level at which you are viewing the image. To preview a different area in your image, pan and zoom to the area of interest and re-enable the Preview option. Depending on the algorithm being used by the tool, the preview result might be different from the final result of processing on the full extent, full resolution of the input image in the following scenarios: 1) If you zoomed out of the input raster in the view by 50%, or a percentage less than 50%, ENVI uses a downsampled image at the closest resolution level to calculate the preview, or 2) If the entire image is not visible in the view, ENVI uses the subset in the viewable area of the input image to calculate the preview.
-
Enable the Display result check box to display the output in the view when processing is complete. Otherwise, if the check box is disabled, the result can be loaded from the Data Manager.
-
To see a model-based version of this tool that shows how the tool is constructed from individual tasks, click Open in Modeler.
-
To reuse these task settings in future ENVI sessions, save them to a file. Click the down arrow next to the OK button and select Save Parameter Values, then specify the path and filename to save to. Note that some parameter types, such as rasters, vectors, and ROIs, will not be saved with the file. To apply the saved task settings, click the down arrow and select Restore Parameter Values, then select the file where you previously stored your settings.
-
To run the process in the background, click the down arrow next to the OK button and select Run Task in the Background. If an ENVI Server has been set up on the network, the Run Task on remote ENVI Server name is also available. The ENVI Server Job Console will show the progress of the job and will provide a link to display the result when processing is complete. See ENVI Servers for more information.
- Click OK.
Interpret the Results
A color slice is applied to the image to create color gradients for specific Z-scores. In the Layer Manager, these gradients are labeled with plus and minus symbols to represent higher and lower Z-scores, respectively. The resulting hotspot image shows statistically significant positive values in green and negative values in red. The following image shows an example:
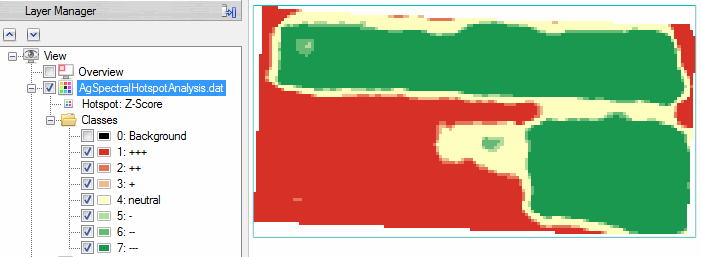
When using a broadband greenness vegetation index, red is less vigorous and green is healthier. However, no matter how healthy or vigorous the vegetation in an area of interest, you will always see hot and cold spots in the results. This is because you will always have values that are above and below the mean.
You may find regions that appear unhealthy but are green in the hotspot result. This is because small local variations do not qualify as hot or cool in the results when the search distance is set to larger values.
Examples
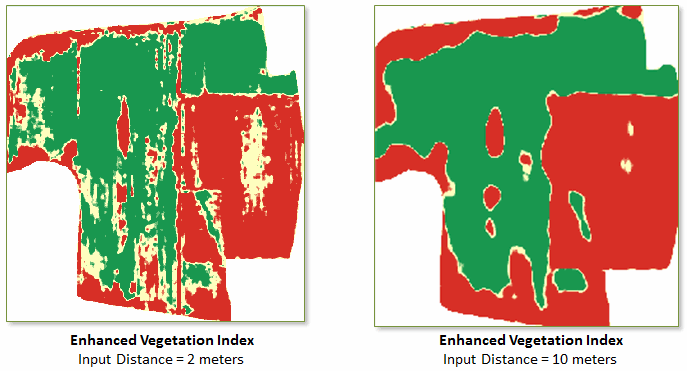
This section provides some different examples of using hotspot analysis, each with a different Search Distance value. The choice of value depends on what you are using hotspot analysis for. Enter a smaller value (for example, the pixel size of the input image) to evaluate crop health on a smaller scale such as individual rows of crops. Or, enter a larger value to assess the general crop health across an entire field.
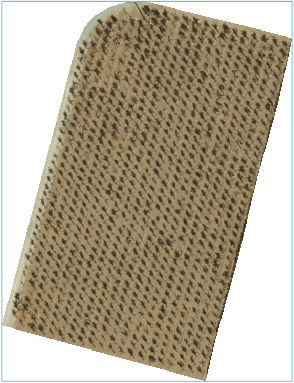
The following example shows an agricultural field extracted from a multispectral image at 1-meter resolution (courtesy of the National Ecological Observatory Network).

An Enhanced Vegetation Index (EVI) image was created from the multispectral image, followed by hotspot analysis on the EVI image using two different Search Distance values. This example illustrates how you can assess crop health over detailed areas, or over a larger extent.
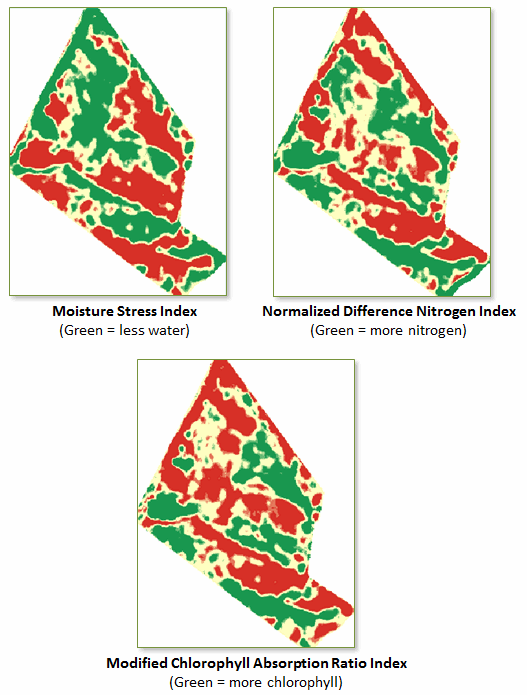
The next example shows an agricultural field extracted from a hyperspectral image at 1-meter resolution (courtesy of Rochester Institute of Technology).
If you have access to high-resolution hyperspectral imagery, you can compute narrowband indices that indicate vegetation stress. Then run Find Hotspots on the spectral index images. These examples show which areas contain less water, have lower nitrogen in their leaves, and have lower levels of chlorophyll. They use a Search Distance value of 4 meters.
References:
Getis, A., and J. K. Ord. "The Analysis of Spatial Association by Use of Distance Statistics." Geographic Analysis 24, no. 3 (1992): 189-206.
Mitchell, A. The ESRI Guide to GIS Analysis, Volume 2: Spatial Measurements and Statistics. Esri Press, 2005.
Ord, J. K., and A. Getis. "Local Spatial Autocorrelation Statistics: Distributional Issues and an Application." Geographical Analysis 27, no. 4 (1995): 286-306.
See Also
Find Developing Hotspots