In this tutorial you will learn how to create an ArcGIS Python toolbox that contains ENVI geoprocessing tools. ENVI® Py for ArcGIS is required in order to create the toolbox. Each tool is based on an ENVITask in the ENVI application programming interface (API) that runs a specific analytic. You will view and run ENVI tools that are automatically installed and added to ArcGIS Pro. You will also create a custom toolbox containing any number of ENVI analytic tools. You will also learn how to publish ENVI models as ArcGIS Pro tools.
See the following sections:
Before You Begin
- Install ArcGIS Pro with administrator privileges.
- Install ENVI.
- Install ENVI Py for ArcGIS Pro by running one of the following files with administrator privileges:
- envipyxx-arcgispro.exe: Included with your web download of ENVI software
- setup-envipyxx-arcgispro.exe : Located on the ENVI installation DVD in the ENVIPyxx folder
- Follow the prompts in the ENVI Py for ArcGIS Pro installer.
View and Run Standard ENVI Tools
Once you install ENVI Py for ArcGIS Pro, an ENVI Analytics toolbox is automatically added to ArcGIS Pro. This toolbox contains several image-processing tools that are ready to use. Follow these steps to view the tools and to run an example.
- Start ArcGIS Pro.
- Start a new project, or open an existing project.
- From the ArcGIS Pro menu bar, select View > Geoprocessing.
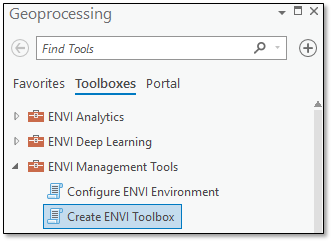
- In the Geoprocessing pane, click Toolboxes.
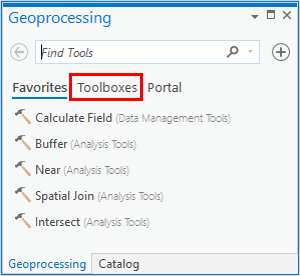
- Click the ENVI Analytics toolbox to expand it. This toolbox contains several image-processing tools:
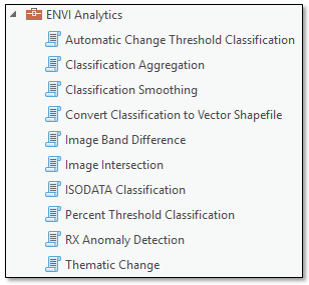
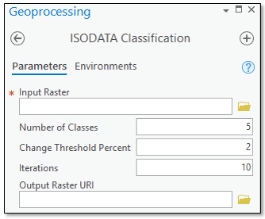
- Double-click the ISODATA Classification tool. ISODATA is an unsupervised classification method. The parameters for ISODATA Classification are displayed in the Geoprocessing pane.
- Click the Browse button next to Input Raster.
- Navigate to the \data folder in your ENVI installation path; for example, INSTALL_DIR\ENVIxx\data\.
- Select Avon.dat and click OK.This is a true-color orthophoto of an area near Avon, New York.
- Keep the default values for Number of Classes, Change Threshold Percent, and Iterations.
Tip: To learn more about these parameters, click the blue help icon in the ISODATA Classification task.
- To optionally specify a folder and filename for the output, type the path and filename directly in the Output Raster URI field. Be sure to include a .dat file extension with the filename.
- Click the Run button at the bottom of the Geoprocessing pane.
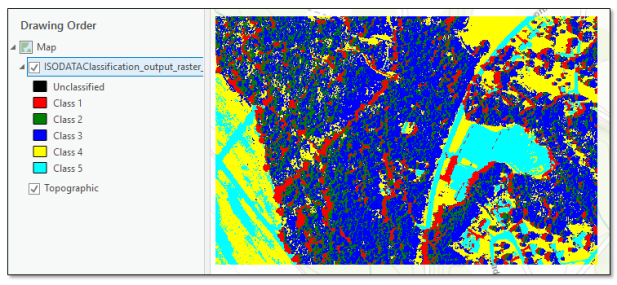
- When processing is complete, right-click on the new image (named ISODATAClassification_output_raster_*.dat) in the Contents pane and select Zoom to Layer. A classification image is displayed with five colors, each representing an unknown land-cover type.
- Remove the ISODATA classification layer from the display.
- Click the Back button in the ISODATA Classification panel to return to the main Geoprocessing panel.
Next you will create a custom toolbox that consists of ENVI geoprocessing tools.
Create a Custom ENVI Toolbox
- Click the ENVI Management Tools toolbox to expand it.
- Click Create ENVI Toolbox.
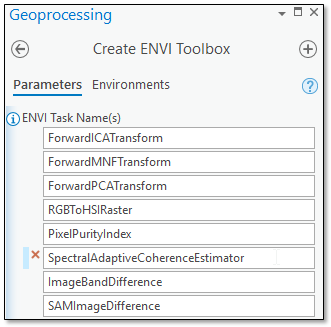
- In the ENVI Task Name(s) field, you can add as many ENVITasks as you want. Here are some tips:
- See ENVITasks for the list of available tasks.
- Not all ENVITasks can be exposed as standalone tools because they require data types that are incompatible with ArcGIS Pro. See Appendix: Supported ENVITasks for a list of supported tasks.
- After entering a task name, press the Enter or Tab key on your keyboard to add a new task name.
- To remove a task, click inside of its field and click the Remove icon (the red X); for example:
- When you are done adding task names, click the Browse button to the right of the Output Toolbox folder. The Output Toolbox dialog appears.
- Choose an output folder and filename for the custom toolbox, then click Save.
- Click the Run button at the bottom of the Geoprocessing pane.
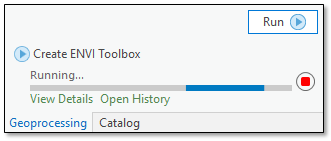
When the toolbox is complete, a green check box indicates that the toolbox was successfully created.
- Click the Catalog tab at the bottom of the Geoprocessing pane to switch to the Catalog pane.
- Select the Project tab in the Catalog pane.
- Right-click on Toolboxes and select Add Toolbox. The Add Toolbox dialog appears.
- Select the toolbox (.pyt) that you just created and click OK. The new toolbox appears under the Toolboxes list in the Catalog pane.
- Double-click the new toolbox to see the tools within it; for example:

- Click the Project tab in the ArcGIS Pro menu bar.
- Click Save to save the current project.
- Close ArcGIS Pro.
Publish an ENVI Model as an ArcGIS Pro Tool
You can use the ENVI Modeler to create models with data-processing workflows that combine multiple tasks. Then you can save the entire model as a metatask, which is a single task that encompasses all of the tasks in the model. The metatask can be published as a standalone tool in ArcGIS Pro.
This section demonstrates how to do this using a simple pre-built model that performs ISODATA unsupervised classification and smooths the resulting classes.
Note: Before you begin, ensure that your ArcGIS Pro \Toolboxes folder has write permission. ENVI will attempt to publish the model/metatask in this example to the \Toolboxes folder. The default location is C:\Program Files\ArcGIS\Pro\Resources\ArcToolBox\Toolboxes\. If you do not have sufficient privileges to change the permission of this folder, you will need to perform some extra steps to add the new tool to ArcGIS Pro.
Configure the Model
- Start ENVI.
- From the ENVI menu bar, select Display > ENVI Modeler.
-
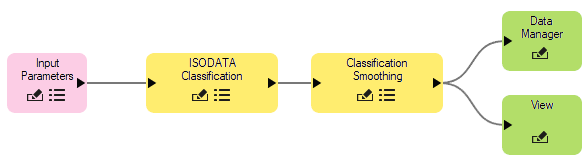
From the ENVI Modeler menu bar, select File > Open Example > Simple Model. The model elements are displayed:
-
Before you can publish the model to ArcGIS Pro, you must make a few changes. You need to define input and output parameters so that all users can run the model using their own data and write the output to their own directory. Notice that the model already has an Input Parameters node. When the model is converted to a tool in ArcGIS Pro, an Input Parameters dialog will display so that you can select your own input file. Now you just need to add an Output Parameters node. Continue with these steps:
- Select the Data Manager and View nodes, and press the Delete key to remove them. The grey connectors are also removed.
- In the Basic Nodes list on the left side of the ENVI Modeler, double-click Output Parameters. A new Output Parameters node is added to the display.
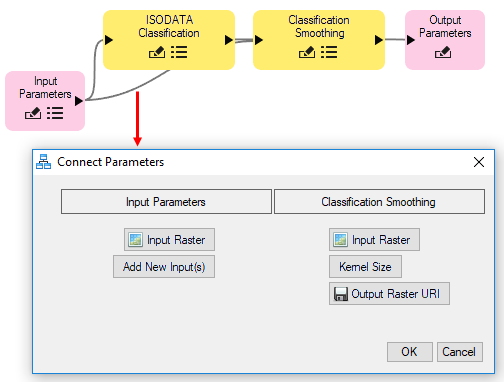
- Move the Output Parameters node to the end of the model, then draw a line to connect it with the Classification Smoothing node:

If you were to run the model now, the resulting image from Classification Smoothing would export to the ENVI temporary directory. Since you are creating a model to possibly share with others, you should display a dialog for users to choose the location of the output image. You will do this next.
- Drag the Input Parameters node down, then add a connector between this node and the Classification Smoothing node (the last task in the processing chain). The Connect Parameters dialog appears:
- Click the Output Raster URI button on the right. A red line is drawn between this and the Add New Input(s) button.
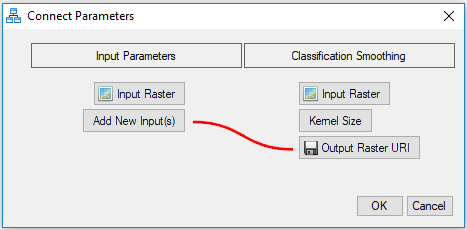
- Click OK in the Connect Parameters dialog. Now is a good time to make sure the model runs successfully.
Run the Model
- Click the Run button in the ENVI Modeler. After a few seconds, the Input Parameters dialog appears.
- Click the Browse button next to the Input Raster field. The Data Selection dialog appears.
- Click the Open File button in the Data Selection dialog.
- Navigate to the \data folder in your ENVI installation path; for example, INSTALL_DIR\ENVIxx\data\. Select the file Avon.dat and click Open.
- Click OK in the Data Selection dialog.
- Click the Browse button next to the Output Raster URI field.
- Select a folder and filename (with a .dat extension) for the output image.
- Click OK in the Input Parameters dialog to run the model. The output image is created in the folder that you specified.
- From the ENVI Modeler menu bar, select File > Save As. The Select Output Model File dialog appears.
- Navigate to a folder that has write permission, and rename the model to ClassificationWorkflow.model. Click Save.
Generate a Metatask from the Model
- From the ENVI Modeler menu bar, select Code > Generate Metatask. The Metatask dialog appears with JSON code for the metatask.
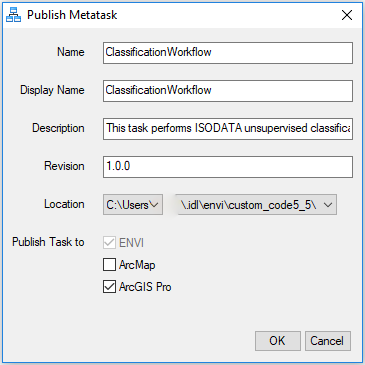
- In the Metatask toolbar, click the Publish Task button. The Publish Metatask dialog appears.
- In the Name field, enter ClassificationWorkflow.
- In the Display Name field, enter Classification Workflow.
- Enter an optional Description.
- Click the ArcGIS Pro check box, then click OK.
An Information dialog appears, indicating where the metatask file was written. The default path is the custom_code folder of your ENVI installation path; for example:
INSTALL_DIR\ENVIxx\custom_code
- Click OK in the Information dialog.
- If the above folder does not have write permission, then ENVI writes the metatask to C:\Users\<username>\.idl\envi\custom_codex_x\, where x_x is the ENVI version number. If this is the case, move the metatask file (ClassificationWorkflow.task) to the custom_code folder of your ENVI installation path, with administrator privileges.
- Close the Metatask dialog and the ENVI Modeler, then exit ENVI.
Run the ClassificationWorkflow Tool in ArcGIS Pro
- Restart ArcGIS Pro and open a project.
- Now that the ClassificationWorkflow tool has been successfully created, it should be available under the Toolboxes folder of the Catalog pane. By default, ENVI adds the tool to the Toolboxes folder of your ArcGIS Pro installation path.
- Double-click the ClassificationWorkflow tool.
- Click the Browse button next to Input Raster.
- Navigate to the \data folder in your ENVI installation path; for example, INSTALL_DIR\ENVIxx\data\. Select the file Avon.dat and click OK.
- Optionally enter a full path and filename for the output image, in the Output Raster URI field. Be sure to include a .dat extension with the filename.
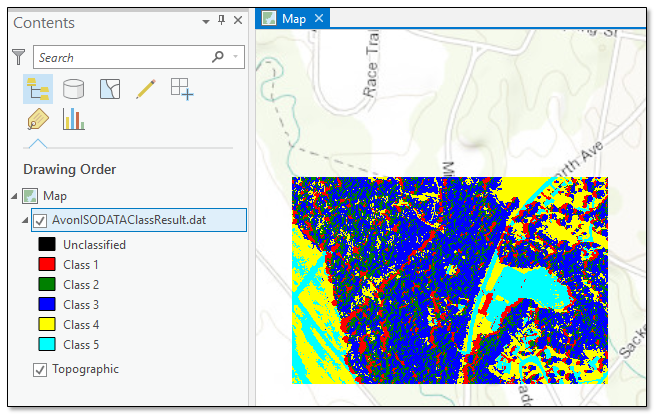
- Click Run. When processing is complete, the resulting ISODATA (smoothed) classification image appears:
Manually Adding the Toolbox
If you cannot provide write permission to the \Toolboxes folder (for example, if you do not have sufficient privileges; see the note above), ENVI automatically adds the new toolbox to an arc_toolboxes subfolder in the ENVI auxiliary folder. The location of this folder is defined in the Auxiliary File Directory preference in ENVI. The default path is:
C:\Users\<username>\.idl\envi\auxiliary\arc_toolboxes
ArcGIS Pro will not show the new toolbox right away. Follow these steps to manually add the new toolbox:
- Select the Project tab in the Catalog pane.
- Right-click on Toolboxes and select Add Toolbox. The Add Toolbox dialog appears.
- Navigate to the arc_toolboxes folder.
- Select ClassificationWorkflow.pyt and click OK. The ClassificationWorkflow tool is now available for you to use in ArcGIS Pro.
Tips for Using ENVI Tools
ENVI tools have specific requirements for input parameters. Click the  tooltip next to a parameter to learn more about it. Since each tool is based on an ENVITask, you can also refer to the ENVI Help topic for that task to see an example of how it is used.
Some tools such as ApplyGainOffset and GaussianStretchRaster have input parameters that accept multiple values. Since you cannot enter an array of values in ArcGIS Pro (as you can with an ENVITask in the ENVI API), you must enter the values line-by-line. For example, the ApplyGainOffset tool requires a gain and offset value for each band of an image. If an image has six bands, you must enter each gain and offset value separately:
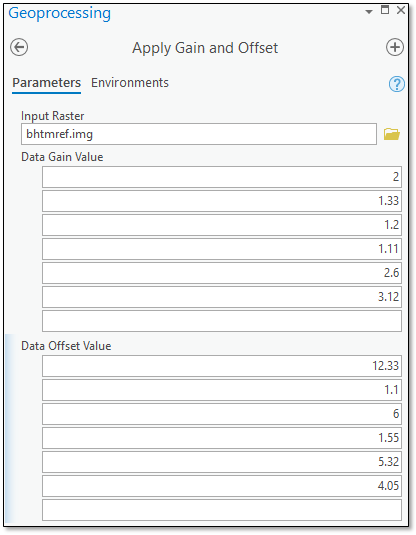
In this example, the Data Gain Value of 2 and the Data Offset Value of 12.33 pertain to the first band in the image.
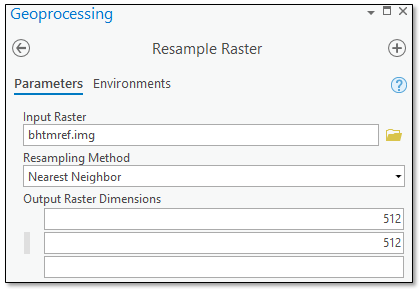
Other tools accept a two-element array of values for kernels and X/Y dimensions. Again, enter each value in a separate line. For example, the DimensionsResampleRaster tool accepts two values for the Output Raster Dimensions parameter: the number of pixels in the X direction and the number of pixels in the Y direction. To resample an image to a new raster with 512 rows and 512 columns, enter the values as follows:
Finally, most tools have an output parameter such as Output Raster or Output Raster URI. These are optional, and you can still run the tool without specifying an output file. However, output parameters are actually treated as inputs in ENVITasks. If you click the Browse button next to an output parameter field, and you specify a filename and location, you will receive an error that the output file does not exist. Instead, type the full path and name for the output file in the field provided; for example:
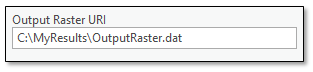
When the tool runs, the output will be written to that location.
With raster output, you can also omit the Output Raster or Output Raster URI field and display the resulting image in ArcGIS Pro. Then right-click on the layer name in the Contents window and select Data > Export to export the image to one of several common image formats.
Appendix: Supported ENVITasks
Some data types that are used in ENVI are not supported in ArcGIS Pro. These include point clouds, ground control points (GCPs), tie points, multi-dimensional arrays of data, and others. If an ENVI tool exposes an input or output parameter that includes any of these data tydpes, the tool will not run and an error message will appear in the progress bar.
Tip: If you want to use ENVITasks that operate on these data types (for example, ROIs or multi-dimensional arrays), you can create a model that includes these tasks as long they do not expose input/output parameters for unsupported data types to the end user. Use the ENVI Modeler to create a new metatask from the model. Then publish the metatask to ArcGIS Pro.