This topic describes how to use the Dataset Browser when reading the following file formats in ENVI:
The Dataset Browser lists individual rasters, metadata, and georeferencing information from these data formats. You can construct one or more raster files that contain a combination of different datasets. The Dataset Browser can also create ENVI Meta Files or dataset templates for future use.
HDF4
Select File > Open from the ENVI menu bar to open the following data types:
- ASTER (HDF-EOS)
- MODIS (HDF-EOS)
- EO-1 ALI and Hyperion (HDF4)
- Landsat (HDF4)
- MASTER (HDF4)
- SeaWiFS (HDF4)
- SPOT Vegetation (HDF4)
For all other generic HDF4 files, select File > Open As > Scientific Formats > HDF4 and select a .hdf file. Refer to the Dataset Browser section for further instructions.
HDF5 and NetCDF-4
Select File > Open from the ENVI menu bar to open the following data types that are in HDF5 format:
- Proba-V
- ResourceSat-2
- SSOT
- Suomi NPP VIIRS
- COSMO-SkyMed (use the File > Open As > Radar Sensors > COSMO-SkyMed menu option)
For all other generic HDF5 and NetCDF-4 files, select File > Open As > Scientific Formats > HDF5/NetCDF-4 and select a .h5 or .nc file. Refer to the Dataset Browser section for further instructions.
NetCDF-3
To open a NetCDF-3 file, select File > Open As > Scientific Formats > NetCDF-3 and select a .nc file. Refer to the Dataset Browser section for further instructions.
Dataset Browser
Use the Dataset Browser to build rasters that contain a combination of data fields, metadata, and georeferencing information.
The left side of the Dataset Browser lists the available datasets and metadata. When you select an item, the bottom part of the dialog lists the dataset name, path, type, and value. The following figure shows an example of an NPP VIIRS dataset in generic HDF4 format:
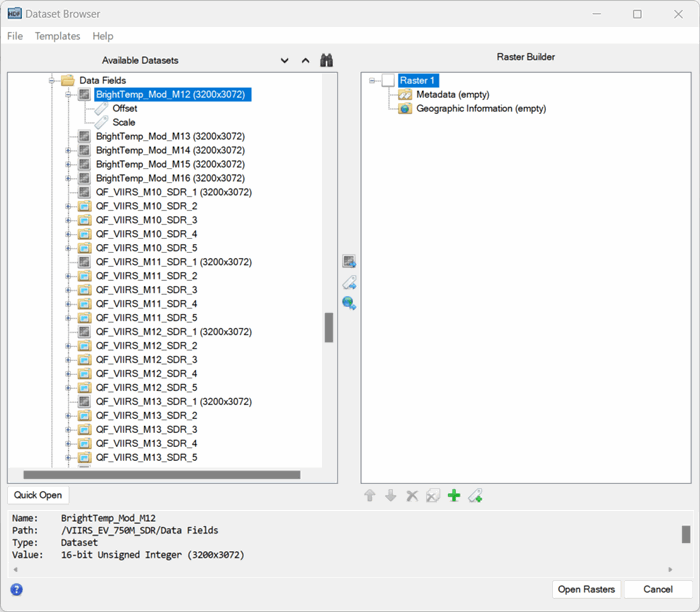
When the Dataset Browser first appears, a "Raster 1" item appears under the Raster Builder section on the right side of the dialog. The following sections describe how to build a new raster that consists of data fields, metadata, and georeferencing information.
Tip: When building a new raster, you can look for specific items in data fields, metadata, and georeferencing fields by clicking the Search button  and entering a search string.
Add Data Fields
The Dataset Browser supports the following types of data fields:
- Datasets (HDF5 and NetCDF-4)
- Scientific Datasets (HDF4)
- Raster Images (HDF4)
- VData Fields (HDF4)
- Variables (NetCDF-3)
ENVI supports all data types in HDF and NetCDF files, except for the following which are denoted by a  icon to indicate that you cannot add them to a new raster:
- 64-bit long integer
- 64-bit unsigned long integer
- More than three dimensions
You can add datasets with the following dimensions:
- One-dimensional, denoted by the
 icon
icon
- Two-dimensional, denoted by the
 icon
icon
- Three-dimensional, denoted by the
 icon
icon
The spatial dimensions must be the same for all datasets added to the raster.
The dimensions of VData fields (denoted by the  icon) are not known until ENVI builds the raster and opens it. Therefore, each raster can only have one VData field. You cannot combine VData fields with other datasets.
To add a data field to the new raster, click and drag the field from the Available Datasets list to the Raster item in the Raster Builder. For example:

Or, select the fields and click the  button. The data field is added as a band to the raster.
Note: You cannot build a raster that contains bands from different files.
To reorder a data field in the Raster Builder, select it and click the Move Up  or Move Down
  button. Or, click and drag it to the desired location.
Add Metadata
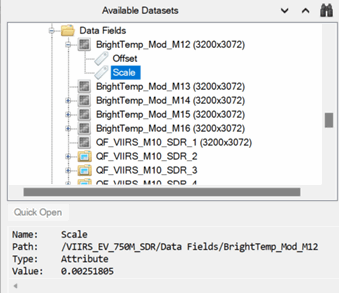
Attributes (including annotations in HDF4 files) from the original hierarchical dataset are listed in the Available Datasets section with a  icon. When you select an attribute, the Dataset Browser shows its value:
To add an attribute to the new raster that you are building, click and drag it from the Available Datasets list to the Metadata folder of the new raster. Or, select the attribute and click the  button. The Add Metadata dialog appears. Use this to map the original attribute to an ENVI header field. A common example is to add a string from an HDF attribute to the ENVI Description header field.
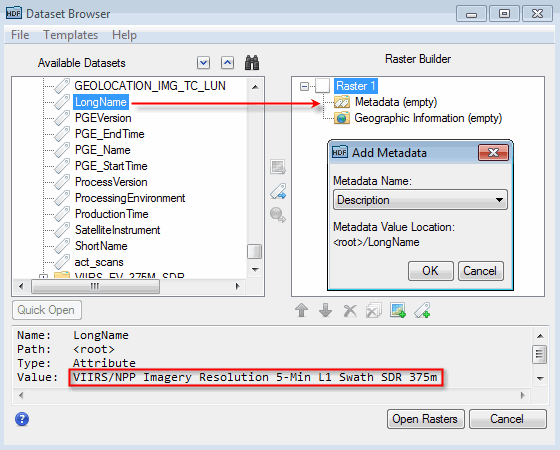
The following figure shows an example of dragging the LongName metadata to the Metadata folder of a new raster. When the Add Metadata dialog appears, select Description for the corresponding ENVI metadata field and click OK.
You can also add standard ENVI metadata fields to the new raster. This is useful when the source dataset does not define the metadata field but you know its value and you want to define it in the new raster. For example, you may know the spectral wavelength information associated with a dataset but the source metadata does not contain wavelength information. Click the Add Metadata button  near the bottom of the Dataset Browser. Choose a metadata field from the drop-down list, enter the metadata value, and click OK.
When reading Scientific Data, ENVI looks for certain standard attributes and automatically populates associated ENVI Header fields with those metadata values.
|
Original attribute
|
ENVI header field
|
|
_FillValue |
data ignore value
|
|
scale_factor |
data gain values
|
|
add_offset |
data offset values
|
Add Georeferencing Fields
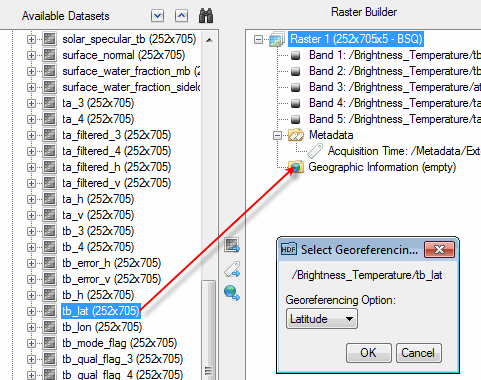
Some scientific datasets contain latitude and longitude fields that you can add to the raster you are building. When you display the raster, ENVI georeferences the raster on-the-fly in the Image window, using the latitude and longitude information. It does not actually geocorrect the dataset.
To add latitude and longitude fields to the new raster, click and drag the fields to the Geographic Information folder in the Raster Builder. Or, select the fields and click the  button. For example:
Note: Latitude and longitude rasters must be in the same file as the data. You cannot build a raster dataset using latitude and longitude rasters from a different file.
One-dimensional arrays may be used as latitude and longitude datasets. ENVI will automatically expand them into full georeferencing grids.
More Tools for Building Rasters
Once you have added data fields, metadata, and georeferencing fields to the new raster, you can organize and complete the raster using the following tips and tools:
- To remove items from the new raster, select the items and click the Remove Selected
 or Remove All
  button.
- To create a raster that consists of datasets from different files of the same format, select File > Add format File where format is HDF4, HDF5, NetCDF-3, or NetCDF-4. You cannot create a dataset that consist of data fields from different file types (for example, HDF4 and HDF5).
- To rename a raster, right-click on the raster name in the Raster Builder and select Rename Raster.
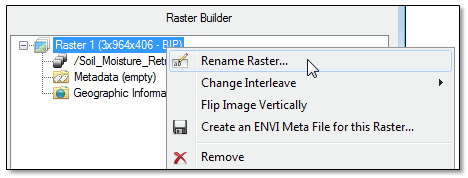
- To change the interleave of a multiband raster, right-click on the top-level raster name (for example, Raster 1) in the Raster Builder and select Change Interleave > BSQ, BIL, or BIP.
- To flip a raster in the vertical direction, right-click on the top-level raster name in the Raster Builder, and select Flip Image Vertically.
- To display an individual data field, select it in the Available Datasets list, and click the Quick Open button.
- To create a report of the data fields and metadata that comprise a raster, select File > Export Dataset Structure. The available formats are text, XML, or JSON. With HDF4 files, JSON is the only available option.
You can also use the Dataset Browser to build more rasters. Click the New Raster button  and follow the steps above to add data fields, metadata, and georeferencing fields to the new raster. To reorder rasters in the Raster Builder, select a raster and click the Move Up or Move Down button.
If you click the Open Rasters button, all rasters under the Raster Builder will be added to the Layer Manager and displayed in the Image window. These are only temporary rasters. To save the rasters to disk, do not click Open Rasters yet. See Create ENVI Meta Files in the next section for further instructions.
Create ENVI Meta Files
Once you have created a raster file that contains a combination of different scientific datasets, you can choose to create an ENVI meta file. This is a text file that contains the names of image files and/or bands to treat as one virtual file. When you later select the meta file for input or processing using File > Open, ENVI retrieves the image data from the individual disk files and treats them as if they were part of the same input file for processing.
- Right-click on a raster name in the Raster Builder section, and select Create an ENVI Meta file for this Raster.
- In the ENVI Meta File Builder dialog, specify a filename and location for the meta file.
- Click OK.
Follow these steps to save the raster file to a different format:
- If the meta file that you just created is not open in the Data Manager, select File > Open and select the meta file.
- Select File > Save As > ENVI, NITF, TIFF, DTED from the menu bar, and select the meta file.
- In the Save File As Parameters dialog, select an output format and click OK.
Work with Templates
Templates are helpful in building the same raster and metadata structure from several scientific data formats. Using a template prevents you from having to use the Dataset Browser to re-define the raster and metadata for every file. Templates provide an efficient way to read the wide variety of new scientific datasets being released in HDF and NetCDF formats today.
You do not need to create templates for the following data types because ENVI reads them natively:
- ASTER (HDF-EOS)
- MODIS (HDF-EOS)
- EO-1 ALI and Hyperion (HDF4)
- Landsat (HDF4)
- MASTER (HDF4)
- SeaWiFS (HDF4)
- SPOT Vegetation (HDF4)
- Proba-V (HDF5)
- ResourceSat (HDF5)
- SSOT (HDF5)
- Suomi NPP VIIRS (HDF5)
- Cosmo-SkyMed (HDF5)
After using the Raster Builder to create a new raster with the desired metadata, follow these steps:
- Select Templates > Export Template from the Dataset Browser menu bar.
- Select a filename and location for the output template (XML format). Do not use the same filename more than once. If you do not specify a directory, the template is saved to the directory specified by the Custom Code Directory preference.
- Provide an optional name for the template.
- Click OK.
Follow these steps to restore templates:
- From the ENVI menu bar, select one of the following options and select an input data file:
- File > Open As > Scientific Formats > HDF4
- File > Open As > Scientific Formats > HDF5
- File > Open As > Scientific Formats > NetCDF-3
- File > Open As > Scientific Formats > NetCDF-4
- ENVI automatically detects and loads any templates that are in the directory specified by the Custom Code Directory preference. They appear under the Templates menu of the Dataset Browser. If you saved a template to another directory, select Templates > Open Template from the Dataset Browser menu bar, and choose a template file. A message appears, indicating that the template file was successfully loaded.
- From the Dataset Browser menu bar, select Templates > template name. The template will build a raster dataset from your source file. You can now open the raster dataset or export the available data.
Manually Create Templates
ENVI programmers can manually create XML templates for reading specialized data in HDF and NetCDF formats.
The table below describes the XML tags and attributes that ENVI supports in scientific data format templates. All are case-sensitive. Also refer to the example template at the end of this table.
You can define multiple templates within one XML file by repeating the tag groups as needed. You can combine HDF4 and HDF5 templates in the same file.
Every raster must contain at least one dataset as defined by the DATASET or SD/IMAGE tags. If you define multiple datasets, ENVI will build one metaspectral raster from the bands. This is common in cases where each band of an image is stored in separate datasets. The metaspectral raster will always have a band-sequential (BSQ) interleave, overriding any interleave attribute that you define.
After creating a template in a text editor, save the template to the directory specified by the Custom Code Directory preference.
|
Tag |
Description |
|
ENVI_FILE_TEMPLATE
|
Required. This is the top-level tag for any scientific data template file.
|
|
HDF4
|
Use this tag for HDF4 files. Add the required name attribute with a custom name for the template. Example:
<HDF4 name="My HDF4 Template Name">
|
|
HDF5
|
Use this tag for HDF5 files. Add the required name attribute with a custom name for the template. Example:
<HDF5 name="My HDF5 Template Name">
|
|
NETCDF4
|
Use this tag for NetCDF-4 files. Add the required name attribute with a custom name for the template. Example:
<NETCDF4 name="My NetCDF-4 Template Name">
|
|
NETCDF3
|
Use this tag for NetCDF-3 files. Add the required name attribute with a custom name for the template. Example:
<NETCDF3 name="My NetCDF-3 Template Name">
|
|
RASTER
|
Required. Use this tag to define a raster that can be built from one or more datasets with optional metadata and spatial reference (map) information.
The name attribute is optional. This is the name that will be displayed in the Data Manager and Layer Manager.
You can also provide an optional interleave attribute for HDF5 files. Valid values are BSQ, BIL, and BIP.
Example:
<RASTER name="My HDF5 raster" interleave="BIL">
|
|
DATASET
|
Required for HDF5 files. Specify the full dataset name, including the path. Insert this tag inside of the RASTER tag block.
|
|
SD
|
Pertains to HDF4 files. Specify the full name (including the path) to a Scientific Dataset. Insert this tag inside of the RASTER tag block.
Or, use the sd_id attribute to open the Scientific Dataset using its ID number instead its name. If you specify the sd_id attribute, you do not need to specify the dataset name.
If you know that the Scientific Dataset name is completely unique in the file, you can set the optional unique attribute to true and omit the path from the dataset name.
|
|
IMAGE
|
Pertains to HDF4 files. Specify the full name (including the path) to an image such as:
- General Raster (GR)
- DFR8
- DF24
Insert this tag inside of the RASTER tag block.
|
|
VDATA_FIELD
|
Pertains to HDF4 files. Specify the full path to a VData field in the form of path/VData_Name/Field_Name. For fields that have a single VData value, specify the path as VData_Name/Field_Name. The optional attributes for the SD tag do not apply to this tag.
|
|
VARIABLE
|
Pertains to NetCDF-3 files. Specify the full name (including the path) to a variable.
|
|
METADATA
|
Optional. Use this tag with the name attribute to add ENVI Header fields or user-defined metadata to a raster. You have two options for using this tag:
(1) Specify a name/value pair where the value is fixed and always specified in the template. Example:
<METADATA name="wavelengths">650,550,480</METADATA>
(2) Provide a name without a specific value. Instead, specify the full path (including folders) to an attribute that stores the desired metadata value. Example:
<METADATA name="custom description" id="/DataFolder/Attribute/"</METADATA>
You can also use dataset values as metadata values.
Insert this tag inside of the RASTER tag block.
When specifying the CLASS_LOOKUP metadata value for a classification raster in a template, define the 3 x n data as: [[0,1,2],[3,4,5],[6,7,8], etc. This is similar to defining a multi-dimensional array in IDL.
|
|
XGRID
|
Optional. Specify the full name (including the path) to a longitude dataset that you want to associate with the raster. If you specify XGRID, you must also specify YGRID.
ENVI will build a geographic lookup table (GLT) spatial reference from these grids. Ideally, the latitude and longitude grids will have the same dimensions as the source raster. However, you can use down-sampled latitude and longitude grids if needed, if they have the same dimensions as each other and are proportional to the source raster.
Insert this tag inside of the RASTER tag block.
|
|
YGRID
|
Optional. Specify the full name (including the path) to a latitude dataset that you want to associate with the raster. If you specify YGRID, you must also specify XGRID.
Insert this tag inside of the RASTER tag block.
|
NetCDF-4 Example Template
In the following example, the Sensor and Day Night Flag attributes are from the source dataset. The Wavelength and Wavelength Units are standard metadata fields that were added along with known values.
<?xml version="1.0" encoding="utf-8"?>
<ENVI_FILE_TEMPLATE>
<NETCDF4 name="VIIRS GHRSST Dataset">
<RASTER>
<DATASET>/sea_surface_temperature</DATASET>
<DATASET>/wind_speed</DATASET>
<METADATA name="Sensor" id="/sensor"></METADATA>
<METADATA name="Day Night Flag" id="/DayNightFlag"></METADATA>
<METADATA name="Wavelength">350, 450, 650, 800</METADATA>
<METADATA name="Wavelength Units">Nanometers</METADATA>
<XGRID>/lon</XGRID>
<YGRID>/lat</YGRID>
</RASTER>
</NETCDF4>
</ENVI_FILE_TEMPLATE>