Tutorial: Image Registration Tutorial
The Image Registration workflow geometrically aligns two images with different viewing geometry and/or different terrain distortions into the same coordinate system so that corresponding pixels represent the same objects. The process includes locating and matching a number of feature points called tie points in a base image and a warp image selected for registration. The corresponding tie points are used to compute the parameters of a geometric transformation between the two images.
ENVI uses a patented Registration Engine that lets you automatically and accurately generate tie points. It uses those tie points to align and resample the warp image to match the base image. It combines available spatial reference information with various automatic registration techniques to improve the accuracy, performance, and automation of image registration. It minimizes or eliminates the need for user interaction and editing.
The spatial reference component of the Registration Engine combines all of the available spatial reference information to achieve the best geolocation accuracy during registration. The spatial reference information of the Registration Engine may come from the following:
- Standard map or RPC information of input images. Standard map information or RPC information establishes the approximate geometric relationship between a warp image and a base image. It reduces the search space and improves the reliability of automatic tie point generation.
- Tie point information you define manually or that is automatically generated from image-matching techniques. For most applications, the Registration Engine can automatically generate tie points with no outliers or a minimal number of outliers. You can also manually define a few seed tie points and use them in automatic tie point generation to improve the overall accuracy.
- Geolocation geometric constraints to search for and filter tie points. The images should align well in the common ground coordinate space in the orthorectified images or nadir view images; therefore, all tie points are constrained by a global transform between the coordinates in the base image and the warp image.
- RPC sensor models and elevation used for a quick orthorectification during image registration. This geometrically corrects the data to a common ground coordinate space and achieves better accuracy in radiometric matching and geometric filtering.
- For images taken at different viewing positions and/or angles, the images of the same scene are related by the epipolar geometry constraint. Two epipolar geometry models are used: one is suitable for the imagery with the frame central projection, and the other model is suitable for the imagery taken with a pushbroom sensor that has RPC information.
See the following for help on a particular step of the workflow:
References:
Jin, Xiaoying. ENVI automated image registration solutions. NV5 Geospatial Solutions, Inc. whitepaper (2017). ENVI automated image registration solutions can be downloaded from our website.
Jin, Xiaoying, and Robert Schafer. Method and system for automatic registration of images. Exelis, Inc., assignee; now owned by NV5 Global, Inc. U.S. Patent No. 9,245,201 (issued January 26, 2016).
Select Files for Image Registration
You will need two images for image registration; one image is base, one image is warp.
The base image can have a standard map projection or RPC information; it cannot be a pixel-based, arbitrary, or pseudo projection. The warp image does not have restrictions.
If you have an input image that has higher georeferencing accuracy or is an orthorectified image, you should use that image as the base image.
- From the Toolbox, select Geometric Correction > Registration > Image Registration Workflow.
-
Select a Base Image File and a Warp Image File. See The File Selection Dialog for details on selecting input data.
- Click Next. The Tie Points Generation panel appears. Two separate views are created. The left view contains the base image, and the right view contains the warp image. If both images are georeferenced, the Link Views option is enabled, which means that the views are geographically linked. When you move around in one view, the other view updates automatically. If one or both of the files are displayed in an active view before you start the workflow, the display bands and any brightness, contrast, stretch, and sharpen settings are retained when ENVI creates the workflow views. The image location is not retained for pixel-based images or those with pseudo or arbitrary projections. If the selected Base Image File was displayed in an active view before you start the workflow, the image center location is retained.
Tip: If your mouse has a wheel, press and hold it to pan around the images. You can also rotate the mouse wheel to zoom in and out.
Generate Tie Points
Use the Tie Points Generation panel to select the parameters for generating tie points.
Automatic Tie Point Generation Settings
Automatic tie point generation compares the gray scale values of patches of two images and tries to find joined image locations based on similarity in those gray scale value patterns. The accuracy of the results largely depend upon the quality of the approximate spatial reference information between the base image and the warp image. This is determined through standard map projection or RPC information, or by using three or more tie points.
If map information and three or more tie points exist, the "three or more tie points" condition is used. If the base image or warp image contain RPC projection information, you can specify a DEM file to perform quick orthorectification. This will geometrically correct the data before image matching. If you input a DEM file, the higher the resolution and accuracy of the DEM data, the more tie points that are generated, and the better the distribution of those points.
You can also write a script to automatically generate tie points using one of the following tasks: GenerateTiePointsByCrossCorrelation, GenerateTiePointsByCrossCorrelationWithOrthorectification, GenerateTiePointsByMutualInformation, GenerateTiePointsByMutualInformationWithOrthorectification
.
In the Main tab:
If at least one of the input images has RPC information, the DEM File field appears. Enter the path and filename for the DEM file. Note that using a DEM increases processing time. If you do not have a DEM file readily available, you can use the Global Multi-resolution Terrain Elevation Data 2010 (GMTED2010) DEM named GMTED2010.jp2 that is provided with your ENVI installation under the INSTALL_DIR/envixx/data folder. The Image Registration workflow uses this DEM by default unless you specify a different one.
To open a remote dataset, click Browse in the File Selection panel, then click Open Remote Dataset in the Select Base Image File dialog.
Select the Matching Method from the drop-down list to use when automatically generating tie points:
- [General] Cross Correlation: This method works well for general purpose, especially registering images with similar modality (e.g., registering optical image with optical image). The normalized cross-correlation between the patch in the base image and the patch in the warp image is computed as the matching score. To register images with different modalities (e.g., registering SAR with optical images), set the Minimum Matching Score to a lower value.
- [Cross Modality] Mutual Information: This method is optimized for registering images with different modalities (e.g., registering SAR with optical images, or thermal with visible images). The normalized mutual information between the patch in the base image and the patch in the warp image is computed as the matching score. Mutual information is based on information theory and measures the mutual dependence of the two random variables. Mutual information produces more accurate results than the traditional correlation based measures for cross-modality image registration. This method takes longer to run since it is more computationally intensive.
Set the Minimum Matching Score to use when automatically filtering tie points based on radiometric criterion. For automatic tie point generation, a window around the tie point location is used as a matching window, and the normalized cross-correlation or normalized mutual information between the window in the base image and the window in the warp image is computed as the matching score. Tie points with a matching score less than this value are considered as outliers and are removed. If the image pairs have a large parallax, it is likely that the matching score is low and you should decrease this value. The maximum value is 1.0. The minimum value is 0.0.
Select the Geometric Model to use when automatically filtering tie points from the drop-down list.
You can also write a script to filter tie points using one of the following tasks: FilterTiePointsByFundamentalMatrix, FilterTiePointsByGlobalTransform, FilterTiePointsByGlobalTransformWithOrthorectification, FilterTiePointsByPushbroomModel.
For orthorectified images, nadir, or near-nadir images, the transformation model between the base image and the warp image fits an RST transform. When the scene is flat and the sensor is far from the scene, the transformation model between the base image and the warp image fits a first-order polynomial transform.
For images of a 3D scene obtained with a conventional frame camera, or images taken with a pushbroom sensor(s) that have RPC information, the images of the same scene are related by epipolar geometry constraint. For a feature point in the first image, the corresponding point in the second image must lie on the epipolar line or curve. Two epipolar geometry models are used: one is suitable for the imagery with the frame central projection, and the other model is suitable for the imagery taken with a pushbroom sensor that has RPC information. Select those options when applicable.
- Fitting Global Transform: Uses the first-order polynomial transform or RST transform to constrain the location of the tie points. This is the default for most images.
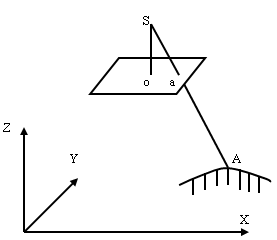
Frame Central Projection: Frame camera and digital (frame central) aerial photography use the frame central projection. This projection has one perspective center (S) defined as the optical center of a camera lens through which all light rays pass and create imaging signatures in the image focal plane. Any object point (A), its image point (a), and its perspective center (S) are collinear in space. The principal point (o) is defined as the foot of the perpendicular from the perspective center to the plane of an aerial photograph.
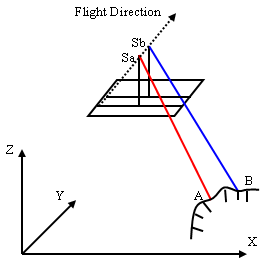
Pushbroom Sensor: This option is available when both images have RPCs. Imagery from pushbroom sensors use the line central projection. Each scan line has its own projection center, as the following figure shows.
- If using the Fitting Global Transform method, select the Transform to use when automatically filtering tie points from the drop-down list:
First-Order Polynomial: A first-order polynomial warp includes an XY interaction term to account for image shear:
x = a1 + a2X + a3Y + a4XY
y = b1 + b2X + b3Y + b4XY
RST: Rotation, scaling, and translation; this is the simplest method. The RST warping algorithm uses an affine transformation:
x = a1 + a2X + a3Y
y = b1 + b2X + b3Y
This algorithm does not allow for shearing in the image warp. To allow for shearing, use a first-order polynomial warp.
- If using the Fitting Global Transform method, enter the maximum error to allow for each tie point in the Maximum Allowable Error Per Tie Point. The tie point with the largest error distance from the predicted location is iteratively removed until no tie points have an error greater than the this value. Multiview images of a 3D scene contain local geometric differences due to variation in local terrain relief and difference in imaging view angle. If image misalignment is mainly due to local geometric differences, increase this value. The default value is 5.00 pixels. A higher value keeps more tie points with larger fitting errors. If you prefer to keep most tie points and review them in the Review Tie Points step, enter a high value, such as 100.
Set Advanced Automatic Tie Point Generation Parameters
To use advanced settings for generating tie points, select the Advanced tab.
- Select the band to match from the base image from the Matching Band in Base Image drop-down list. If the image has wavelength information, and if the base image also has wavelength information, the red band is used by default.
- Select the band to match from the warp image from the Matching Band in Warp Image drop-down list. If the image has wavelength information, and if the warp image also has wavelength information, the red band is used by default.
- Enter the Requested Number of Tie Points to use for image registration. The minimum is 9; however, the recommended value is the default number that is set based on the input file. Though smaller values provide quicker processing time, they do not result in an alignment as precise as one that used more tie points. Request more tie points if you need localized control to align images at the tie point locations.
Enter the tolerance for the search range in the Search Window Size field. This moving window is a subset of the warp image that is searched to find topographic feature matches for tie point placement. Increasing the Search Window Size may be necessary, but increases processing time.
If the pixel offset between the two images to register is greater than the Search Window Size, the search will not be able to detect corresponding features. To determine a different Search Window Size do the following:
- Find a feature in the base image (the left view) and click on it. Note the file coordinate on the base image in the Cursor Value window.
- Click on the same feature in the warp image (the right view) and note the file coordinate on the warp image in the Cursor Value window.
Determine the distance in pixels between the two readings. Find the maximum distance across the image and use 2*(distance+5) as your new Search Window Size value.
For example, the pixel location of a feature in the base image is [200, 200], but the pixel location for the same feature in the warp image is [300, 300], creating an offset of 141 pixels (where offset = sqrt(100^2 + 100^2)). Use 2*(141+5)=292 as the Search Window Size value.
- Specify the Matching Window Size to use around the tie point location. The window is used for computing the matching score between the base image and the warp image. The default is 61, but may be automatically adjusted based on the input file.
Select the Interest Operator to use to identify feature points from the drop-down list:
- Forstner: Obtains and analyzes the gray scale gradient matrix between one pixel and its adjacent pixels. The Forstner operator is typically better for image matching than the Moravec operator.
- Moravec: Searches for gray scale value differences between one pixel and its adjacent pixels. The Moravec operator is typically faster than the Forstner operator.
- Harris: Improves upon Moravec by using the auto-correlation matrix and avoids using discrete directions and shifts.
- Click Next to go to the Review and Warp panel.
Import, Add, or Delete Seed Tie Points
You can add or import a set of initial seed tie points that can help generate tie points more accurately, particularly when the input images have poor or no georeferencing information. Import, add, or delete seed tie points in the Seed Tie Points tab.
If the warp image is pixel based, arbitrary, or a pseudo projection, you need to add three seed tie points before you continue. The seed tie points do not need to be highly accurate; they just provide information needed for automated tie point generation. For best results, select points on distinctive image features such as building corners, road intersections, salient point features, water boundaries, and so forth. If there is big misalignment between the base image and warp image, especially if the warp image is pixel based, arbitrary, or a pseudo projection, it may be difficult to select seed tie points on the full-resolution images. In this case, it is recommended that you Zoom Out the image or Zoom To Full Extent, and select the seed tie points on the down sampled images.
Select the Seed Tie Points tab to begin. The steps for working with seed tie points are the same as the Manage Tie Points section below. Refer to that section for further instructions.
Review Tie Points and Warp Image
When tie point generation is complete:
- The Review and Warp panel appears.
- The base image in the left view contains green-colored tie points.
- The warp image in the right view contains magenta-colored tie points.
- The Cursor Value tool appears.
Use the Review and Warp panel to review and edit the resulting tie points and to select warping and resampling methods.
If the number of resulting tie points is small, then return to the automatic tie point generation step and select different parameter values. For example, you can add seed tie points, increase the Search Window Size, select a different geometric model, select Mutual Information for registering images with different modalities, or adjust other parameters.
If you specified a DEM file for images that have RPC information, more tie points are typically generated. This is because they are created and filtered in a common ground coordinate space. The higher the resolution and accuracy of the DEM, the more tie points will be generated. Their distribution will also be better.
The table in the Review and Warp panel lists the details of all generated tie points, such as their pixel coordinates on the base and warp images, and their SCORE and ERROR values.
- The SCORE is from automatic tie point generation. A patch around the tie point location is used as a matching window. Depending on the matching method you choose, the normalized cross-correlation or normalized Mutual Information between the window in the base image and the window in the warp image is computed as the matching score. Manually added tie points have a SCORE of 1.0.
- The ERROR measurement represents the distance of each tie point in the warp image to its predicted location, in pixel units. If the base and warp image do not have RPC map information and an associated DEM, a first-order polynomial transform is used to compute the predicted location from tie points on the base image to points on the warp image. If the base image or warp image have RPC map information and you specified a DEM file, ENVI performs a quick orthorectification on the base and warp image, resulting in a more accurate image registration. Higher errors may indicate bad tie points or an inappropriate geometric model used. It does not necessarily reflect the positional errors in the tie points. The best way to check the accuracy of the tie points is to visually examine their placement in the side-by-side views. The ERROR measurements are updated if you add or delete tie points.
- The total root mean square (RMS) error displays at the bottom of the tie point table. An RMS error could indicate the overall tie point quality, but it could also be a fitting error of the geometric mode that is used. You should always perform visual examination along with the RMS error analysis.
The tie point numbers in the views correspond to the row labels of the tie point table. The rows and row labels are the same if the tie points are in their original order. If the tie points are sorted by the selected column, the rows and row labels are typically different.
Manage Tie Points
The most reliable way to review tie points is through visual examination. Good tie points should locate at the same features on both images. For most images, the tie points should be well distributed across the overlapping areas.
You may need to manually add tie points in the following scenarios:
- The tie points are unevenly distributed.
- The base and warp images contain differences in local geometry (due to variation in local terrain relief) and differences in imaging view angles.
You can review, add, or delete tie points in the following sections of the Image Registration workflow:
- The Seed Tie Points tab in the Tie Points Generation panel
- The Tie Points tab in the Review and Warp panel
Review Tie Points
To verify points, select a row in the table. Both views center over the corresponding tie point. Crosshairs from the Cursor Value tool mark the location of that tie point. The tie point color changes to cyan.
You can use keyboard keys to navigate the table rows (Windows systems only), or click the appropriate button:
- Click the up or down arrow key, or click the
 or
or  button to select the previous or next record in the table.
 - Click the Home or End key, or click the
 or
or  button to select the first or last record in the table.
 - Enter a tie point label in the Go To field (between the buttons), then press the Enter key to go to a specific tie point.
- Click the Delete key, or click the Delete Tie Point button
 to delete a selected record.
Sort the data in a table column as needed by clicking on the column heading, then right-click and select the desired sort order.
- You can sort the ERROR column in reverse order to place the tie points with a higher error at the top of the table. To sort, click the ERROR column, then right-click and select Sort By Selected Column Reverse.
- You can sort the SCORE column in forward order to place the tie points with a lower score at the top of the table. To sort, click the SCORE column, then right-click and select Sort By Selected Column Forward.
Link and Unlink Views
The Link Views option is enabled by default in the Review and Warp panel. This means that both views are geographically linked as long as they both have map information. When you move around in one view, the other view moves accordingly.
If the base and warp images have poor georeferencing, you may not see a tie point location in both images at the same time. In this case, disable the Link Views option so that you can explore each view independently.
Add Tie Points
- Find and click on a feature point in the base image (left view).
- If the Predict Warp Location option is enabled in the Review and Warp panel, ENVI will use an image-matching technique to try to find the corresponding location in the warp image. The crosshairs in the warp image will automatically move to that location. This option is enabled by default if both images have map information. If the warp image is pixel-based, or if there are less than three tie points, this option is disabled.
- If the Predict Warp Location option is disabled, find and click the corresponding point in the warp image (right view).
- Click the Add Tie Point button
 . The tie point is added to the table.
Delete Tie Points
To delete tie points from the table:
- Click the row to delete. To select multiple tie points, press and hold the Shift or Ctrl key as you click.
- Click the Delete Tie Point button . The error values and the total RMS error are re-computed and updated in the tie point table.
Tip: To determine bad tie points, you can sort the tie points based on the quality measurement. Either sort the ERROR column in reverse order, or sort the SCORE column in forward order, then delete the bad tie points that are at the top of the table. You can also use the Error Overlay to view the relative error magnitudes of your tie points.
Save and Restore Tie Points
To save tie points that you added and deleted:
- Click the Save Tie Points button
 . The Save Tie Points dialog appears.
 - Choose an output directory to save the tie points file (.pts), then click Save.
To restore a tie points file:
- Click the Restore Tie Points button
 . A prompt appears that says all existing tie points will be disregarded. When prompted to proceed, click Yes.
 - Select a tie point file (.pts) and click Open. The tie point table and views are updated with the restored tie points.
Error Overlay
If you have three or more tie points, click the Show Error Overlay button in the Review and Warp panel to overlay a transparent color map that shows the relative error magnitudes of your tie points. The Error Overlay is based on ERROR values in the tie point table. The ERROR measurement reflects the quality of fitting to the first-order polynomial math model. Higher errors may indicate bad tie points or an inappropriate geometric model used. It does not necessarily reflect the positional errors in the tie points. The best way to check the accuracy of the tie points is to visually examine their placement in the Image window.
Tip: Select Full Extent from the Zoom To drop-down list in the menu bar, to see the entire scene. The error overlay is restricted to the area bounded by your tie point locations.
Dark grey areas represent tie points with negligible error magnitudes, while orange-to-white areas represent tie points with higher error magnitudes. It is recommended that you examine the tie points in orange-to-white areas and delete those tie points or add new ones as needed. Dark-red to bright-red areas represent tie points with error magnitudes within a reasonable range (1.0 to 10.0). Examine the tie points in those areas depending on the level of accuracy you desire. You should always perform visual examination along with the error analysis.
The Error Overlay updates whenever you delete or add tie points in an attempt to minimize errors.
To remove the Error Overlay, click the Hide Error Overlay button in the Review and Warp panel.
Set Warping Parameters
You can also write a script to perform warping using the ImageToImageRegistration task.
To set the warping parameters, select the Warping Parameters tab.
- Select a Warping Method from the drop-down list. The choices are as follows:
RST: Rotation, scaling, and translation; this is the simplest method. The RST warping algorithm uses an affine transformation:
x = a1 + a2X + a3Y
y = b1 + b2X + b3Y
This algorithm does not allow for shearing in the image warp. To allow for shearing, use a first-order polynomial warp.
Polynomial: (default) A first-order polynomial warp includes an XY interaction term to account for image shear:
x = a1 + a2X + a3Y + a4XY
y = b1 + b2X + b3Y + b4XY
Triangulation: Delaunay triangulation warping fits triangles to the irregularly gridded data points and interpolates values to the output grid. It aligns the two images exactly at the tie point locations. If there is local distortion between the base image and warp image, Triangulation is recommended.
When you choose the Triangulation warping method, Image Registration warps the entire image in the region (either the overlapping area or the full extent, depending on your output choice).
- Select one of the following resampling options from the Resampling drop-down list:
- Nearest Neighbor: Uses the nearest pixel without any interpolation to create the warped image.
- Bilinear: (default) Performs a linear interpolation using four pixels to resample the warped image.
- Cubic Convolution: Uses 16 pixels to approximate the sinc function using cubic polynomials to resample the image. Cubic convolution resampling is significantly slower than the other methods.
- Set the Data Ignore Value, which is the pixel value used to fill areas where no image data appears in the warped image.
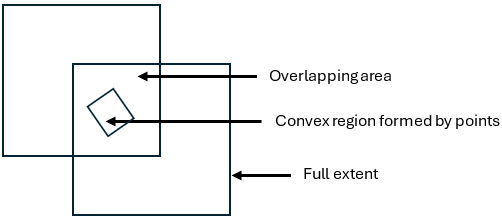
- Select the Output Extent:
- Full Extent of Warp Image: (default) Output the full extent of the warp image.
- Overlapping Area Only: Output only areas of overlap between the base and warp image.
- Select an Ouput Pixel Size From option to indicate how the output pixel size is determined. The choices are as follows:
- Base Image: (default) The output pixel sizes are the same as those of the base image.
- Warp Image: The output pixel sizes are the same as those of the warp image.
- Customized Value: Enter custom pixel sizes in the Output Pixel Size X/Y fields. You cannot set a large output pixel size value that results in a small output image (where the number of samples or lines is less than approximately five pixels).
- The Output Pixel Size X/Y fields show the pixel sizes of the output warped image. The default values are the pixel sizes of the base image. If you select Customized Value in the above step, the Output Pixel Size X/Y fields become available for editing.
Preview Warping Results
To preview how the warping results look before processing, enable the Preview check box. A Preview Window appears in the base image so that you can preview how the warped image will look, compared to the base image. The Preview option is helpful for seeing how the warp image will appear when you change warping parameters. The Preview Window works with full or higher resolution views, and is only available on the full display area of the base image.
If preview is enabled while you are adding or deleting tie points or changing the warping parameters, the preview is updated with the changes. You can observe if the changes will improve your warping results.
Export Image Registration Results
- Click the Export tab.
- To export the warped image, select a file format from the Select Output Image File drop-down list. ENVI and TIFF are the supported formats.
- Enable the Export Tie Points to ASCII option to export tie points.
- Click Finish to create the output, add the new layers to the Layer Manager, and save the files to the directories you specified. When the export is complete, the workflow view closes. The original data and the export data display in the Image window view.