Use Find Developing Hotspots to look for anomalies between two rasters of the same spatial extent, from different dates. The result is a classification image that shows statistically significant differences during the intervening time period. Areas that change at an average rate are suppressed, while areas that change at a higher rate (positive or negative) are highlighted. For agricultural studies, this can be useful for identifying areas that are growing faster or slower, relative to the entire image. Or, it can reveal areas that were damaged by events such as hail storms and drought.
Two tools are available:
-
Find Developing Hotspots: This tool accepts two single-band rasters from different dates (Time 1 and Time 2).
-
Find Developing Hotspots with Spectral Index: This tool accepts two multi-band images from different dates, and it requires you to choose a spectral index to compute for each image.
These tools are designed for analyzing individual fields. You should spatially subset the Time 1 and Time 2 images to only include your area of interest, or mask out the rest of the images outside of the field extent. Then ensure that they are co-registered. See Example of Subsetting by ROI in the Find Hotspots topic for instructions.
These tools require a separate license for the ENVI Crop Science Module; contact your sales representative for more information.
You can also write a script to find developing hotspots using AgFindDevelopingHotspots Task or AgFindDevelopingHotspotsWithSpectralIndex task.
See the following sections:
Background
The Find Developing Hotspot tools compute Z-scores using Getis-Ord Gi* statistics (Getis and Ord, 1992) on two co-registered images from different dates. See the Find Hotspots topic for more information about Getis-Ord Gi* statistics and hotspot analysis.
The second Getis-Ord Gi* image (Time 2) is subtracted from the first Getis-Ord Gi* image (Time 1). The result is a classification image that shows changes that are much bigger or lower than the average change between the two images.
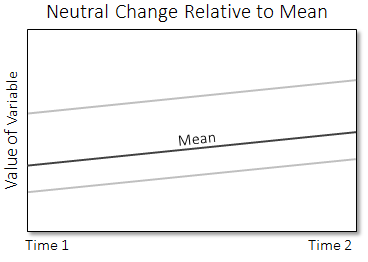
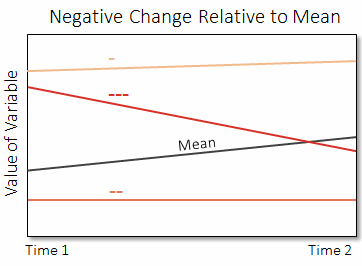
For example, suppose that the Time 1 and Time 2 images represent a variable such as Normalized Difference Vegetation Index (NDVI). The following plots provide a graphical example. The difference in the global mean image value is plotted between the two time periods. For the developing hotspot image, each pixel represents how much the local mean changes, relative to the global mean. Their absolute position on the y-axis does not matter; the rate of change is of interest.
In the following plot, if the local mean of the variable for a given pixel changes at the same rate as the global mean, that pixel is considered neutral and is colored light grey in the developing hotspot image. This plot shows two grey lines, one for each pixel.
In the next plot, three different pixels show increasingly negative changes ("---" the most negative to "-" the least negative), relative to the global mean difference of the variable.
In the final plot, three different pixels show increasingly positive changes ("+" the least positive to "+++" the most positive), relative to the global mean difference of the variable.
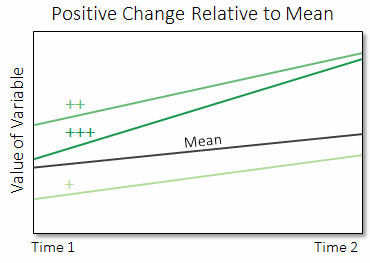
Pixels that show highly negative or positive changes indicate areas in a field that may be growing or dying at a faster rate, relative to the entire field.
Choose one of the following options:
Find Developing Hotspots
Use this option to find developing hotspots using a single-band raster, without specifying a spectral index image.
- From the Toolbox, select Crop Science > Find Developing Hotspots. The Find Developing Hotspot dialog appears.
- Select an Input Time 1 Raster and Input Time 2 Raster. These are single-band images from different dates.
- Enter a Distance value, which is the radius of the area around each pixel used to calculate the local mean. If the input raster has a valid spatial reference, then the radius is measured in meters. Otherwise, it is measured in pixels. The radius determines the spatial resolution over which the clustering occurs. A good starting point is the pixel size of the input image.
- Enter a Threshold value. This is the first of three standard deviations from the mean difference used to create a color slice classification of Z-score differences. The default value is 3 standard deviations. Lower values reveal more hotspots, while higher values reveal fewer hotspots.
- Specify a filename and location for the Output Raster.
-
Enable the Preview check box to preview the settings before processing the data. The preview is calculated only on the area in the view and uses the resolution level at which you are viewing the image. To preview a different area in your image, pan and zoom to the area of interest and re-enable the Preview option. Depending on the algorithm being used by the tool, the preview result might be different from the final result of processing on the full extent, full resolution of the input image in the following scenarios: 1) If you zoomed out of the input raster in the view by 50%, or a percentage less than 50%, ENVI uses a downsampled image at the closest resolution level to calculate the preview, or 2) If the entire image is not visible in the view, ENVI uses the subset in the viewable area of the input image to calculate the preview.
-
Enable the Display result check box to display the output in the view when processing is complete. Otherwise, if the check box is disabled, the result can be loaded from the Data Manager.
-
To see a model-based version of this tool that shows how the tool is constructed from individual tasks, click Open in Modeler.
-
To reuse these task settings in future ENVI sessions, save them to a file. Click the down arrow next to the OK button and select Save Parameter Values, then specify the path and filename to save to. Note that some parameter types, such as rasters, vectors, and ROIs, will not be saved with the file. To apply the saved task settings, click the down arrow  and select Restore Parameter Values, then select the file where you previously stored your settings.
-
To run the process in the background, click the down arrow next to the OK button and select Run Task in the Background. If an ENVI Server has been set up on the network, the Run Task on remote ENVI Server name is also available. The ENVI Server Job Console will show the progress of the job and will provide a link to display the result when processing is complete. See ENVI Servers for more information.
- Click OK.
Find Developing Hotspots with Spectral Index
Use this option to find developing hotspots by creating a spectral index image.
Data should be in units of reflectance before creating spectral indices. See Spectral Indices for more information.
Select Two Time Rasters
- From the Toolbox, select Crop Science > Find Developing Hotspots with Spectral Index. The Query Spectral Indices for Two Time Rasters dialog appears.
- Select an Input Time 1 Raster and Input Time 2 Raster. These should be multispectral files with defined wavelengths.
-
To see a model-based version of this tool that shows how the tool is constructed from individual tasks, click Open in Modeler.
-
To reuse these task settings in future ENVI sessions, save them to a file. Click the down arrow next to the OK button and select Save Parameter Values, then specify the path and filename to save to. Note that some parameter types, such as rasters, vectors, and ROIs, will not be saved with the file. To apply the saved task settings, click the down arrow and select Restore Parameter Values, then select the file where you previously stored your settings.
- Click OK. The Find Developing Hotspots with Spectral Index dialog appears.
Set Parameters
- From the Spectral Index drop-down list, select a spectral index to compute for the Time 1 and Time 2 rasters. The list includes only those indices that can be computed on both rasters.
- Enter a Distance value, which is the radius of the area around each pixel used to calculate the local mean. If the input raster has a valid spatial reference, then the radius is measured in meters. Otherwise, it is measured in pixels. The radius determines the spatial resolution over which the clustering occurs. A good starting point is the pixel size of the input image.
- Enter a Threshold value. This is the first of three standard deviations from the mean difference used to create a color slice classification of Z-score differences. The default value is 3 standard deviations. Lower values reveal more hotspots, while higher values reveal fewer hotspots.
- Specify a filename and location for the Output Raster.
-
Enable the Preview check box to preview the settings before processing the data. The preview is calculated only on the area in the view and uses the resolution level at which you are viewing the image. To preview a different area in your image, pan and zoom to the area of interest and re-enable the Preview option. Depending on the algorithm being used by the tool, the preview result might be different from the final result of processing on the full extent, full resolution of the input image in the following scenarios: 1) If you zoomed out of the input raster in the view by 50%, or a percentage less than 50%, ENVI uses a downsampled image at the closest resolution level to calculate the preview, or 2) If the entire image is not visible in the view, ENVI uses the subset in the viewable area of the input image to calculate the preview.
-
Enable the Display result check box to display the output in the view when processing is complete. Otherwise, if the check box is disabled, the result can be loaded from the Data Manager.
-
To see a model-based version of this tool that shows how the tool is constructed from individual tasks, click Open in Modeler.
-
To reuse these task settings in future ENVI sessions, save them to a file. Click the down arrow next to the OK button and select Save Parameter Values, then specify the path and filename to save to. Note that some parameter types, such as rasters, vectors, and ROIs, will not be saved with the file. To apply the saved task settings, click the down arrow and select Restore Parameter Values, then select the file where you previously stored your settings.
-
To run the process in the background, click the down arrow next to the OK button and select Run Task in the Background. If an ENVI Server has been set up on the network, the Run Task on remote ENVI Server name is also available. The ENVI Server Job Console will show the progress of the job and will provide a link to display the result when processing is complete. See ENVI Servers for more information.
- Click OK.
Example
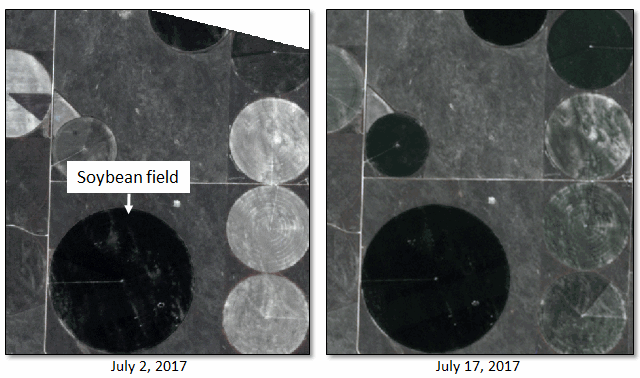
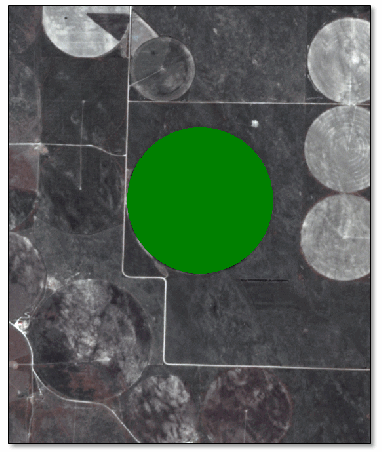
The following example uses the Find Developing Hotspots with Spectral Index tool with two PlanetScope images, two weeks apart. The source images are four-band orthorectified tiles (4-meter resolution), courtesy of Planet, Inc. A circular soybean field was chosen for analysis.
The following steps were taken to pre-process each image:
- Convert the pixel values to apparent surface reflectance, using the QUick Atmospheric Correction (QUAC®) tool. This tool is available with an ENVI Atmospheric Correction Module license.
- Define a circular region of interest (ROI) around the soybean field.
- Mask the image so that pixels outside of the field have values of NoData.
- Spatially subset the image to the extent of the ROI.
Here is a side-by-side comparison of the two images (displayed in color infrared) after they were processed:
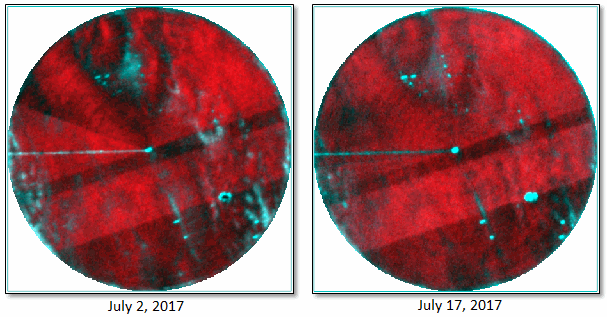
Next, the Find Developing Hotspot with Spectral Index tool was run, using the following values:
- Input Time 1 Raster: July 2 image
- Input Time 2 Raster: July 17 image
- Spectral Index: Normalized Difference Vegetation Index
- Search Distance: 4 meters (the spatial resolution of the PlanetScope images)
- Threshold: 3 standard deviations
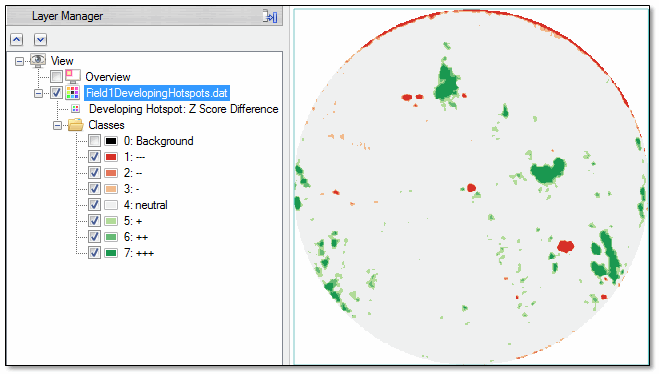
When the tool runs, ENVI creates an image showing the difference in Z-scores between the July 2 and July 17 images. It applies a color slice to the image to create color gradients for specific Z-score differences, based on the Threshold parameter. In the Layer Manager, these gradients are labeled with plus and minus symbols to represent larger positive and larger negative Z-score differences, respectively.
Neutral pixels are colored light grey. These pixels represent an average rate of growth within the field. Pixels that show a healthier than average change (based on NDVI) are colored green. Red pixels indicate areas that have become less healthy than average during the two-week period.
References:
Getis, A., and J. K. Ord. "The Analysis of Spatial Association by Use of Distance Statistics." Geographic Analysis 24, no. 3 (1992): 189-206.
Mitchell, A. The ESRI Guide to GIS Analysis, Volume 2: Spatial Measurements and Statistics. Esri Press, 2005.
Ord, J. K., and A. Getis. "Local Spatial Autocorrelation Statistics: Distributional Issues and an Application." Geographical Analysis 27, no. 4 (1995): 286-306.
See Also
Find Hotspots