Use the Task Scheduler to automate and manage running models. The Task Scheduler is ideal for models that rely on input from folders where the contents will change over time.
Models can be scheduled to run in the following ways:
- As one-time execution on a specific date/time
- Every n minutes
- Every n hours
- Once per day or every n days
- Every n weeks
- Every n months
You can also write a script to schedule and submit a job using the SubmitScheduledJob task.
The operating system executes the job schedule (Task Scheduler on Windows, cron on Linux and Mac), so ENVI does not need to be running for scheduled jobs to run (you only need to be logged in on the machine). This means that jobs can be scheduled to run overnight or during off-peak hours, freeing the machine for other tasks during the day.
See the following sections for details:
Example Model
In the ENVI Modeler menu, the File > Open Example > Automatic Thumbnail Generation example shows how to use nodes and techniques in a workflow (in contrast, the Generate Thumbnails example model is the manual way to create thumbnails).
In the Automatic Thumbnail Generation model example, the following nodes will help with automation:
- The Input Parameters will specify the input folder to watch, the search pattern to use (e.g., look for *.hdr files), and the output folder to save the thumbnails to.
- The Find Rasters node searches for ENVI rasters (*.hdr files) in the specified folder.
-
The Filter Iterator Node specifies conditional statements for the job. For example: if you have a job that runs daily, weekly, etc., you likely want it to process only the datasets that were added to the folder since the last job and ignore datasets that were already processed. You could accomplish this by selecting the Skip if element already processed condition from the Examples drop-down list in the Filter Iterator. This condition uses an expression such as the following (in yellow highlight):
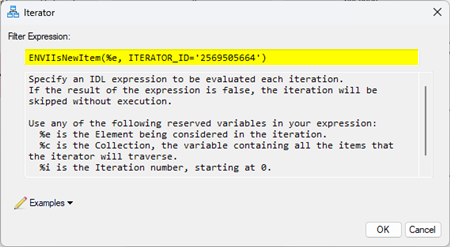
Give each job its own ITERATOR_ID. If you use an ID that is being used on another job, the iterator will treat those datasets as already processed and skip them.
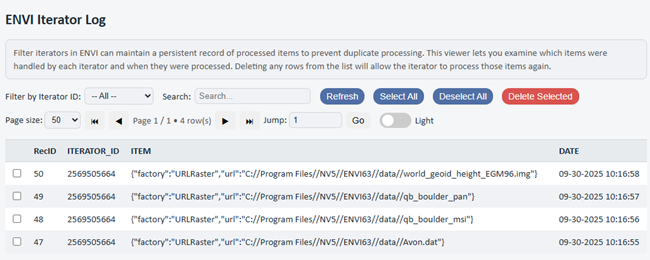
After the job runs one or more times, use the Iterator Log Browser to see a list of the datasets the job has already processed. Notice that the ITERATOR_ID in the browser matches the ENVIIsNewItem(%e, ITERATOR_ID='2569505664') value set in the Filter Iterator expression:
:
Schedule a Job
- In the ENVI Modeler, open the model you want to schedule.
- Click the down arrow next to the Run button
 and select Run Model on a Schedule. A dialog for Input Node parameters appears. The parameters will vary, depending on your model.
- Enter the input parameters to use each time the model is run, then click OK. The Submit Scheduled Job dialog appears.
- In the Label field, enter a unique name for the job. The task names will display in the task scheduler for your operating system.
-
From the Schedule Type drop-down list, select how often you want the job to run. The options are:
- Once: Run a one-time execution on a specific date/time
- Minute: Run the task every n minutes
- Hourly: (default) Run every n hours
- Daily: Run once per day or every n days
- Weekly: Run every n weeks
- Monthly: Run every n months
- Use the Frequency field to set the interval at which to run the Minute, Hourly, Daily, Weekly, or Monthly jobs.
-
Set the Start Date for the job using one of the following:
- Click the Today link to enter the current date. You can click the - and + buttons to change the date.
- Click on the calendar icon and select a date from the calendar.
- Manually enter the date in MM/DD/YYYY format in the field.
-
Set the Start Time using one of the following:
- Click the Now link to enter the current time. You can click the - and + buttons to change the time.
- Manually enter the time in HH:MM format in the field.
- If applicable, set an End Date and End Time for the job.
- Click OK. A New Scheduled Job dialog appears, listing the parameter settings for the job.
- Select File > Close to close the dialog.
After the job is scheduled, you can manage it in the task manager for your operating system (Task Scheduler for Windows, cron for Linux and Mac).
View Scheduled Jobs
To view all scheduled ENVI jobs, select Automation > View Scheduled Jobs from the ENVI Modeler menu. One of the following dialogs opens:
- Windows: The Task Scheduler dialog appears. In the left panel of the Task Scheduler, expand the Task Scheduler Library folder and select the ENVI folder. ENVI's scheduled jobs are listed in the center panel.
- Linux and Mac: The ENVI Scheduled Jobs dialog appears, showing the ENVI jobs that are listed in crontab.
Below is an example of ENVI scheduled jobs in the Windows Task Manager:

You can delete a scheduled job or modify its schedule. Refer to the documentation for Task Manager or cron for details on how to delete or modify a scheduled job.
Scheduled Jobs Console
The ENVI Scheduled Jobs Console shows the status of jobs that have executed. The Result column shows Completed if the job was successful, or Error if the job failed to complete.
Hover over Completed or Error to view the details. You can also copy the text to paste into a file by clicking the clipboard icon  and paste into a document.
Iterator Log Browser
To avoid duplicate processing on datasets when a scheduled job runs, the Filter Iterator maintains a persistent record of processed items. To view the log, select Automation > Iterator Log Browser from the ENVI Modeler menu.
The ENVI Iterator Log shows which datasets were handled by each iterator ID and the date and time they were processed. Datasets that were already processed in previous jobs will be ignored in future jobs; however, if you delete any entries from the list, the Filter Iterator will process those datasets again the next time the job runs.
See Also
Apply Conditional Statements Using Filter Iterator Nodes