Two-Color Multiview
The Two-Color Multiview tool takes two overlapping single-band rasters and creates a three-band raster product combined as follows:
- The first raster will be applied to the red channel
- The second raster will go to the green and blue channels
Thus, if the first raster represents an earlier time, the colors of the output can be interpreted with this mnemonic: red is fled, blue is new.
You can also write a script to create a two-color multiview using the TwoColorMultiView task.
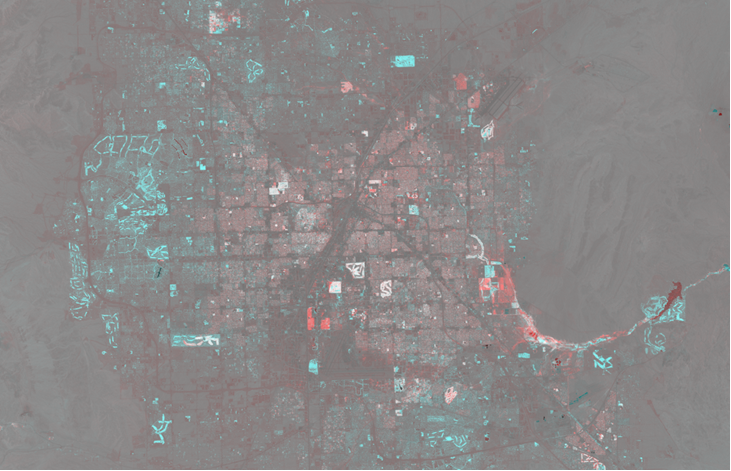
The image below shows a two-color multiview composite of NDVI data for Las Vegas from 1985 and 2010. Areas highlighted in blue represent an increase in vegetation index, typically associated with urban expansion. Red areas signify regions where vegetation was lost between the two dates.
- From the Toolbox, select Change Detection > Two-Color Multiview. The Two-Color Multiview dialog appears.
- In the Input Raster 1 field, specify a single-band raster representing the earliest time.
- In the Input Raster 2 field, specify a single-band raster representing the latest time.
- Enter a filename and location for the Output Raster, or select to create a Virtual Raster.
- Enable the Preview check box to preview the settings before processing the data. The preview is calculated only on the area in the view and uses the resolution level at which you are viewing the image. To preview a different area in your image, pan and zoom to the area of interest and re-enable the Preview option. Depending on the algorithm being used by the tool, the preview result might be different from the final result of processing on the full extent, full resolution of the input image in the following scenarios: 1) If you zoomed out of the input raster in the view by 50%, or a percentage less than 50%, ENVI uses a downsampled image at the closest resolution level to calculate the preview, or 2) If the entire image is not visible in the view, ENVI uses the subset in the viewable area of the input image to calculate the preview.
-
Enable the Display result check box to display the output in the view when processing is complete. Otherwise, if the check box is disabled, the result can be loaded from the Data Manager.
-
You can run the process in the background on your computer or in the background on an ENVI Server (if available). Click the down arrow  next to the OK button and select one of the following:
- Run Task in the Background: Runs the process on your computer. This method does not use an ENVI Server. The job progress will show in the ENVI Job Console's Background Jobs tab.
- Run Task on envi_server_name. Runs the process on the selected ENVI Server. The job progress will show in the ENVI Job Console's envi_server_name tab.
See ENVI Job Console for details on monitoring ENVI Server jobs and viewing results. See ENVI Servers for details on configuring and using an ENVI Server.
- Click OK.