Download Digital Elevation Model
Use this tool to download Shuttle Radar Topography Mission (SRTM) raster Digital Elevation Model (DEM) data based on the result of a query. SRTM raster DEM data is available from https://srtm.csi.cgiar.org/. The URI for the
You can also write a script to download SRTM raster Digital Elevation Model data from srtm.csi.cgiar.org using the DownloadSRTMRasterDEM task.
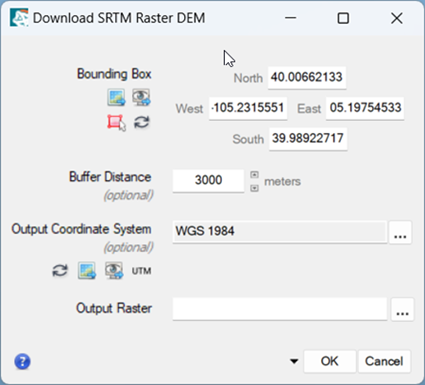
Open an image, then select File > Open World Data > Download Digital Elevation Model from the ENVI menu bar. The Download SRTM Raster DEM dialog appears. Follow the steps below to define an area of interest, buffer distance, and output coordinate system for the download.
-
Specify a bounding box to constrain the download of the DEM to a specific geographic area. If your image covers a large geographic area, opening a large DEM may take a longer amount of time.
The Download SRTM Raster DEM dialog initially displays the coordinates of the current view extent. Coordinates are expressed in Geographic latitude and longitude.
If the displayed image does not have a spatial reference, then these fields are empty. You must specify a bounding box; use one of the following options to do this:
- Enter map coordinates in the fields provided.
- Click the From Dataset button
 to use the spatial extent of another dataset.
- Click the From Current View button
 to use the spatial extent of the current view.
- Click the Draw Bounding Box button
 , then click and drag to draw a box around a specific area. The map coordinate fields update with the extent of the bounding box.
- To clear the bounding box values, click the Reset button
 .
.
-
In the Buffer Distance field, the distance (in meters) to extend the borders of the bounding box definition.
- Choose an option to select an Output Coordinate System:
- Click the Browse button
 . The Select Coordinate System dialog appears. Refer to the Select Coordinate Systems topic for instructions on choosing a pre-defined or custom coordinate system.
 - To use the coordinate system from another dataset, click the From Dataset button
 .
. - To use the coordinate system of the current view, click the From Current View button
 .
. - To reset the selection, click the Reset button .
- Specify the filename and location for the Output Raster.
-
To reuse these task settings in future ENVI sessions, save them to a file. Click the down arrow next to the OK button  , select Save Parameter Values, then specify the path and filename to save to. Note that some parameter types, such as rasters, vectors, and ROIs, will not be saved with the file. To apply the saved task settings, click the down arrow and select Restore Parameter Values, then select the file where you previously saved your settings.
-
You can run the process in the background on your computer or in the background on an ENVI Server (if available). Click the down arrow next to the OK button and select one of the following:
- Run Task in the Background: Runs the process on your computer. This method does not use an ENVI Server. The job progress will show in the ENVI Job Console's Background Jobs tab.
- Run Task on envi_server_name. Runs the process on the selected ENVI Server. The job progress will show in the ENVI Job Console's envi_server_name tab.
See ENVI Job Console for details on monitoring ENVI Server jobs and viewing results. See ENVI Servers for details on configuring and using an ENVI Server.
- Click OK. ENVI adds the resulting output to the Data Manager.