Animate Raster Series and NITF Image Segments
This topic describes how to use Band Animation/Series Manager to animate the bands of a raster, MIE4NITF series or frames, or NITF file image segments. See the following sections for details:
Animate a Raster Series
To animate the bands of a raster in the Layer Manager:
- In the Layer Manager, right-click the layer and select Band Animation > Using Raster Series. Or, select Display > Band Animation > Using Raster Series from the menu bar.
- ENVI creates a raster series that includes all of the bands in the raster.
- The raster series is added to the Layer Manager as a new layer and displayed in the view.
- The Band Animation dialog appears and begins animating the raster series. The Band Animation dialog is almost identical to the Series Manager; see Series Manager Controls for details on how to use the dialog.
If you open a saved .series file, the Series Manager dialog will open so you can animate the series. If the Series Manager dialog was closed and you need to reopen it to animate a saved series, select Display > Series/Animation Manager from the menu bar.
Animate Similar NITF Image Segments
To animate NITF image segments, create a series by using one or more NITFs and selecting a baseline image segment.
- Open one or more .ntf, .nitf, .nsf, or .r0 files in the NITF Dataset Browser.
-
In the browser, right-click the image segment to use as the baseline image segment and select Animate Similar > Using Raster Series. ENVI will include image segments in the raster series based on your selection, as follows:
- If the baseline image segment is numeric (for example, '0123456789'), then all numeric image segments will be included.
- If the baseline image segment contains a hyphen, then all image segments with the same characters before the hyphen will be included. For example, if the baseline image segment is 'AB2-456789', then all image segments that start with 'AB2' will be included.
- If the baseline image segment contains a letter sequence followed by a numeric sequence, then all image segments that begin with the same letter sequence will be included. For example, if the baseline image segment is 'ABC3456789', then all image segments that start with 'ABC' will be included.
- From the right-click context menu, select Animate Similar > Using Raster Series.
- ENVI builds a series based on your baseline image segment selection, opens the series in the Layer Manager, and the Series Manager appears. See the end of this topic for details on how to use the Series Manager controls for animation.
Animate MIE4NITF Series or Frames
To animate a MIE4NITF series:
- Open a .ntf, .nitf, .nsf, or .r0 file in the NITF Dataset Browser.
- Right-click a series and select Display to open it into ENVI. ENVI opens the series in the Layer Manager, and the Series Manager appears. See the end of this topic for details on how to use the Series Manager controls for animation.
To animate a subset of frames within a series:
- Open a .ntf, .nitf, .nsf, or .r0 file in the NITF Dataset Browser.
- Right-click a series and select Subset. The Camera Frame Selection dialog appears.
- Enter the frame numbers for the Start Frame and End Frame.
- Specify the Increment to use when including frames in the subset series. For example, your Start Frame is set to 1 and End Frame is set to 10.Using an Increment of 1 means every frame will be included in the subset series (a total of 10 frames), whereas an Increment of 2 will include every other frame (a total of 5 frames).
- Leave the Display result check box enabled to add the resulting series to the ENVI view.
- Click OK. ENVI builds the series using the subset options, opens it in the view, and the Series Manager appears. See the end of this topic for details on how to use the Series Manager controls for animation.
Series Manager Controls
The top of the Series Manager dialog lists the currently displayed image (layer), and the date and time of the layer if it contains acquisition time metadata.
- Click the Forward
 and Back
  buttons, or click and drag the wheel, to step through the series one frame or band at a time. The image updates at each frame.
- Click the Play forward
 and Play backward
  buttons to animate the series. While the series is animating, choose a delay time in seconds (between frames) using the drop-down list next to the play button.
- Click Pause
 to stop the animation.
- Click and drag the slider bar
 to move to another point in the series, without updating each image. This allows for a quick selection of a particular frame since you can see the dates or band names in the series. The associated image will load once you release the mouse button.
- Click on any hash mark along the slider to move to a known date or band in the series. The associated image will load.
View Multiple Layers
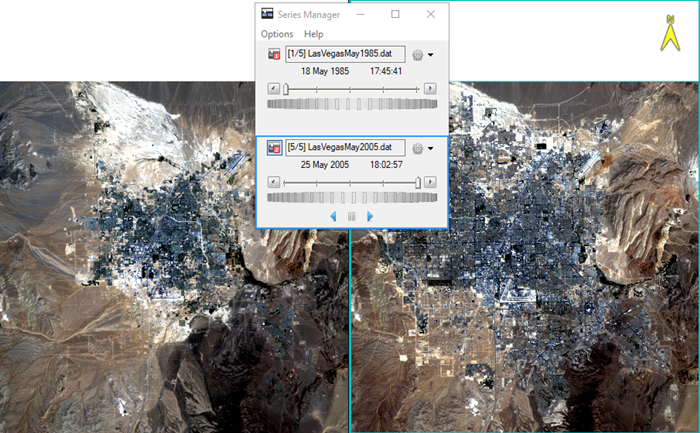
You can view specific images within a spatiotemporal series in multiple views for visual comparison. An example is comparing the same variable from two different dates, as the following figure shows:
- Select Views from the ENVI menu bar and select a multiple-view layout. One layer should be already listed in the Layer Manager and displayed in one of the views. Each layer is associated with a numbered icon
 in the Layer Manager and Series Manager.
- Click and drag a layer from the Layer Manager to an empty view.
- Use the slider needle or wheel to change the image in that view.
- Select Options > Show all sliders from the Series Manager menu bar to view controls for all of the open layers.
The order of the layers in the Series Manager match the order in the Layer Manager.
Series Manager Options Menu
The Series Manager drop-down menu  includes the following options:
- Annotate: Adds metadata to each frame in the view. Select Date and time, Frame number, Filename, or Band. You can click and drag to move the selected annotation item to a new location.
- Link to/Unlink from: If you have a series open in multiple views, this creates a time link between any displayed layers. Select Link to, then select the layer to link to. When linked, the animation controls for the linked views will act as one (the dates are linked). To link three or more layers, select Link to > Link All. To remove the links, select Unlink from. You can optionally link the views by geographic or pixel location. See the Link Multiple Views topic.
- Series Profile: For a spatiotemporal series, plots the pixels of a specified band. See Series Profile for more information.
- Load Current Raster: Loads the image that is currently displayed in a series to a new view. This can be useful if you want to use ENVI's display and processing tools on individual images. You can also right-click on the corresponding layer in the Layer Manager and select Load Current Raster.
- Save Video Animation: Creates a video of a band animation or spatiotemporal series. In the Save Video dialog that appears, provide a name and location for the video file, and the video duration (in seconds). The default format is AVI. Click the Advanced button to select a different video format and coder-decoder (codec) format used for video compression. If a layer is linked by time to another layer in a different view, the video will include all of the views in the display.
The maximum number of image frames to display in a spatiotemporal series is 250. You can change this value in the Maximum Time Series Frame Buffer Size preference.
See Also
Spatiotemporal Analysis, Image Window Views, Landsat Time Series Tutorial, Raster Layers, Animate Using Xtreme Viewer