This topic contains the following sections:
For information on applying a mask to an image, see Masks.
Spatial Subset
Spatial subsetting specifies a geographic area of the image to use for processing. Use any of the following to define spatial subsets:
- Select a subset that was previously used during the current ENVI session
- Specify column and row ranges
- Use extent of the image visible in the active View
- Select a raster file whose spatial extents overlap with the base file
- Select a vector file
- Select an ROI file
- Specify map coordinates
You can also write a script to define a spatial subset using the ENVISubsetRaster function, or the GeographicSubsetRaster or SubsetRaster tasks.
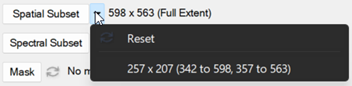
When you select a file to open in the Data Selection dialog, the full extent of the image will be selected by default (no subsetting is applied). If you previously applied a subset to the selected image in the current ENVI session, you can reuse that subset for additional processing. Click the drop-down arrow  next to the Spatial Subset button and select the previously-used subset from the list. Selecting Reset clears the subset and returns to the full extent.
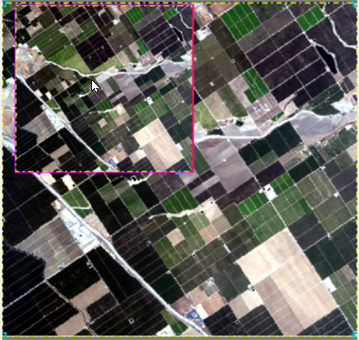
To specify a spatial subset using other methods, click the Spatial Subset button. The Data Selection dialog expands to show the Spatial Subset panel.The full extent of the image appears in the Spatial Subset panel and an Overview appears when you hover the cursor in the top-left corner of image. The Overview Locator, a rectangle within the Overview, defines the extent to show in the image; click and drag the rectangle to move to a different location. Any rotation or stretch you apply to the image is reflected in the Overview. You can toggle the Overview on or off with the Hide/Show Overview button  .
.
To see more detail in an area you want to subset, use the zoom and stretch buttons located above the image.
Zoom options:
- Zoom via Mouse Drawn Box
 Click and drag to select an area to zoom into.
- Zoom to Full Resolution
 Zoom to the full resolution of the image.
- Zoom In
 and Zoom Out
  Zoom in and out of the center of the display by a fixed percentage. The default is 1.25x, which can be set using the Zoom Factor preference.
- Zoom to Full Extent Zoom to the full extent of the image.
- Use the mouse wheel to zoom in and out.
Stretch options:
If the image colors make visualization difficult, use the stretch applied in the View, or select an option from the Stretch drop-down list in the Spatial Subset panel. The stretch options are described below.
- Stretch Using View from Display
 If the image is loaded in ENVI and in the active View, use the stretch applied to that View.
- Stretch on Full Extent
 Apply the selected stretch to the full extent of the image.
- Stretch on View Extent with Auto Update
 Apply the selected stretch to the view extent and automatically update the stretch as you pan around the image.
- Stretch on View Extent
 Apply the selected stretch to the view extent.
You can define a subset using any of the following:
- Interactively select the subset on the image by clicking and dragging on the image to draw a box around the area you want to use for the subset. Resize the box by dragging its handles, or move the box by clicking and dragging from the middle of the box.
- Enter the beginning and ending file coordinates in the Columns and Rows fields. To adjust the ending (to) values for Columns and Rows, enter a value in the total field and press the Enter key.
- Click the Use Full Extent button
 to use the entire image.
- Click the Use View Extent button
 to use what is visible in the View for the subset. This option is available when the image is in the active View and it is visible in the View. It is not available if the image has been rotated, or if it has arbitrary pixel-based projection.
- Click the Subset By Raster button
 to use an image file for the subset. The file must have spatial extents that overlap with the base file and cannot have arbitrary, pseudo, or pixel-based projection. The Data Selection dialog appears for you to select the raster.
- Click the Subset By Vector
 button to use an image subset from a vector file. The Data Selection dialog appears for you to select the vector.
- Click the Subset By ROI
 button to use an image subset from one or more region of interest (ROI) files already opened in ENVI. The ROI Selection dialog appears for you to select the ROIs. If more than one ROI file is selected, the union of the files will be used to define the subset.
- Click the Enter Map Coordinates
 button to define the subset by entering map coordinates. This option is not available if the image to subset has no coordinate system information. Files with a geographic coordinate system can only be subset using degree coordinates. Files with a projected coordinate system can be subset using degrees or the projection units of the selected image.
Click OK to accept the subset and close the Spatial Subset panel.
Spectral Subset
Spectral subsetting specifies a set of bands to use for image processing.
You can also write a script to define a spectral subset using the ENVISubsetRaster function.
Tip: Applying a spectral subset before running spectral processing and analysis tools can significantly change the processing results since the pixel spectral information changes after subsetting (for example, FLAASH or QUAC atmospheric correction or ACE target detection). If the raster has a bad bands list defined, you should exclude those bad bands in subsequent processing and analysis.
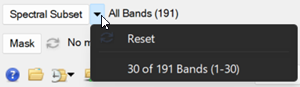
When you select a file to open in the Data Selection dialog, all bands are selected by default (no subsetting is applied). To use a spectral subset of the image for processing, click the Spectral Subset button.
If you previously applied a subset to an image in the current ENVI session and you want to apply the same subset for additional processing, click the drop-down arrow next to the Spectral Subset button and select the previous subset from the list. Selecting Reset clears the subset and returns to the full extent.
In the Spectral Subset dialog, specify the bands to use in the following ways:
- Select a single band to use for the subset, or use Ctrl+click or Shift+click to select multiple bands.
- If the image has a list of bad bands (specified by a bbl entry in the associated header file), then an Apply Bad Bands List button is available to exclude bad bands from processing. Creating a list of bad bands is highly recommended for hyperspectral imagery, especially if the imagery is used in a workflow such as Anomaly Detection or Feature Extraction.
- Click Select All to select all bands (no subsetting).
- Click Clear to clear band selections.
Click OK to accept the band selection(s) and return to the Data Selection dialog.