This tutorial is the second in a two-part series about preparing data for image classification. You will learn how to interactively define regions of interest (ROIs) that represent known land-cover types. The ROIs serve as ground truth, or training, data. Training data is required for supervised classification.
See the following sections:
Files Used in this Tutorial
Tutorial files are available from our ENVI Tutorials web page. Click the Classification link to download the .zip file to your machine, then unzip the files.
Data files were provided by the National Ecological Observatory Network, 2014. Files were accessed in July 2016, available online at http://data.neonscience.org from the National Ecological Observatory Network (NEON), Boulder, CO, USA.
|
File |
Description |
|
NEONOrthophoto.dat
|
Digital photograph from the NEON RGB camera at 0.25 meter resolution
|
|
NEONOrthophoto.hdr
|
ENVI header file for above
|
Open and Display an Orthophoto
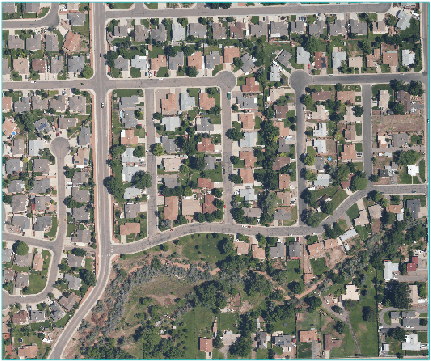
In this section you will open a digital orthorectified photograph that was captured at the same time as the NEON image used in Classification Tutorial 1: Create an Attribute Image. The two images are co-registered, so you can collect training data from the orthophoto and apply it to the multispectral image or the attribute image. You will collect training data from the orthophoto because it has a higher spatial resolution (0.25 meters) than the NEONUrban.dat image (0.5 meters) used in the first tutorial. The colors in the orthophoto are also more natural because it was captured with an RGB camera.
Follow these steps:
- Start ENVI.
- Click the Open button
 in the toolbar.
- Navigate to the directory where you saved the tutorial files.
-
Select NEONOrthophoto.dat and click Open. The orthophoto appears in the view.

Create Regions of Interest
In this section you will define training data ROIs for five different land-cover types:
- Building
- Tree
- Grass
- Concrete
- Asphalt
This is a simple use case with a few classes. Real-world land-use classification typically involves many different feature types and training samples.
Collect Training Data for Buildings
- Click the Region of Interest (ROI) Tool button
 in the toolbar.
- Click the Add ROI button
 in the Region of Interest (ROI) Tool. A new Regions of Interest layer appears in the Layer Manager. The default name is "ROI #1" and its color is red.
- Change the ROI Name to Building, and use the color picker to choose a different color if desired.
- Zoom in to the orthophoto.
-
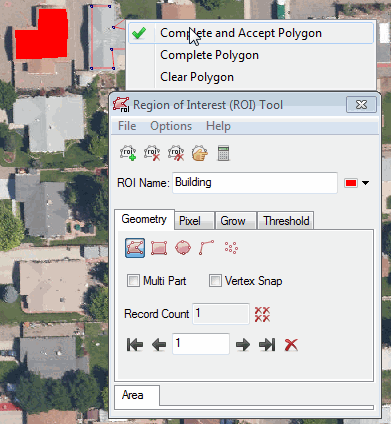
The Polygon icon is active in the ROI Tool. Click and drag the cursor to define a polygon around some building pixels. To complete the polygon, right-click and select Complete and Accept Polygon. For example:

To pan around the image while creating ROIs, press the middle mouse button and move around the display. You can also click the Pan button  in the toolbar. To resume drawing ROIs, you must (1) click the Select button in the toolbar and (2) click inside of the ROI Tool. The cursor will change back to a crosshair. See Create ROIs from Geometry for more tips on drawing ROIs.
- Create several more polygons around building pixels. You do not have to draw ROIs for every building. The key is to draw ROIs around buildings with different colors, intensities, and features (including solar panels and vents) so that you have a wide representation of building types.
Collect Training Data for Other Land-Cover Types
- Click the Add ROI button
 in the Region of Interest (ROI) Tool. A new Regions of Interest layer appears in the Layer Manager. The default name is "ROI #1" and its color is green.
- Change the ROI Name to Tree.
- Define polygons that represent tree pixels. Choose different colors of trees.
- Repeat Steps 1-3 for the other ROIs:
- Grass: Select pixels that are purely grass, not a mixture of bare soil and grass.
- Concrete: Select pixels from sidewalks and driveways.
- Asphalt: Select pixels from roads and asphalt parking lots.
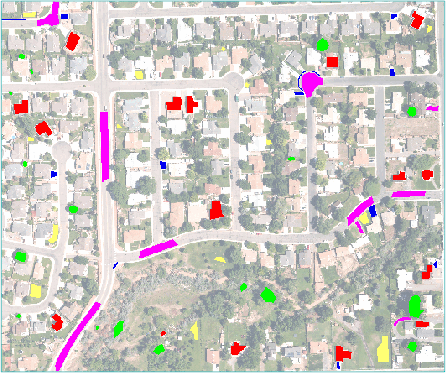
Here is an example with all five ROIs defined:

- When you are finished creating ROIs, select File > Save As from the ROI Tool menu bar.
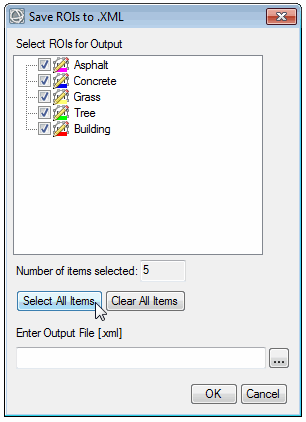
- In the Save ROIs to .XML dialog, click the Select All Items button to select all five ROIs.

- Click the
 button next to the Enter Output File field.
- Select an output folder, and name the output file TrainingDataROIs.xml.
- Click OK in the Save ROIs to .XML dialog.
- Exit ENVI.
Next Steps
Now you can use the attribute image created in Classification Tutorial 1: Create an Attribute Image) and the training data ROIs created in this tutorial for any of ENVI's supervised classification methods.