NNDiffuse Pan Sharpening
Use NNDiffuse Pan Sharpening to sharpen multispectral data using the nearest neighbor diffusion (NNDiffuse) pan sharpening algorithm.
You can also write a script to perform pan sharpening using the NNDiffusePanSharpening task.
NNDiffuse pan sharpening works best when the spectral response function of each multispectral band has minimal overlap with one another, and the combination of all multispectral bands covers the spectral range of the panchromatic raster.
The following are input raster requirements for running the NNDiffuse pan sharpening algorithm:
- The pixel size of the low-resolution raster must be an integral multiple of the pixel size of the high-resolution raster. If it is not, then pre-process (resample) the rasters.
- When the rasters have projection information, it must be in the same projection. If it is not the same, then reproject the rasters.
- The rasters must be aligned. If the rasters have misalignment, then register the rasters.
-
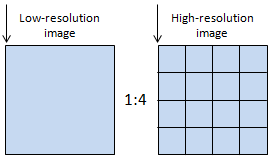
Ensure that the rasters line up, particularly in the upper-left corner (see the following diagram). When alignment is as little as 1/2 pixel off between the two, pan sharpening accuracy will be affected. If both input rasters have map information, they will be automatically subsetted so that they line up. If the rasters do not line up and do not have map information, then use spatial subsetting.
Reference:
Sun, W., B. Chen, and D.W. Messinger. "Nearest Neighbor Diffusion Based Pan Sharpening Algorithm for Spectral Images." Optical Engineering 53, no. 1 (2014).
To apply NNDiffuse pan sharpening:
- From the Toolbox, select Image Sharpening > NNDiffuse Pan Sharpening.
The NNDiffuse Pan Sharpening dialog appears.
- Select the Input Low Resolution Raster, perform optional spatial and spectral subsetting, then click OK.
- Select the Input High Resolution Raster band, perform optional spatial and spectral subsetting, then click OK. The high resolution raster must be a single band raster after subsetting.
- Enter the Pixel Size Ratio to define the ratio of the low-resolution raster and the high-resolution raster. The NNDiffuse pan-sharpening algorithm requires that the pixel size ratio be an integer. If the value is not specified, it is determined from the metadata of the input rasters. For example, the pixel size of Ikonos low-resolution MSI data is 4 meters, and the pixel size of Ikonos high-resolution Pan data is 1 meter. The ratio is 4/1, so the value is 4.
-
Enter a positive number for the Spatial Smoothness factor (σs) of the NNDiffuse pan sharpening algorithm. Spatial smoothness should be set to a value that will resemble a bicubic interpolation kernel. The default value is the Pixel Size Ratio x 0.62.

-
Enter a positive number for the Intensity Smoothness. This value defines the intensity smoothness factor (σ) of the NNDiffuse pan sharpening algorithm. A smaller value will restrict diffusion and produce sharper images, but will have more noise. For example, a smaller value is good for pan sharpened images that will be used for visualization. A larger value will produce smoother results with less noise, which is suggested for images that will be used for classification and segmentation purposes. A larger value is also suggested for panchromatic scenes with high contrast (they require less diffusion sensitivity), and with complex scenes (to reduce the possibility of noise). The default is to dynamically adjust to local similarity, as shown in the equation that follows. You can enter a value to override the default, for example, a value in the range 10 x √2 to 20.

where Nj is the difference factor of the nine neighbors given by the following equation:
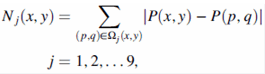
where Ωj (x,y) defines the diffusion region for each of the nine neighboring super pixels, and (x,y) denotes the position of a pixel in the high-resolution coordinate.
-
To write the output to disk, select the File radio button and specify a filename and location. To produce output in memory only, select the Virtual radio button.
- Enable the Preview check box to preview the settings before processing the data. The preview is calculated only on the area in the view and uses the resolution level at which you are viewing the image. To preview a different area in your image, pan and zoom to the area of interest and re-enable the Preview option. Depending on the algorithm being used by the tool, the preview result might be different from the final result of processing on the full extent, full resolution of the input image in the following scenarios: 1) If you zoomed out of the input raster in the view by 50%, or a percentage less than 50%, ENVI uses a downsampled image at the closest resolution level to calculate the preview, or 2) If the entire image is not visible in the view, ENVI uses the subset in the viewable area of the input image to calculate the preview.
- Enable the Display result check box to display the output in the view when processing is complete. Otherwise, if the check box is disabled, the result can be loaded from the Data Manager.
-
To reuse these task settings in future ENVI sessions, save them to a file. Click the down arrow next to the OK button and select Save Parameter Values, then specify the path and filename to save to. Note that some parameter types, such as rasters, vectors, and ROIs, will not be saved with the file. To apply the saved task settings, click the down arrow  and select Restore Parameter Values, then select the file where you previously stored your settings.
-
To run the process in the background, click the down arrow next to the OK button and select Run Task in the Background. If an ENVI Server has been set up on the network, the Run Task on remote ENVI Server name is also available. The ENVI Server Job Console will show the progress of the job and will provide a link to display the result when processing is complete. See ENVI Servers for more information.
- Click OK.