Thematic Change Tutorial
In this tutorial, you will use the Thematic Change workflow to assess differences in land cover classification along the Louisiana coastline, before and after hurricane Katrina. Thematic change detection takes two classification images of the same scene at different times and identifies differences between them.
Files Used in this Tutorial
Tutorial files are available from our ENVI Tutorials web page. Click the Classification link to download the .zip file to your machine, then unzip the files. You will use these files in the tutorial:
|
File |
Description |
|
pre_katrina_05.dat
|
Spatial subset of a land cover classification image, pre-hurricane Katrina, 30-meter resolution. This dataset was derived from Landsat TM scenes from 17 January through 27 April 2005.
|
|
post_katrina_06.dat
|
Spatial subset of a land cover classification image, post-hurricane Katrina, 30-meter resolution. This dataset was derived from Landsat TM scenes from 22 November 2005 through 07 February 2006.
|
These classification images were created and provided by the NOAA Coastal Services Center.
Reference: National Oceanic and Atmospheric Administration, Office for Coastal Management. Coastal Change Analysis Program (C-CAP) Regional Land Cover. Charleston, SC: NOAA Office for Coastal Management. Accessed March 2018 at www.coast.noaa.gov/ccapftp.
Selecting Files for Thematic Change
In the File Selection panel, you choose the two classification images to include in thematic change detection.
- Start ENVI.
- From the Toolbox, select Change Detection > Thematic Change Workflow. The Select File panel appears.
- Click Browse next to the Time 1 Classification Image File field. The Select Time 1 Classification Image File dialog appears.
- Click Open File. The Open dialog appears.
- Navigate to the location where you saved the tutorial data and select pre_katrina05.dat, and click Open, then click OK.
- Click Browse next to the Time 2 Classification Image File field. The Select Time 2 Classification Image File dialog appears.
- Click Open File. The Open dialog appears.
- Navigate to the location where you saved the tutorial data and select post_katrina06.dat, and click Open, then click OK.
- Click Next. The Thematic Change panel displays.
Applying Thematic Change Analysis
- Because the two input classification images have the same number of classes that use the same class name, the Only Include Areas That Have Changed check box is available, and is enabled by default. Keep the default setting. The thematic change analysis will group those classes into a class named no change if no difference is detected in those classes during processing. The output is a new classification image that only includes areas that have changed. When you uncheck this option, it includes all class transition information.
- Open the Cursor Value window with the
 toolbar button. When the Cursor Value dialog appears, the On demand updates button
  is active and a red probe (crosshairs) appears in the display.
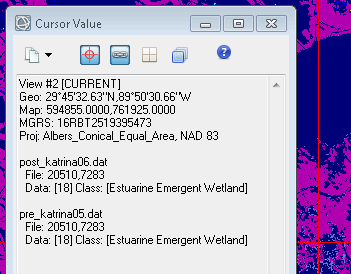
- In the Go To field, enter 594865.735,761937.370. The probe centers over the pixel located at these map coordinates. The Cursor Value window provides information about the two input layers and the classes that are identified at the cursor location. In the example below, the Cursor Value shows that the pixel under the cursor in the pre- and post-Katrina layers are in the same class (Estuarine Emergent Wetland). This is an area that did not change classes.

-
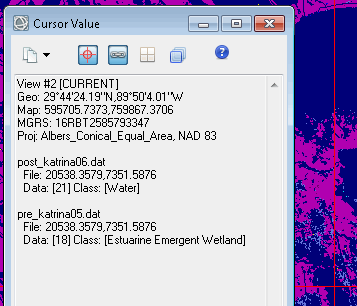
Click in the display on a blue area close to a lake. In the next example, the pixel under the cursor is in one class in the pre-Katrina image (Estuarine Emergent Wetland), and is in a different class in the post-Katrina image (Water).

- Click the On demand updates button in the Cursor Value dialog to turn off the probe.
- Enable the Preview check box to preview the settings before processing the data. The preview is calculated only on the area in the view and uses the resolution level at which you are viewing the image. To preview a different area in your image, pan and zoom to the area of interest and re-enable the Preview option. Depending on the algorithm being used by the tool, the preview result might be different from the final result of processing on the full extent, full resolution of the input image in the following scenarios: 1) If you zoomed out of the input raster in the view by 50%, or a percentage less than 50%, ENVI uses a downsampled image at the closest resolution level to calculate the preview, or 2) If the entire image is not visible in the view, ENVI uses the subset in the viewable area of the input image to calculate the preview.
-
Before you begin processing, disable the Only Include Areas That Have Changed check box, to see a preview of the same area when this option is turned off. The result includes areas that have changed, and also areas that have not changed (for example, from 'Water' to 'Water'.
- Enable the Only Include Areas That Have Changed check box again.
- Click Next. Thematic change processing begins. When processing is complete, the Cleanup panel appears.
Cleaning Up Thematic Change Results
The cleanup step refines the result. You can preview what the refinement will look before you apply the settings. The cleanup options are:
- Enable Smoothing removes speckling noise.
- Enable Aggregation removes small regions.
- Use the default setting for thematic change cleanup. The default is Enable Smoothing, where the square kernel's center pixel will be replaced with the majority class value of the kernel. Keep the default value of 3.
-
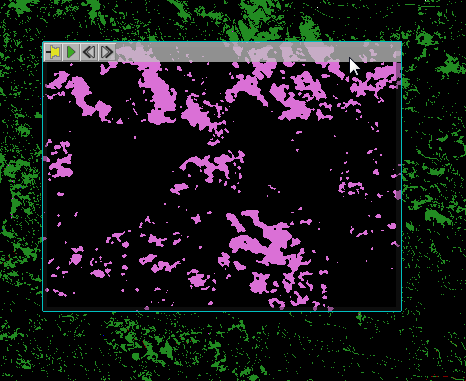
View the cleanup result in the Preview Window before processing.

You can change the cleanup settings and preview the results again, if desired.
- Click Next. The Export panel appears.
Exporting Thematic Change Results
To export results:
- In the Export Files tab, enable the check boxes for the exports you want to output. The following are available:
- Export Thematic Change Image saves the classification result to a raster file.
- Export Thematic Change Vectors saves the vectors created during classification to a shapefile.
- Use the default paths and filenames.
- To save statistics on thematic change, enable the Export Thematic Change Statistics check box in the Export Statistic tab,
- Use the default paths and filenames.
- Click Finish. ENVI creates the output, opens the layers in the Image window, and saves the files to the directory you specified.
-
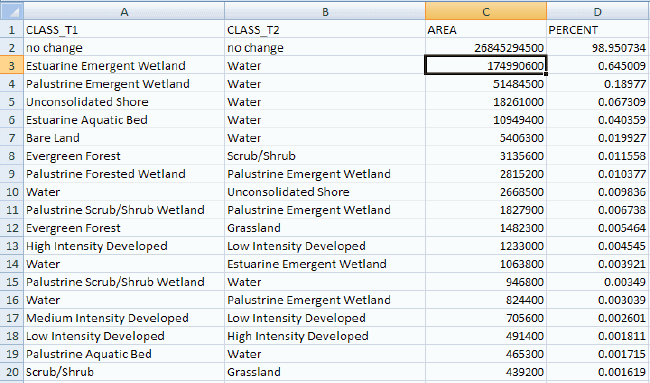
Navigate to the statistics file and open it in a spreadsheet application, such as Microsoft Excel. As you can see in the statistics below, the most significant changes were classes that changed to Water.

- Select File > Exit to exit ENVI.